


D&D Beyond's combat tracker and encounter builder tools have been combined into Encounters — and it's free to use by all registered users! The tool is an invaluable resource for Dungeon Masters who want to plan and run combat encounters with ease. If you aren't yet registered, you can sign up for free here.
Click below for step-by-step instructions on using Encounters:
Watch Encounters in action
The D&D Beyond team hopped on stream to show off how to use Encounters. Watch as they face off against a tarrasque!
Building an encounter
Creating a new encounter
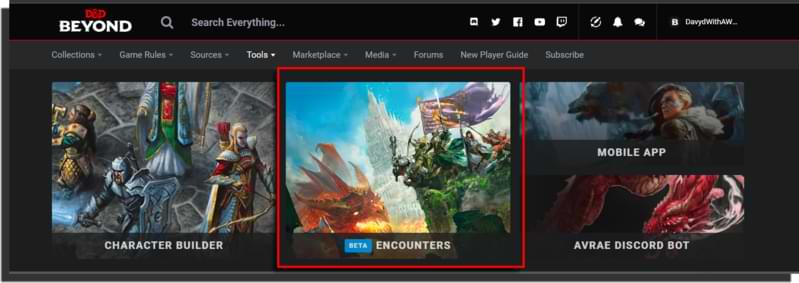
The first thing you’re going to want to do is to make an encounter. You can access Encounters from the tools menu. This will take you to a blank encounter.
Adding player characters to an encounter
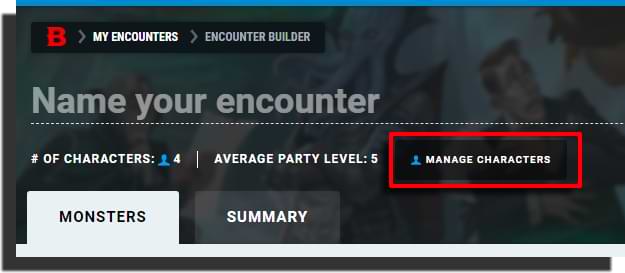
If you're making an encounter for your party, specify the number of player characters and their respective levels. By default, your encounter will be set to 4 characters of 5th level each, giving an average party level of 5. To adjust this, click the "Manage Characters" button.
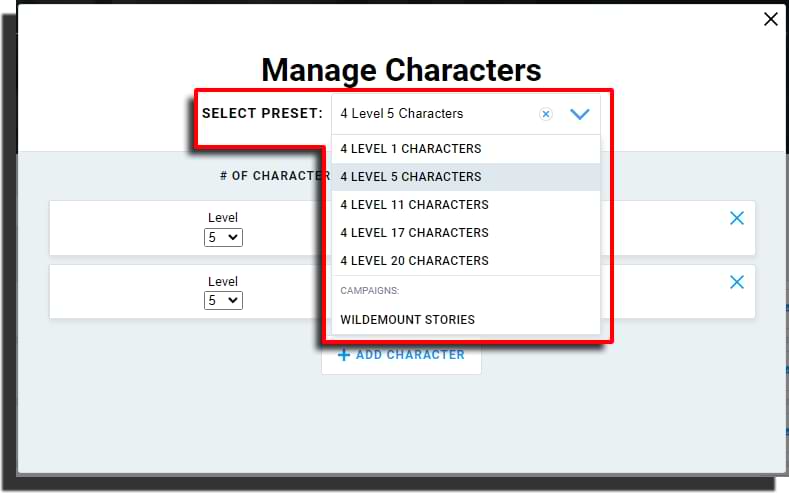
This will bring up a menu that lets you add various party presets that can be customized, or even pull characters from one of your campaigns. Clicking the "Select Preset" dropdown will give you a list of options, including preset parties of 4 characters of 1st, 5th, 11th, or 17th level (corresponding to the four tiers of play), as well as a list of all your campaigns. Selecting any of these will add the preset to your encounter.
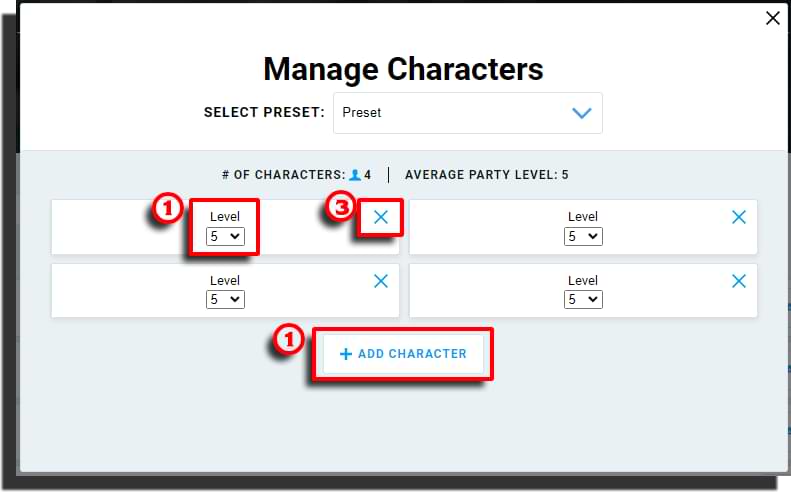
If you select a generic preset, you’ll be presented with four character blocks each with a dropdown that lets you change the level (1). You can also add more characters using the "+ Add Character" button (2) and remove them by clicking the "X" button (3).
 If you select a campaign, you’ll be presented with a slightly different view. A summary of the active characters in that campaign will be listed, with their level being automatically used to calculate the average party level.
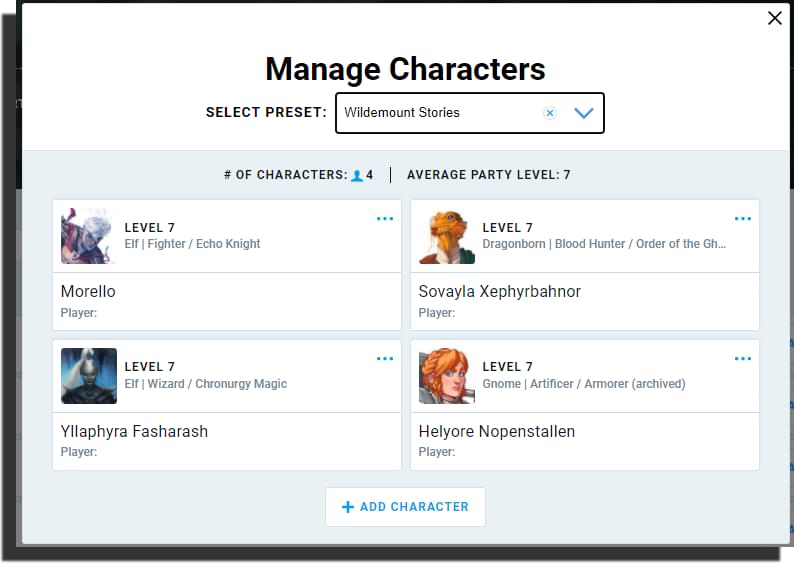
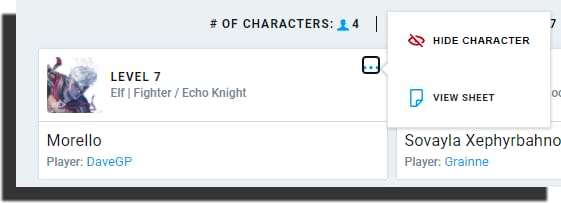
As with the presets, you can add and customize generic characters. Additionally, if you wish to remove a character from encounter calculations, you can click the "..." button and select "Hide Character." You can also select "View Sheet" to be taken to their character sheet.
Using the campaign option will link the encounter to the campaign, meaning the character data will be pulled in when running the encounter, and dice rolls will be shared.
Once you’ve set your party composition to your liking, click the X button in the top right.
Adding monsters
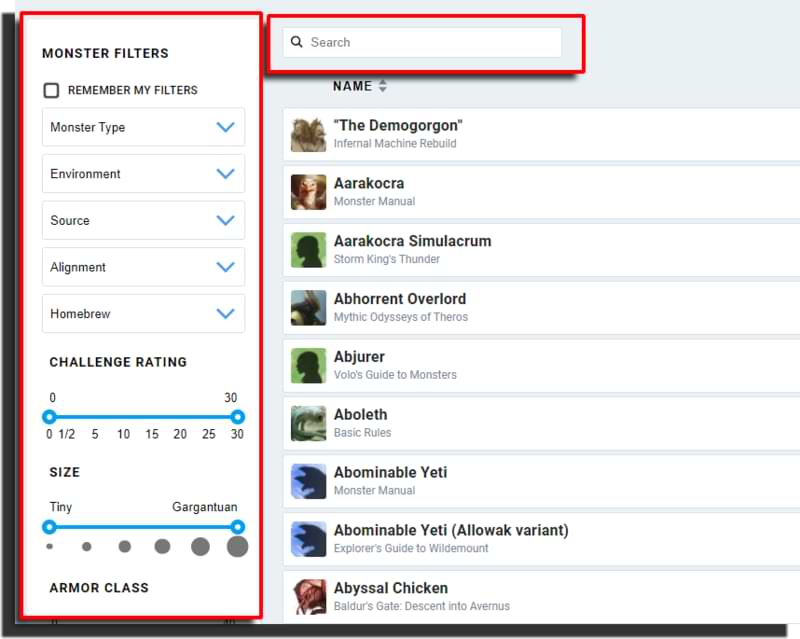
Now that you’ve set up your party, it's time to select monsters to challenge them with! The easiest way to find the monster of your dreams — or your players' nightmares — is to use the search option at the top of the listings. But in addition to the search function, there are filters to the left. You can use these to refine the results, so if you want to see all Large, CR 3 to 5 aberrations with a fly speed, you can!
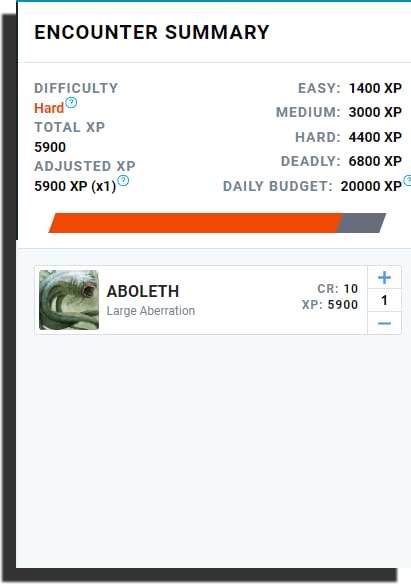
Having found your monsters of choice, you can add them to the encounter by clicking the "+Add" button, which is found on the right-hand side of the monster's summary bar, where you’ll also find its artwork, name, source, creature type, size, challenge rating, and difficulty based on the average level of your party.

You can click any monster's summary bar to expand it to view the whole stat block.

Adding a monster causes it to appear in the summary list on the right-hand side of the screen.
If you want to increase the number of monsters of a given type, you can do so in one of two ways. First, you can repeatedly click the "Add" button. This will add a new copy of that monster each time you do. Alternatively, you can click the "+" button next to the monster's entry in the encounter summary, which will increase the number of monsters in the encounter. Clicking the "-" button decreases the number, and removes them if you only have one.
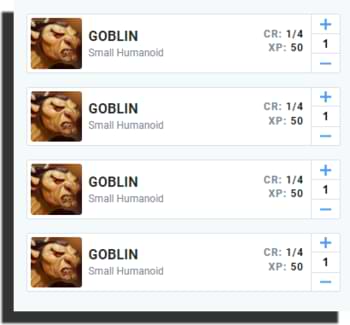
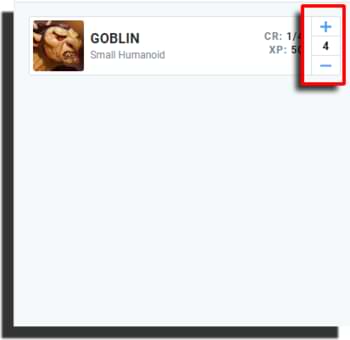
It’s important to note that there is a mechanical difference between adding monsters in these two ways. Adding the monster using the "Add" button, so that it is listed multiple times, will result in each monster getting its own initiative. Increasing the number of monsters using the "+" and "-" buttons will result in all monsters of that sort using the same initiative roll.
Both of these are rules-accurate ways of rolling for monster initiative and come down to Dungeon Master preference. We wanted to make sure that it was possible to do both when running encounters.
Encounter summary
At the top of the encounter summary sidebar, you’ll see a collection of information. This is the encounter's difficulty rating based on the rules for evaluating encounter difficulty. You’ll find not only the current difficulty, total XP (what you award to your players), and adjusted XP (what the difficulty is based off), but also the XP bracket for each of the four difficulty levels and your daily budget of XP. All of this is automatically calculated based on your party preset!
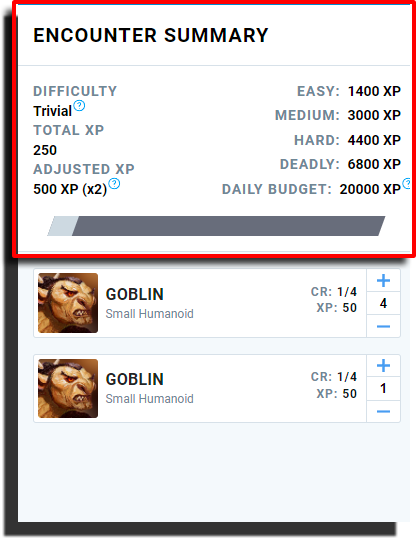
Finally, there’s a handy little color-coded bar to show how close you are to your daily budget!

Encounter details
At the top of the encounter builder, you’ll find two important areas for adding additional details: the name field and the "Summary" tab.

The name field allows you to add a custom name to your encounter so that you can easily identify it later.
Clicking the "Summary" tab takes you to a separate view where you can add additional information such as a short summary of your encounter, a more comprehensive description, and other notes! You can return to the main view by clicking the "Monsters" tab.
Saving your encounter
Now that you’ve made your perfectly balanced encounter, as all things should be, you’re ready to save it. The save button can be found on the right-hand side of the screen, next to the Encounter Summary.

Once you’ve saved your encounter, you can navigate away from this page safe in the knowledge that it’ll be ready for you when it comes time to roll for initiative!
Running an encounter
Now that we’ve made an encounter, it’s time to run it!
Loading a saved encounter
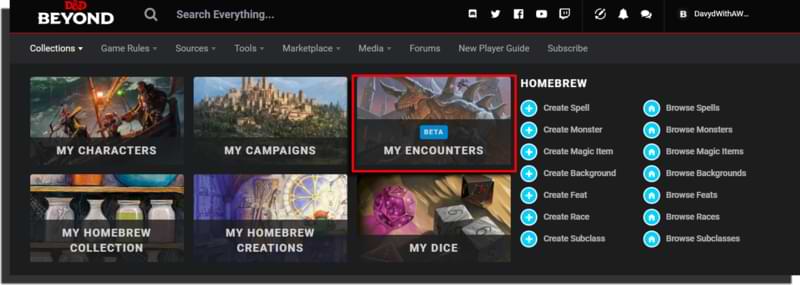
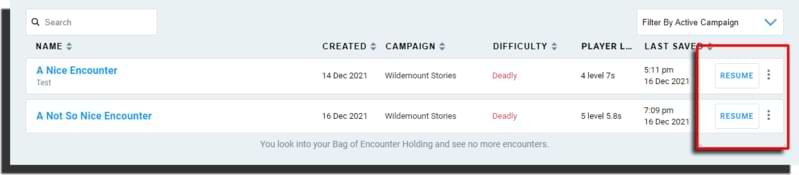
You can find your saved encounters by clicking "My Encounters" under the "Collections" tab of the megamenu.
This will take you to a list of your saved encounters, where you can not only see the names of your encounters but their creation date, what campaign they’re linked to, difficulty, player levels, and when it was last saved. You can sort by any of these headers, search by encounter name, or filter by active campaign.
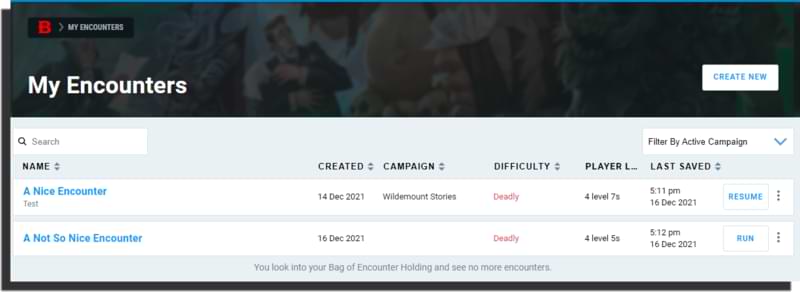 Two important options sit at the right-hand side of each encounter: a "Run" or "Resume" button and the encounter menu button. From that menu, you can edit, duplicate, and delete encounters, and restart them if it’s already been started.

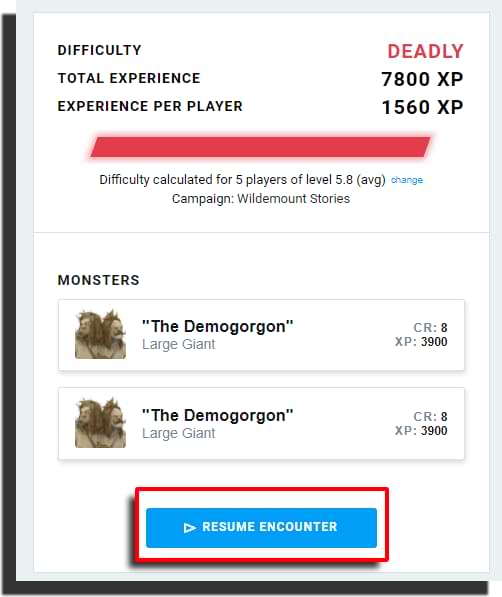
To load an encounter in order to run it, just click anywhere on the bar and you’ll be taken to the pre-combat summary screen. This screen shows you all the monsters in the encounter, a summary of its difficulty, and any descriptive information you might have added. You can also open the Game Log from the button in the top right, as well as access the same menu as before to edit, duplicate, delete, and restart.
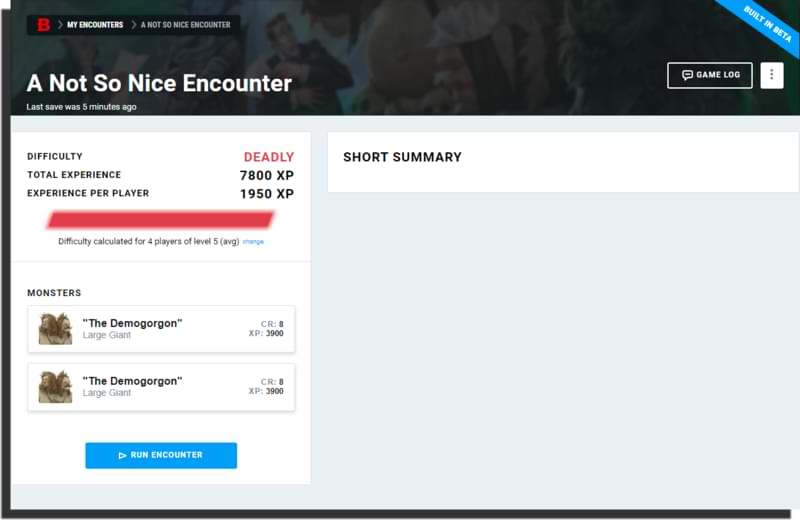 To start the encounter, click "Run Encounter" below the monster list. If you’ve previously started this encounter, the button will instead say "Resume Encounter."
Rolling initiative
As everyone knows, combat begins with initiative being rolled. For both monsters and player characters, you have the option to roll automatically or manually enter initiative rolls. Rolling automatically will pull the appropriate initiative or Dexterity modifier from either the character sheet or monster stat block. Just click the "Auto Roll Initiative" button found above the "Player Characters" list and the "Monsters" list.
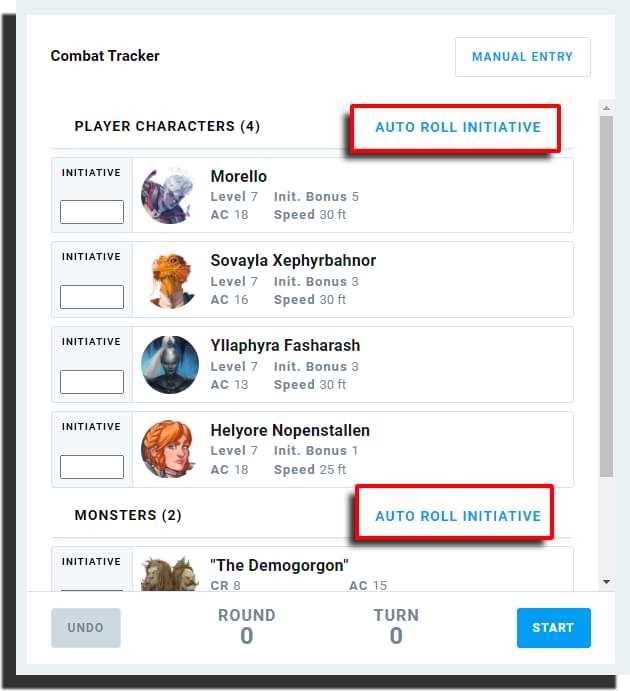
Clicking these buttons will automatically populate the appropriate fields and, if you’ve got digital dice enabled, roll a whole lot of math rocks!
If your encounter uses any generic player character entries, either because you’ve had to add some on the fly or the encounter isn’t tied to a campaign, you’ll see entries labeled "Player Character (A),” “Player Character (B),” etc. If you automatically roll initiative, the result listed for those player characters will just be the d20 roll, so you’ll need to manually add any modifiers.
It’s important to note that you can change initiative values at any time and the initiative order will automatically adjust, moving any creatures around to be in the right order.
Setting hit points
Monsters and characters linked to character sheets will automatically set hit points when you start the encounter. For player characters, it will be the number of hit points their sheet currently says they have. For monsters, it will be their average hit points. However, for both monsters and generic player character entries, you can set the current hit points using the "Max HP Override" option.
Click on the box where the hit points are displayed on any monster or generic PC. You’ll see three options: damage and heal, temp hp, and max hp override. Whatever amount you put into the last option will set that character's max hp.
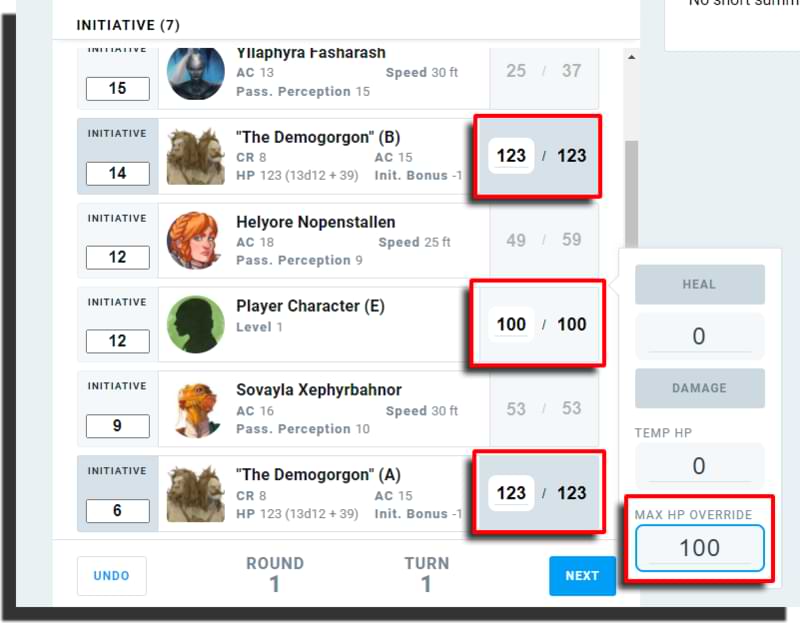
This is also how you apply damage and healing to any monster or generic PC, or any temporary hit points.
Manual entry
Manual entry is a useful option if you want to add stuff to initiative other than creatures. For example, you can use it to:
- Track lair actions
- Track environmental effects
- Add reminders for legendary actions after certain characters' turns
- Add reminders for chase consequences
Manual entry has six fields: name, max hp, armor class, speed, initiative, and quantity. Any of these fields except name can be left blank if the information doesn’t apply. Once you’ve filled out any initiative events that you need, just click "Add."
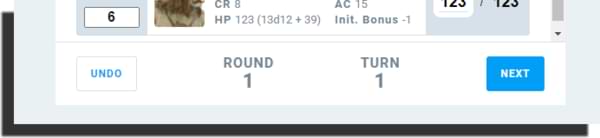
Turn information and controls
Below the initiative order, you’ll find turn information. Here, you can find the current round and the current turn in the round. This can be invaluable for tracking things like haste or enlarge/reduce.
Additionally, there are two buttons. "Next" advances the turn to the next creature and "Undo" rewinds the turn back to the previous creature.
Creature information
Within the initiative order, there is summary information for all creatures in the encounter. In addition to their names and artwork, if they have it, you’ll find AC and speed for all creatures. Player characters will have Passive Perception, while monsters will have their HP, including the dice formula, plus initiative bonus.
![]()
Clicking on a monster will also open their stat block in the area to the right of the initiative order. From there, if you have digital dice enabled and are a subscriber, you’ll be able to roll from their stat block directly into the Game Log!
Saving, editing, and resuming an encounter
We all know that feeling of getting halfway through an epic fight and having to pause for the evening. Luckily with the encounters tool, you can save your progress.
Saving and resuming an active encounter
Encounters automatically saves as you play, so don’t worry about losing everything if your cat jumps on your keyboard and closes your browser window!
To resume an active encounter, just navigate to "My Encounters" under the "Collections" tab of the megamenu. There, to the right of paused encounters, you’ll see a "Resume" button. This will take you straight back into the action!
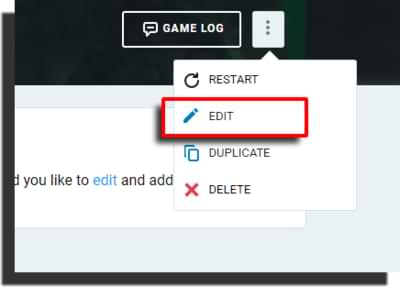
Editing an active encounter
But say your party has made a terrible tactical error and alerted the enemy reinforcements? Well, that’s where the edit option comes in. By clicking the three vertical buttons in the top right next to the "Game Log" button, you can access the "Edit" option.
This will take you back into the encounter builder screen, but without losing your progress. From here you can completely change any part of the encounter, including monsters and even what player characters are participating. Once you’re done, hit "Save" and you’ll be taken to the pre-encounter screen, but with a "Resume Encounter" button instead of "Run Encounter."
Easter eggs await you in Encounters
Hopefully, this gives you all the tips and tricks you need to make full use of the Encounters tool. It is a powerful way to plan and run combat encounters in D&D Beyond. Now, I’ll leave you with a little challenge: there are some easter eggs hidden within the encounter builder, can you find them?
Davyd is a moderator for D&D Beyond. A Dungeon Master of over fifteen years, he enjoys Marvel movies, writing, and of course running D&D for his friends and family, including his daughter Willow (well, one day). The three of them live with their two cats Asker and Khatleesi in south of England.
-
View User Profile
-
Send Message
Posted Dec 15, 2021Is this any different from the Encounters tool that has been available to subscribers already? It's just now free and available to all users?
-
View User Profile
-
Send Message
Posted Dec 15, 2021From what I can see it's a bit different. The only difference I've spotted so far is in the combat tracker if you have characters linked to the combat it pulls their stats and health in now. Was crying out for this feature, glad it got added
-
View User Profile
-
Send Message
Posted Dec 15, 2021Love love love love love it 🐉🐉🐉🐉🐉🐉🐉🐲🐲🐲🐲🐲🥰😍😍🥰🥰😍🤣🤣😂🤣😂😭🤩🥳🥳🥳🐺🐺🐺
-
View User Profile
-
Send Message
Posted Dec 16, 2021YES! Combat Tracker is finally released! Now I don't have to subscribe to use it! Let's celebrate! (no offense, subscribing is still useful)
-
View User Profile
-
Send Message
Posted Dec 16, 2021Can we get a feature that allows for the increasing or decreasing of the CR for monsters? It would be extremely useful and allow for a wider list of monsters to be used for different encounters.
-
View User Profile
-
Send Message
Posted Dec 16, 2021Are you able to save it mid combat if you have to quit in the middle of the battle?
-
View User Profile
-
Send Message
Posted Dec 16, 2021Yes, you can resume a combat encounter from the My Encounters page.
-
View User Profile
-
Send Message
Posted Dec 16, 2021Thanks. Next Question. How do you get the PCs sheets so you can view them easily? I can click on the monsters, but not the PCs.
-
View User Profile
-
Send Message
Posted Dec 16, 2021I also can't show changes to the PCs HP from damage.
I would really like to be able to click on sources and select 'ones I own'
-
View User Profile
-
Send Message
Posted Dec 16, 2021And most significantly, you can hit the edit button in the middle of an encounter, add or remove monsters, and then resume combat, relatively seamlessly. Crucial for when reinforcements arrive halfway through the battle!
-
View User Profile
-
Send Message
Posted Dec 16, 2021Nice to see some progress on this after being stuck in Alpha for so long. The integration with the character sheets is much improved.
Still some pretty significant missing features though:
But, it's getting there! Now we just need an integrated VTT... :)
-
View User Profile
-
Send Message
Posted Dec 16, 2021Awesome. This still has a long way to go before its the all 1 one tool it really needs to be (the site, not this feature) but this is really solid.
-
View User Profile
-
Send Message
Posted Dec 16, 2021I remember a long time ago when this was first brought up, Adam send a few times that the books were going to be modified to have the encounters built in. Basically if you had access to an adventure module, within would be built out. Is this still a plan?
-
View User Profile
-
Send Message
Posted Dec 16, 2021With very minimal effort you can transload everything over to Foundry
-
View User Profile
-
Send Message
Posted Dec 16, 2021I know its not a built in feature, but if you start the encounter with the NPC monster you can right click -> Inspect and then change the name of the monster in the html.
It will take you to this line (or something like it) <div class="combatant-summary__name">Scarecrow</div> double click 'Scarecrow' and you can type in a new name, It only lasts till you reload the page, but its a useful work around.
-
View User Profile
-
Send Message
Posted Dec 16, 2021This is really cool! Thank you for the great work. Now as soon as we get the ability to automatically add combats from the books (like preloading an encounter by just clicking a button from the book source) I'll definitely use it :) can't wait!
-
View User Profile
-
Send Message
Posted Dec 16, 2021I must say, I hoped for more. I am playing mostly on foundry and the flexibility and the customization possible there are just so much easier, faster and show all information I want as a DM.
I hope the development speed is getting faster next year. I would love to use ddb for my games but there is so much missing atm to, make it work for me.
Tracking conditions, rage, bless etc. is so important especially if you run for players that tend to forget a lot.
In foundry I add the effect to the character and all saves, checks etc. are automatically adding all modifiers for my players.
In ddb a Fläming sword still doesn’t add the fire damage to the roll and I have to use the clunky dice roller on the side. The floating dice results are still blocking the sheet. The dice still roll into the corners which makes them unreadable. I cannot reduce the time of the dice on screen.
This sounds a bit negative but I just want to give feedback. I have the legendary bundle and own every book on ddb. The character builder is really solid and love making characters here.
The DM side of things is still very much underdeveloped to say the least.
maybe Fandom should just buy one of the vtts out there, I don’t know. If you use beyond20 you can roll everything on the sheet but the sheet itself cannot do it.
Just my 2cents.
-
View User Profile
-
Send Message
Posted Dec 16, 2021Just started setting up my first encounter and I love it! I especially like the ability to autoroll initiative on monsters and the ease of tracking turns and monster HP.
-
View User Profile
-
Send Message
Posted Dec 16, 2021I really agree with this, as a developer I know how hard can be to speed up processes, but I'm sure that dnd beyond is not lacking money to get some guys and split the projects.
-
View User Profile
-
Send Message
Posted Dec 16, 2021Fingers crossed for the day we can add friendly NPC's.