


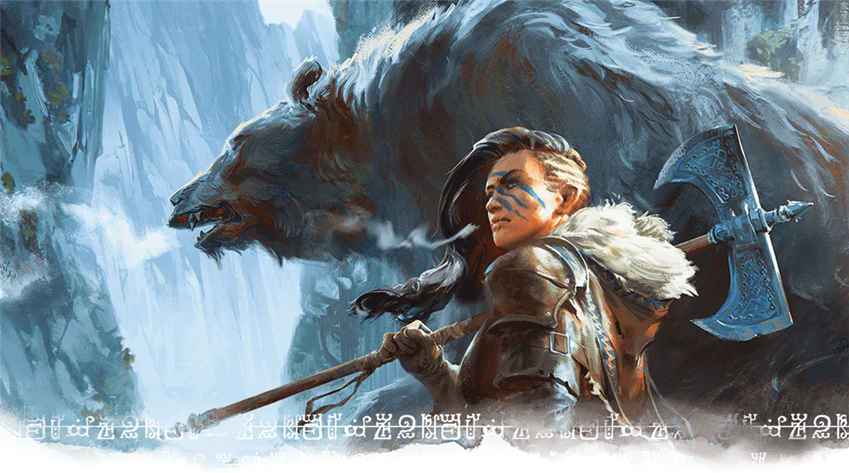
Are you prepared to journey to Icewind Dale, the frozen north of Faerûn? Times are strange, and countless rumors swirl around this cold and isolated land, like so many snowflakes in an endless blizzard. The next D&D adventure, announced at D&D Live 2020, is dark fantasy horror story titled Icewind Dale: Rime of the Frostmaiden. This encounter is the sixth part of an ongoing encounter series called “Icewind Mail: Special Delivery,” a non-canon dark comedy that leads into the official adventure. Well, sort of. It’s more like it tosses players in the general direction of the official adventure with some silly props and tells them to go have fun.
The previous encounters in this series are:
- Loadin’ Up the Icebreaker
- Frost and Fear in Fireshear
- Ambush at Aurilssbarg
- Evil on the Icy Sea
- Shelter from the Storm
- Trek to Ten-Towns
The Fourth Delivery
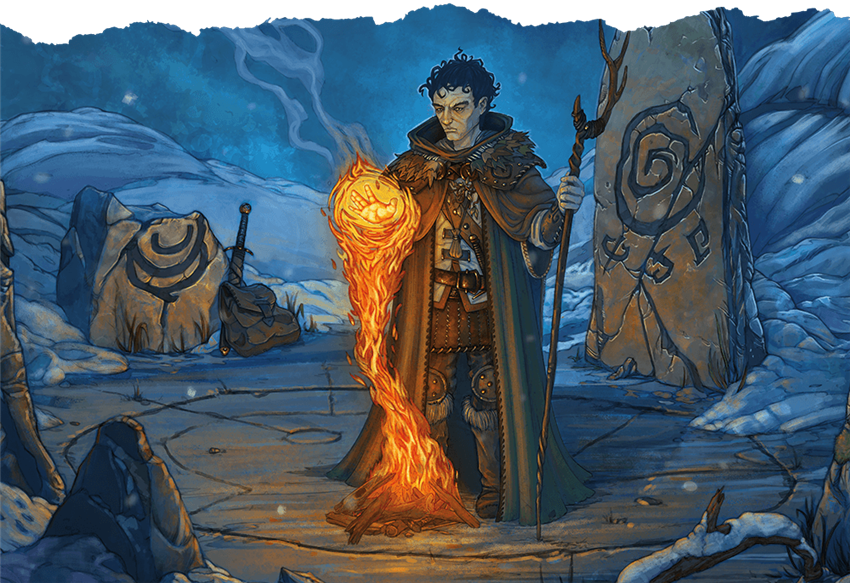
In this adventure, the characters are to deliver a package to Artus Cimber, an immortal hero that bears the legendary Ring of Winter. He has returned to Icewind Dale to kill a frost giant lich by the name Skarde Draugsson. The lich is a powerful necromancer, raising legions of undead from within the cairn’s secret crypt. These warriors were once the loyal soldiers of Kelvin Duarol, a frost giant warlord slain at this mountain. Now, they serve Skarde with undying loyalty. Skarde is too great a foe for the characters to handle—but their timely delivery of a weapon from Artus’s boon companion Dragonbait could turn the tide of this epic battle.
Though Cimber has fought through most of Skarde’s minions, the dead here are loathe to remain so for long. The passages within Kelvin’s Cairn are now crawling with weak undead piecing themselves back together in the wake of Cimber’s assault on the crypts—and the Luskar Deliverers will have to deal with them in order to reach the recipient of their package.
The lich has been defeated several times by Cimber, but he has returned just as many times, revived by his phylactery—an enchanted trinket that Cimber has found, but can’t destroy. The package the characters are to deliver is a small, hand-carved box of teak hardwood containing a magical weapon that could save Cimber’s life. This corpse slayer dagger can tear through undead flesh and destroy the lich’s phylactery once and for all.
There are only three parcels left to be delivered in this adventure series. If you want this part of the adventure to be non-linear, you could give the characters the choice of whether to deliver Artus Cimber’s parcel first, or to travel to the Reghed Glacier to deliver Vanifer’s parcel first. The third parcel, belonging to Jarlaxle Baenre, follows as a surprise immediately after Artus Cimber's, and is the topic of next week's encounter.
Journey to Kelvin’s Cairn
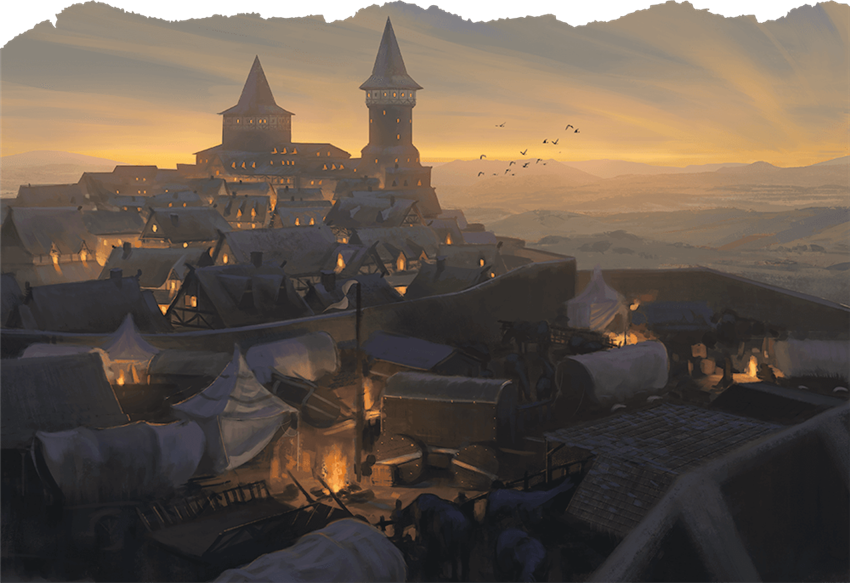
The safe route to Kelvin’s Cairn is to follow the Eastway out of Bryn Shander, then turn north when the road forks and travel until you reach the town of Caer-Konig at the base of the mountain. Travelers never leave the boundaries of Ten-Towns during this journey, and they never leave the road, so the trip is safe. Of course, while folk in Ten-Towns often say it’s safe to travel along the roads between the towns newcomers to Icewind Dale may not know that Ten-Towners have an awful different definition of “safe” than folk who grew up on the Sword Coast. Indeed, anyone who’s lived in the lands of Icewind Dale for long knows that “safe” isn’t a promise—it’s a prayer.
On this day, however, it seems the characters’ prayers have been answered. The journey from Bryn Shander to Caer-Konig is uneventful. If they leave Bryn Shander at dawn, they will arrive in the town of Caer-Dineval before dusk. Then, the next day, if they leave Caer-Dineval at dawn, they’ll arrive in Caer-Konig by midday with enough time to prepare for their ascent of Kelvin’s Cairn at dawn the next day. If you want to add some danger to this two-day journey, however, roll once per day on the low-level Arctic Encounters table from Xanathar’s Guide to Everything to determine what the characters encounter on their travels.
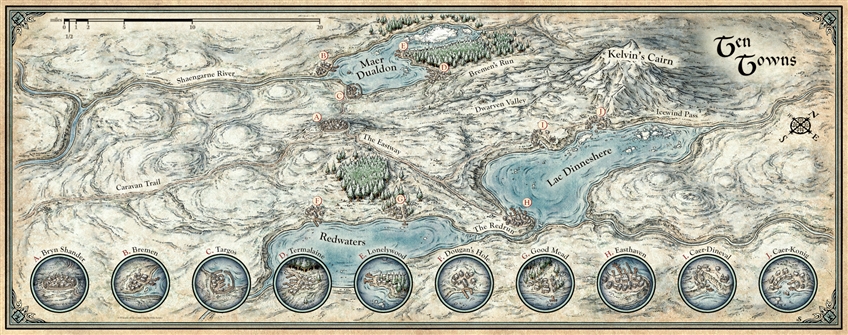
This map of Ten-Towns and the surrounding environs was created by Mike Schley for Legacy of the Crystal Shard, an adventure for 3.5e, 4th edition, and the D&D Next playtest. You can find high-res versions of this map and others for sale on his website.
To summarize their journey to the base of Kelvin’s Cairn, read or paraphrase the following:
You depart from Bryn Shander at dawn, traveling out of the city along the Eastway, a wide dirt highway that connects Bryn Shander to several of the other towns. Your journey through the arctic landscape is cold but uneventful. By dawn on the third day of travel, you stand at the base of Kelvin’s Cairn prepared to climb the mountain and find a man named Artus Cimber—a legendary warrior that is supposedly investigating this mountain. You’ve heard rumors in town that he was searching for a hidden crypt somewhere on the mountainside, and that restless spirits and the living dead have been seen in these parts of late.
Give the characters an option to make any last-minute “oh wait,” requests. If they want to buy supplies, they can find any equipment from chapter 5 of the Player’s Handbook worth 50 gp or less in the town of Caer-Konig. Likewise, characters that want more information about Cimber’s whereabouts can learn the following information by spending an hour talking in town:
- Few people travel to Kelvin’s Cairn, save for hunters, trappers, and young folk with more pride than sense.
- About a month ago, rumors of draugar—walking dead—being spotted on the mountainside have circulated through town.
- Artus Cimber arrived in Caer-Konig about a tenday ago, prepared for battle.
- He told a number of people in town that there was a necromancer within a secret crypt tunnel somewhere on the mountainside, and he was going to solve their undead problem once and for all—before it became any worse.
- He has made several expeditions to the mountain, seeking the secret crypt. He has returned covered in blood and gore each time.
- He left for the mountain for the fifth time in as many days about five days ago, and said if he didn’t return in a tenday, to flee to Bryn Shander before Caer-Konig were overrun by undead. He hasn’t returned since.
Exploration Encounter: Ascending the Mountain
This encounter is suitable for a party of 3rd-level characters.
Kelvin’s Cairn is a squat and lonely mountain, standing only about 1,000 feet tall and with no other mountains nearby. Even though it is really just a large hill, the cairn is craggy, rocky, and covered year-‘round with snow. Climbing the side of the mountain requires the characters to make several ability checks in order to find paths, climb sheer cliffs, squeeze through gaps, and swing across chasms.
Artus Cimber’s trail grows more obvious the farther the characters travel across the mountain. The corpses of Skarde’s undead minions lay beneath a light layer of snowfall, a grisly memorial of Cimber’s first assault on the mountain. If a character ever makes a Wisdom (Perception) check while on the mountain, a roll of 10 or higher reveals that there are inert, motionless, frost-rimed corpses buried in the snow all around.
First Leg: Narrow Trail
The characters’ first obstacle on the mountainside is when the trail narrows to a mere 12 inches across, squeezed between the sheer vertical mountainside and a 50-foot drop into a snowdrift below. The trail continues in this way for about 500 feet before the path widens again. Each creature must make a successful DC 13 Dexterity check to sidle along the cliff. Small creatures (like halflings) have advantage on this check, and Large creatures (like horses) have disadvantage.
On a failed check, the creature slips from the ledge. The character (or another character within 5 feet of them) can try to catch the ledge, or the falling character’s hand, by making a successful DC 13 Dexterity saving throw. On a failed save, the creature plummets into the chasm. Their fall is softened slightly by the freshly fallen snow, and they take 14 (4d6) damage from the fall. They can climb back up the steep slope to where they started by making a successful DC 10 Strength (Athletics) check, made with advantage if they can rappel up with a rope or a climber’s kit.
Once this obstacle is overcome, the characters continue along the winding mountain path until they reach the next obstacle.
Second Leg: Rugged Cliff
The path comes to a sudden halt against a rugged cliff face. The cliff is about 50 feet tall, and has several obvious handholds. To climb the cliff, a creature must make a successful DC 13 Strength (Athletics) check, and can make this check with advantage if they have a climber’s kit. If even one character is at the top of the cliff, they can throw down a rope (if they have one), granting anyone who climbs up after them advantage on their checks, as long as the rope is somehow secured.
On a failed check, the creature loses their grip and falls to the bottom of the cliff. Roll 1d6 – 1 and multiply the result by 10 to determine how many feet up they were when they fell. They take 1d6 falling damage for every 10 feet they fell.
Once this obstacle is overcome, the characters continue along the winding mountain path until they reach the next obstacle.
Third Leg: Deep Chasm
The mouth of an ominous, skull-shaped cave comes into sight. However, the mountainside has long since crumbled away, leaving a 20-foot gap separating the characters from the cave mouth. A scraggly tree hangs over the chasm, and a length of rope dangles from a grappling hook that has been hooked to the tree—a tool that Artus Cimber left here when he entered the cave.
The rope dangles in the middle of the gap, 10 feet distant from either side. In order to grab it, a character will have to leap to it, or pull it over to their side (perhaps with a spell like mage hand). Once a character has grabbed the rope, they must make a DC 15 Strength (Athletics) or Dexterity (Acrobatics) check to swing across and leap to the other side of the gap.
On a failed check, the creature swings successfully, but misses the ledge. That creature or another creature already on the ledge can try to catch the ledge, or the falling character’s hand, by making a successful DC 13 Dexterity saving throw. On a failed save, the creature plummets into the chasm. Their fall is softened slightly by the freshly fallen snow, and they take 14 (4d6) damage from the fall. They can climb back up the steep slope to where they started by making a successful DC 10 Strength (Athletics) check, made with advantage if they can rappel up with a rope or a climber’s kit.
If the check to swing across the gap fails by 5 or more, they plummet straight down, unable to try to grab the ledge before they fall.
Once across, the party can enter the secret crypt hidden within Kelvin’s Cairn.
Combat Encounter: Chaos in Kelvin’s Cairn
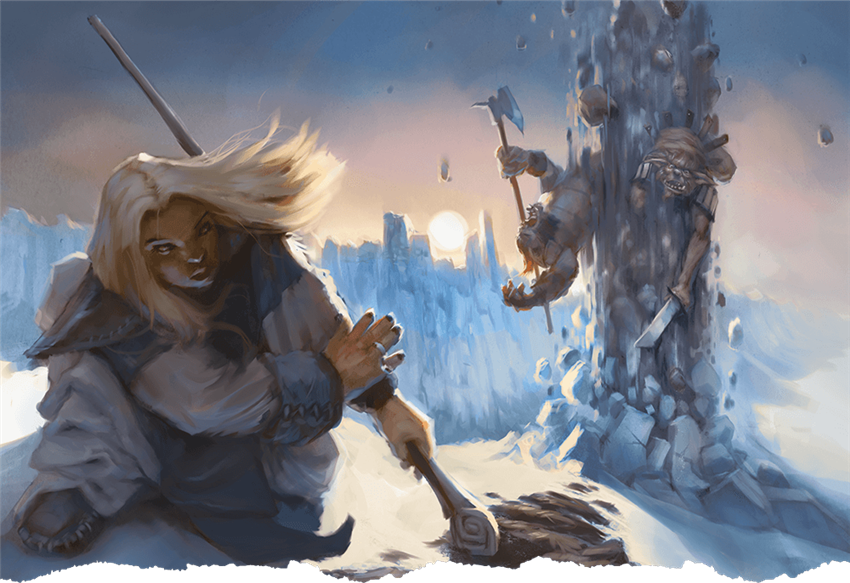
The characters are now in the crypt-tunnels used by the frost giant warlord Kelvin Duarol. Artus Cimber has largely destroyed, the mighty undead warriors that lurked in these tunnels, revived by Skarde’s necromancy. However, these chopped-up undead still have some semblance of animation, and will crawl, hop, and roll their way to attacking the characters in any way they can.
Passages of the Revived
Read or paraphrase the following when the characters first enter the cave:
You enter the cave and walk down, feeling your feet on crude steps carved into the stone. The cave reaches back into the mountain, curving gently downward for about sixty feet before ending at a large stone door. Dozens of crypt alcoves are carved into the walls on either side of the cave, and a veritable army of rotting undead are strewn about the passage, their dismembered limbs limp on the floor.
Then, they move. Scraping, dragging, hopping across the floor towards you are limbs and torsos and heads of untold dozens of undead soldiers!
Roll initiative! This group of assorted limbs have formed themselves into two skeletal swarms. One swarm approaches from the back of the cave, and the other approaches from the front, trapping the characters in between them. Four relatively complete zombies rise and approach, as well. The one or two limbs they’re missing don’t significantly hinder their ability to move or attack.
Crypt Door. At the back of the cave is a stone door that stands just slightly ajar. Behind it is a spiral staircase that descends into a wide ritual chamber (see below).
Cimber’s Struggle
The characters descend a flight of ancient stairs (in the southwest part of the room below) into a wide ceremony chamber (that makes up the entirety of the west half of the map) where Artus Cimber is locked in combat with the frost giant lich Skarde Draugsson. You can fill the other areas of this map with creatures and treasure if you want to expand it into a larger dungeon.

This map originally appeared in chapter 6 of Waterdeep: Dragon Heist.
To set the scene, read or paraphrase the following:
Rasping laughter echoes through the room as you descend the stairs, then begins to speak in a booming voice. “Artus Cimber, you scrawny, foolish whelp! You may destroy me as many times as you like, but so long as my phylactery exists, I shall never die!”
You reach the bottom of the stairs and see a wide ritual chamber. Hiding behind a pillar near you is a grizzled human warrior, a sword in one hand and a rune stone the size of his torso clutched to his chest. He looks over his shoulder and growls, “Then if I have to fight you forever, Skarde, I will! I’ve got time.” He then stands and runs from the pillar he was hiding behind to another one to the east—just in time to avoid a blast of acid that melts the first column to slag.
This man is Artus Cimber. Standing in the west of the chamber, before a grisly altar, is a Huge frost giant lich named Skarde Draugsson. Don’t worry much about either of their statistics; both of these characters are essentially just props for you to use as the DM. It’s highly unlike that the characters will kill Skarde if they attack him, and Artus’s actual statistics aren’t much of a match for a lich in a one-on-one fight. Your goal in this fight is to give the characters the illusion of a dangerous fight that they can duck and weave through in order to deliver Dragonbait’s package to Artus.
Stealth. The characters need to get the package to Artus without being annihilated by Skarde. As long as a character has an object to take cover behind, they can Hide behind it as an action. As long as Skarde is focused on Artus, they must make a DC 14 Dexterity (Stealth) check in order to avoid his notice. Artus starts at the southwesternmost pillar and moves counterclockwise from one pillar to another at the end of each of his turns to avoid Skarde’s attacks..
Detection. If a character fails this check, Skarde spots them. He laughs a gravely laugh and says, “Friends of yours, Cimber? They’re welcome to join you in oblivion!” He casts ray of frost (which has a +12 bonus to hit and deals 4d8 cold damage) using his Cantrip Legendary Action at the end of that character’s turn. He still focuses his spells and attacks on Artus when it’s his turn, and uses Legendary Actions to attack the characters.
Rules Tip: Legendary Actions
Legendary creatures like liches can take special actions at the end of another creature’s turn in combat. The lich is one such creature. Skarde can take three legendary actions; but in this combat, he only uses them to cast cantrips at the characters.
Minions. When the characters enter this room, a group of six zombies emerge from alcoves in the southern wall of this chamber. They fight the characters, trying to distract them from reaching Artus. Once all of the zombies are dead, another group of six zombies emerge from alcoves in the north wall 1d4 rounds later to keep the pressure on. Zombies stop animating once Skarde is defeated.
Delivery
Once the characters reach Artus, he reacts with surprise and gruffly demands they explain why they came to find him. If they reveal they have a package from Dragonbait, he demands they hand it over, saying that it could be the key to destroying this lich. When he touches the box, it magically unlocks and the corpse slayer dagger within falls into his hand. Cimber smiles and hands both the dagger and the rune stone he holds underneath his arm. He quickly explains:
“The big stone is the lich’s phylactery, I think this knife can destroy it. I knew Dragonbait could do it.” He glances over his shoulder at the frost giant lich, then looks you dead in the eye, a wicked smile on his face. “I’m going to finish this monster off. I want you to plunge that knife into that stone the instant I get him, so he can see what it’s like to be taken by oblivion. Got that?”
On his next turn, Artus charges Skarde, leaps into the air, and plunges his sword into Skarde’s chest. Skarde ultimately dies whenever one of the characters plunges the corpse slayer into the rune stone, which causes it to crack, shudder, and explode in a gout of green flame.
Conclusion: Another Successful Delivery
Artus Cimber is a gruff man of few words—but he thanks the characters in his own terse way. He hands the corpse slayer dagger back to the characters as payment, explaining, “I’m leaving Icewind Dale—I’m not a fan of it here. Too many enemies. But if you’re sticking around, you’ll need this thing. Stay alive.”
He travels with the characters back to Caer-Konig, but disappears in the night before they can say goodbye. There are more adventures for these adventurers to have, and this world-weary man has no desire to interfere. Before the characters leave Caer-Konig, however, they hear an interesting rumor—one that could pertain to one of their jobs: delivering a parcel to the drow iconoclast, Jarlaxle Baenre, in next week's encounter.
Are you excited for Icewind Dale: Rime of the Frostmaiden? Looking forward to more chilly adventures over the sweltering summer? Let us know what you're looking forward to in the comments!
Get ready for more icy adventures in Icewind Dale: Rime of the Frostmaiden by preordering the digital version on D&D Beyond, and get free preorder bonuses like the Glacial Digital Dice Set.


Create A Brand-New Adventurer Acquire New Powers and Adventures Browse All Your D&D Content
Did you like this encounter? Check out the encounters in the Encounter of the Week series. You can also pick up the adventures I've written on the DMs Guild, such as The Temple of Shattered Minds, a suspenseful eldritch mystery with a mind flayer villain. My most recent adventures are included in the bestselling Encounters in Theros, a collection of over 70 unique encounters created by the Guild Adepts, which can be used to enhance your campaign in Theros or in your Greek mythology-inspired campaign setting. Also check out the Platinum Bestseller Tactical Maps: Adventure Atlas, a collection of 88 unique encounters created by the Guild Adepts, which can be paired with the beautiful poster battlemaps in Tactical Maps Reincarnated.
 James Haeck is the lead writer for D&D Beyond, the co-author of Waterdeep: Dragon Heist, Baldur's Gate: Descent into Avernus, and the Critical Role Explorer's Guide to Wildemount, a member of the Guild Adepts, and a freelance writer for Wizards of the Coast, the D&D Adventurers League, and other RPG companies. He lives in Seattle, Washington with his fiancée Hannah and their animal companions Mei and Marzipan. You can find him wasting time on Twitter at @jamesjhaeck.
-
View User Profile
-
Send Message
Posted Aug 3, 2020How many of these encounters until the Icewindale book comes out? I’m really looking forward to it
-
View User Profile
-
Send Message
Posted Aug 3, 2020This is really good. Nice use of Exploration pillar to "soften" the PCs for further encounters. And I love the use of "unwinnable fights" that need to be overcome through something other than reducing a boss-monster's hit points. You could add drama and difficulty if Artus loses the runestone in his ducking and dodging and needs help from the PCs to get to it.
You seem to have forgotten to mark the map, however - Although I can probably guess which points you mean, I see no "A" or "B" telling where the staircase or ceremony chamber are.
-
View User Profile
-
Send Message
Posted Aug 3, 2020I love the idea of this encounter, even though I think it'll be difficult for me as a new dm to flesh out the fight between Cimber and the lich. :) Really looking forward to leading my players through this series though. ^^
I did note this sentence though (used twice): "They can climb back up the steep slope two where they started by making a successful DC 10 Strength (Athletics) check, made with advantage if they can rappel up with a rope or a climber’s kit." Sure it should be "to" instead of "two". Also, the marks on the map are sadly missing. Just thought I'd point it out.
-
View User Profile
-
Send Message
Posted Aug 3, 2020I love how Artus and Dragonbait are returning after tomb of annihilation.
-
View User Profile
-
Send Message
Posted Aug 3, 2020Not sure if there's a reference article regarding this, but I was curious who is making the artwork for these articles and whether they have a portfolio site/media somewhere?
-
View User Profile
-
Send Message
Posted Aug 3, 2020James Haeck, what would you call the people who inhabit Icewind Dale?
-
View User Profile
-
Send Message
Posted Aug 4, 2020Excellent article, as always! I really want to DM this encounter series for my players... Can't wait for Rhyme of the Frostmaiden!
-
View User Profile
-
Send Message
Posted Aug 4, 2020Just saying - the map isn't marked because it says that this map was made for another campaign, he's just reusing it. It wasn't made specially for this encounter. I guess he technically could've marked it, but he kind of referenced to where the important areas are (west side of the map).
-
View User Profile
-
Send Message
Posted Aug 4, 2020Aw... I was hoping this would have no paid content(The skeletal swarms from Ghosts of Saltmarsh)
Could I substitute them with something?
-
View User Profile
-
Send Message
Posted Aug 4, 2020As a new player and even newer DM, I’m looking forward to trying to run these. What is the minimum party size for level 1 characters to be able to run this successfully?
-
View User Profile
-
Send Message
Posted Aug 4, 2020I'm excited about the next encounter involving Jarlaxle Baenre. Definitely using this encounter as well.
-
View User Profile
-
Send Message
Posted Aug 4, 2020It appears to have been edited, but the original text of the article said the map was marked "A" for the stairs and "B" for the room the fight happens in - why Yavie and I mentioned it. They didn't add markings but the new description is just as good.
-
View User Profile
-
Send Message
Posted Aug 4, 2020Ah. Makes sense.
-
View User Profile
-
Send Message
Posted Aug 4, 2020Oh, and (this is a question for James) how many parts to this series will there be?
-
View User Profile
-
Send Message
Posted Aug 4, 2020The encounter series starts at level 1, and by this time the party are meant to be level 3, but presumably this is worked from the standard size adventuring group (4), so with level 1 characters anywhere upwards of around 6 should be fine. Not calculated in any way, just a guesstimate.
-
View User Profile
-
Send Message
Posted Aug 4, 2020If you don't want to purchase the full GoS campaign, you could purchase the skeletal swarm à la carte for $1.99.
Alternatively, you can find the skeletal swarm stats on any number of websites. Use the Create Monster feature if you want to add it to an encounter you've made on dndbeyond.
-
View User Profile
-
Send Message
Posted Aug 4, 2020I'm loving all of these encounters of the week. I recently discovered them and they're going to up my DM game so much. Thanks James!
-
View User Profile
-
Send Message
Posted Aug 5, 2020Thanks James, another fantastic encounter.
I really love the epic battle between Artus and Skarde. I was looking at Icewind Dale for my Storm King's Thunder adventure and was wondering what to do about Artus Cimber and his Ring of Winter. You definitely have inspired me to put him into the game now, instead of just hinting he is all the way down in Chult.
-
View User Profile
-
Send Message
Posted Aug 5, 2020Any undead of CR 2 would work well, or you could use multiple undead adding up to CR 2.
-
View User Profile
-
Send Message
Posted Aug 6, 2020Thanks! :D