


When you use the D&D Beyond Encounters tool, you'll notice that monster stat blocks have buttons you can click to easily roll for attacks, damage, saving throws, and ability checks. These fancy buttons are powered by something that looks more like eldritch script—or worse, code!
In this tutorial, we'll explain how dice blocks work, how to set them up yourself, and a few useful shortcuts you can use.
- What Is the Encounters Tool?
- What Is a Rollable Dice Block?
- Components of a Rollable Dice Block
- Attack/Spell Blocks
- Damage/Healing
- Recharge
- Generic Roll
- Automatic Rollable Dice Blocks
What Is the Encounters Tool?
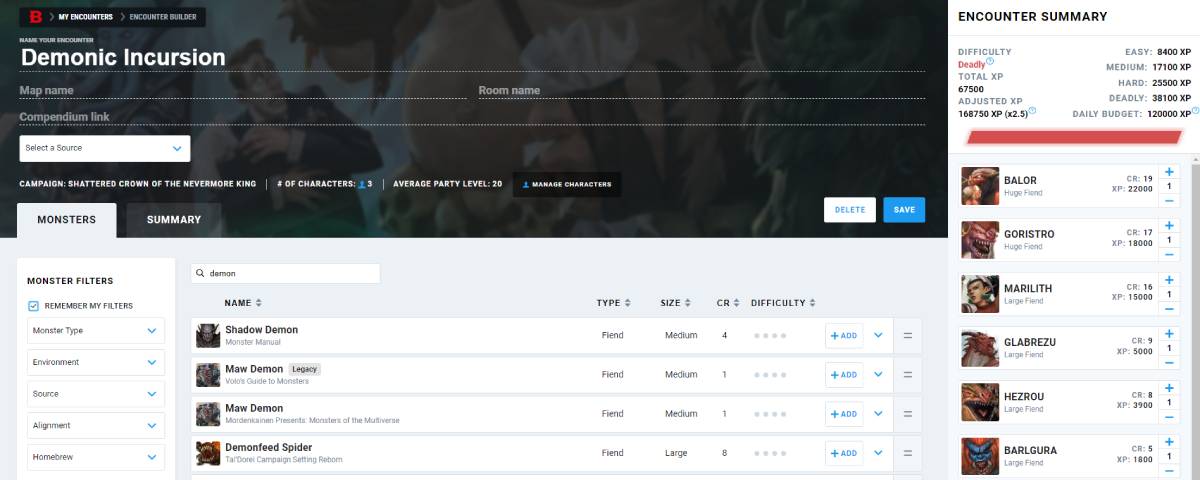
Encounters is two powerful tools in one package available to D&D Beyond users. It combines a combat difficulty calculator and an initiative tracker, allowing you to take an encounter from an idea to a thrilling fight in one place.
The first part of the tool automates the encounter building rules found in the 2014 Dungeon Master's Guide, saving you from having to calculate XP budgets and difficulty thresholds. You can pull in all the monsters you have access to, including homebrew ones.
Once you've designed your perfectly deadly encounter, you can hit "Run" and start rolling those dice.
But speaking of homebrew and rolling dice, you may wonder how to add those handy dice buttons. Well, it's all down to rollable dice blocks, the secret behind making your custom monsters roll-ready.
What Is a Rollable Dice Block?
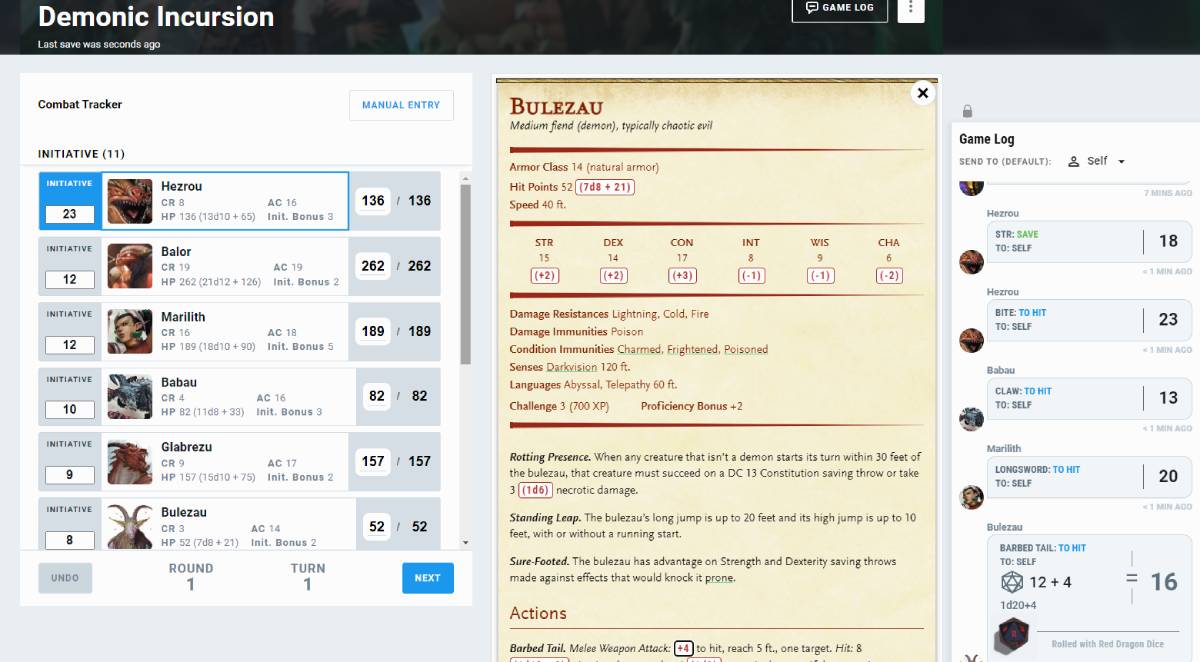
A rollable dice block is a special bit of text that you add to a monster stat block. Outside of the encounter builder and initiative tracker built into Encounters, you won't even know it's there.
But when you load a creature up in either of those tools, the rollable dice block transforms into a clickable button that lets you roll dice directly from the stat block. When you click the button, it not only rolls the associated dice and adds any bonuses, but the result is displayed in the Game Log along with the ability's name, what type of roll it is, and any associated damage types.
There are four types of rollable dice blocks you can find in a monster stat block:
- Attack/Spell
- Damage/Healing
- Recharge
- Generic Roll
This tutorial will cover each rollable dice block type and how you set it up. But first, let's cover some of the fundamental elements of a rollable dice block.
Components of a Rollable Dice Block
All rollable dice blocks are wrapped in rollable tags, which means you need [rollable] at the start and at the end [/rollable]. This tells the site that what you're writing needs to be handled in a special way. Whatever you write immediately after the [rollable] tag, followed by a semicolon, will be displayed on your monster's stat block. For example, writing:
[rollable]+4;
Will be displayed as "+4" on the stat block as a button when using the Encounters tool. Outside of the Encounters tool, this will appear as plain text.

The next bit is the fancy part: the dice notation. After the semicolon of your button text, you put a pair of curly brackets containing "diceNotation:"
[rollable]+4;{“diceNotation”:}
After the colon is where the magic happens. You tell the site what dice to roll, what modifiers to apply, and what information to display. A comma will separate each element and consist of an element category in quotation marks, a colon, and then the type.
These are the following dice element categories:
- "diceNotation:" The actual dice and modifiers that will be rolled when you click the button.
- "rollType:" What type of dice roll is being made, such as a spell, damage, recharge, or general roll.
- "rollAction:" The name of the ability being rolled, such as the name of the attack or damage.
- "rollDamageType:" For blocks that have damage, this will list the damage type for the game log.
Attack/Spell Blocks
Attack and Spell Attack blocks are used whenever you want a clickable attack roll. When writing an attack or spell attack dice block, your dice notation will always be 1d20 plus a number, which will be the to-hit bonus.
Let's start making a weapon attack for our monster, the pancake elemental:
[rollable]+4;{"diceNotation":"1d20+4",
Note the parts in bold. They should be the same. Also, don't forget to use colons and commas in the right places to tell the site where elements begin and end.
Next, we want to tell the site what type of roll this is. For attack rolls, it's "to hit" and for spells, it's "spell". Let's take the above example and make it an attack roll:
[rollable]+4;{"diceNotation": "1d20+4", "rollType": "to hit",
Finally, we want to set the name of this dice block, which, in this case, is the attack's name. Let's say it's for an attack called Batter Flip; we'll want to use "rollAction" followed by the name:
[rollable]+4;{"diceNotation": "1d20+4", "rollType": "to hit", "rollAction": "Batter Flip"}
That's almost everything. The last thing we need to do is add the closing [/rollable] tag like this:
[rollable]+4;{"diceNotation": "1d20+4", "rollType": "to hit", "rollAction": "Batter Flip"}[/rollable]
Unlike all the other elements, we don't need a comma after the rollAction because we're ending the dice block. It's important to check that all your colons and commas are in the right place because dice blocks are a stickler for precision.
If you wanted to write a spell attack block, it'd look pretty much the same, except the rollType would be "spell" instead:
[rollable]+3;{"diceNotation": "1d20+3", "rollType": "spell", "rollAction": "Big Spell"}[/rollable]
Damage/Healing
You've got your to-hit roll sorted, so now you need damage rolls. These are very similar, with only one additional element, "rollDamageType." We'll follow the same steps as above, first defining the opening rollable tag and the button. We want Batter Flip to deal 2d8+2 fire damage, so that's what we'll put after the rollable tag:
[rollable](2d8 + 2);
Note that the dice block is written inside a pair of parentheses. When writing out damage or healing in D&D, you write the average first, then the dice roll in parentheses. We only want the dice roll to be a button, so that's the part we put within the rollable tag.
Next up, we want to write out the diceNotation, which follows the same format as for to-hit rolls. Just make sure it matches what you wrote for the button:
[rollable](2d8 + 2);{"diceNotation":"2d8+2",
Now we add the rollType, which in this case is damage, and the rollAction name to display:
[rollable](2d8 + 2);{"diceNotation": "2d8+2", "rollType": "damage", "rollAction": "Batter Flip",
This is where we add the new element unique to damage rolls, rollDamageType. This defines what type of damage the roll is, which will be displayed in the Game Log. In this case, we're going with fire damage:
[rollable](2d8 + 2);{"diceNotation": "2d8+2", "rollType": "damage", "rollAction": "Batter Flip", "rollDamageType": "fire"
That is our almost complete damage dice block. We just need to close the rollable tag by adding the closing curly brace and [/rollable]:
[rollable](2d8 + 2);{"diceNotation": "2d8+2", "rollType": "damage", "rollAction": "Batter Flip", "rollDamageType": "fire"}[/rollable]
If you wanted instead to make a dice block for a healing roll, you change the rollType from "damage" to "heal" and remove the rollDamageType, like this:
[rollable](2d4);{"diceNotation": "2d4", "rollType": "heal", "rollAction": "Smol Heal"}[/rollable]
Recharge
Some monsters, such as the legendary ancient red dragon, feature abilities that recharge at the start of their turn on a roll of a d6. These blocks are even simpler than the previous examples. The first element is the button immediately after the opening rollable tag:
[rollable](Recharge 6);
The recharge value may vary, from 4-6 to just 6, but this doesn't actually change the dice block itself. Once you've got your button text defined, the recharge dice block follows a familiar structure:
[rollable](Recharge 6);{"diceNotation": "1d6", "rollType": "recharge", "rollAction": "Breath Weapon"}[/rollable]
The important elements are highlighted in bold; the diceNotation is always 1d6, and the rollType is "recharge."
Generic Roll
Finally, here is the structure for just making a generic, multipurpose dice roll block, such as for determining a random effect on a table:
[rollable]10d20 + 23;{"diceNotation": "10d20 + 23", "rollType": "roll", "rollAction": "Big Roll"}[/rollable]
You'll see that it's very simple compared to the previous examples, with the only unique element being that its rollType is "roll", which is fairly self-explanatory.
Automatic Rollable Dice Blocks
If all this seems a little too much like wizardry to you, don't worry, as the D&D Beyond homebrew tools have an unseen servant waiting to lend you a hand. If you go into the homebrew tools and look at the toolbar in any text input field, you'll see a small calculator-looking icon at the far end of the toolbar; this is the automatic rollable dice block tool.

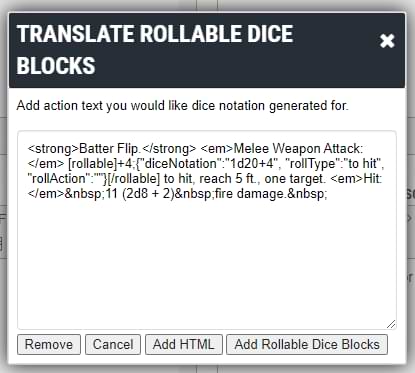
If you highlight an attack action, recharge ability, or other similar feature where you'd like to add a dice block and click that button, a dialogue box will appear.
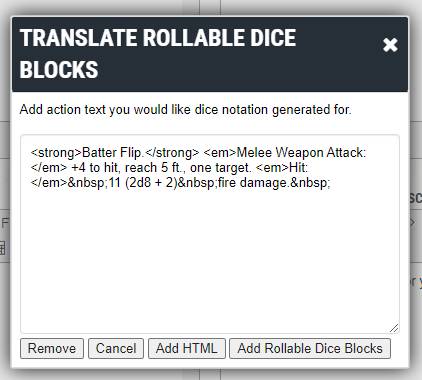
Once that dialogue appears, click "Add Rollable Dice Blocks," and you'll see the text converted automatically to a dice block!
It's important to keep in mind that this tool will do its best to correctly format the dice block for you, but it may not properly register every element every time. As such, it's useful to understand how the dice blocks work so you can fix an error yourself.
Get Rolling!
With D&D Beyond's suite of tools, prepping D&D has never been easier. Whether you're homebrewing monsters using the creation tools, planning combat using Encounters, or running the game through Maps, we're here to take work off your plate so you can focus on the fun!
Davyd is a moderator for D&D Beyond. A Dungeon Master of over fifteen years, he enjoys Marvel movies, writing, and of course running D&D for his friends and family, including his daughter Willow (well, one day). The three of them live with their two cats Asker and Khatleesi in south of England.
-
View User Profile
-
Send Message
Posted Jan 23, 2024Good, I needed this.
-
View User Profile
-
Send Message
Posted Jan 23, 2024Nice article. No references?
-
View User Profile
-
Send Message
Posted Jan 23, 2024Well needed article.
-
View User Profile
-
Send Message
Posted Jan 23, 2024I had no idea about the auto dice blocks!!! My life just became easier.
-
View User Profile
-
Send Message
Posted Jan 23, 2024You should check out the Homebrewers’ “How To” FAQ: (https://www.dndbeyond.com/forums/dungeons-dragons-discussion/homebrew-house-rules/131411-a-homebrewers-how-to-faq). I posted about that over a month ago, Monsters FAQ #4.
-
View User Profile
-
Send Message
Posted Jan 23, 2024Well, I'm mad at myself - I've been putting the code in all on my own this entire time.
This is... actually VERY good to know for the dice roll creator.
-
View User Profile
-
Send Message
Posted Jan 23, 2024Thanks. Nope, no references. I didn't use any external resources.
-
View User Profile
-
Send Message
Posted Jan 23, 2024Testing [rollable]+4
-
View User Profile
-
Send Message
Posted Jan 23, 2024Awa, this is for stat blocks, bean. Sorry to say.
-
View User Profile
-
Send Message
Posted Jan 23, 2024It's for use in stat blocks and you need to use the full dice expression. If you read through the full article, it should explain everything.
If you want to use dice rolls in forums posts, such as for Play-by-Post games, there's a dice roller option that's second to last in the toolbar
9
-
View User Profile
-
Send Message
Posted Jan 23, 2024One of these lines in the post may have a typo and be wrong because the quotation mark and the colon are reversed. Please edit/fix the text:
The next bit is the fancy part: the dice notation. After the semicolon of your button text, you put a pair of curly brackets containing "diceNotation:"
-
View User Profile
-
Send Message
Posted Jan 23, 2024That looks correct, the syntax is "diceNotation": followed by the relevant components, all wrapped in a pair of curly braces { }
-
View User Profile
-
Send Message
Posted Jan 23, 2024More articles like this please! Trying to figure out the ins and outs of homebrew code in D&D Beyond can be challenging sometimes. I'll use this one a ton.
-
View User Profile
-
Send Message
Posted Jan 23, 2024What about 2d8 fire damage + 1d6 radiant damage?
-
View User Profile
-
Send Message
Posted Jan 23, 2024This is fantastic and we need more articles like this! Whenever I try to make homebrew on DnD Beyond, I just get frustrated and give up due to not understanding the site requirements/tools.
-
View User Profile
-
Send Message
Posted Jan 23, 2024You'd do each damage roll as a separate damage expression, e.g:
This would render as
With the bits in [ ] rendering as buttons in the encounter tool
-
View User Profile
-
Send Message
Posted Jan 23, 2024I've been homebrewing for about 2 and a half years now and have over 60 pages worth of homebrew, the largest part of which is monster statblocks. When I first started using this site I decided I wasn't going to use the rollable dice feature, made a few dozen statblocks without it. Then when I started actually running the game I realized the encounter builder combined with rollable statblocks were very convenient. I still didn't learn how to use the diceblocks, nor did I use the tool that creates them for me as I never figured out how to properly use it.
I simply learned which parts of the lines could be edited and all this time I've copied existing lines and edited them as I saw fit. I even have a homebrew template statblock that I go to whenever I need a recharge ability. With this article I still think I'll stick to my copy paste method as it seems easier. But now I think I can learn to change the types of rolls and that is very useful.
Also I expect to see a full pancake elemental statblock in the future.
-
View User Profile
-
Send Message
Posted Jan 23, 2024There's a JSON generator for this in the thread of rollable tags in the forum that removes the guesswork. I hope the mod team can make this more streamline and/or apply updates to the coding system for this segment and for rollable tags in other parts of a character sheet like extras in the future.
-
View User Profile
-
Send Message
Posted Jan 23, 2024Another great article thank you.
-
View User Profile
-
Send Message
Posted Jan 23, 2024Is there way to make the autoroller ALWAYS roll with advantage or disadvantage?