


Maps is the official virtual tabletop (VTT) of D&D allows Dungeon Masters to bring their players into a single browser-based play space to share interactive maps and tokens from their D&D Beyond digital library. No matter how you choose to play—in-person with pen and paper or online using D&D Beyond—Maps is another step toward our goal of making it easier to jump into the action of Dungeons & Dragons.
Everyone with a D&D Beyond account can explore the time-saving features of this tool—no subscription required. A fair warning: This tool is in Beta, so bugs and performance issues are to be expected!
Read on for a deep dive into Maps' functionality and how you can start using this VTT for your D&D sessions!
- What Is Maps?
- Accessing Maps
- Adding a Map
- Uploading and Scaling a Map
- Adding Tokens
- Adding Stickers
- Navigating the Map
- Controlling Tokens
- Fog of War
- Ruler, Point, and Ping
- Draw
- Overlays
- Select and Groups
- View Keyboard Shortcuts
- Session Controls
- Inviting Players to View the Map
- Connected Players Menu
- Game Settings
- Spectator View
- Game Log
- Combat Encounters on Maps
- Safety and Feedback Tools
Beta Testing Phase
Expect bugs and crashes as we put Maps Beta to the test! We’re starting out slow and steady, focusing on the fundamentals needed for this VTT experience, so bear with us.
Over the coming months, we’ll refine features as well as add new ones. For the latest update on Maps, keep an eye on the D&D Beyond Changelog.
What Is Maps?
Prep less, play more. That’s our guiding star for Maps, the official D&D VTT. Whether you play online or in person, we want Maps to offer a quick and easy way for DMs to connect with players and launch their adventures on D&D Beyond.
With Maps, you can pull official maps and monster tokens from your D&D Beyond digital library to play with. You can also upload your own maps, drop in player tokens, and apply a fog of war. When you’re ready to play, you can invite players who have a free or upgraded D&D Beyond account into the shared play space. The Game Log will help you keep track of dice rolls on the fly.
Maps is in Beta, so we’ll be adding and refining features as the tool progresses. As of now, the majority of official adventures are implemented in Maps.
Although we are setting aggressive goals for ourselves, we have a way to go before we’re ready to officially launch Maps. We're excited to have you on the first step of our journey toward a suite of tools geared toward making D&D more accessible to DMs and the players they journey with.
Accessing Maps
To get started using Maps, you’ll first need a D&D Beyond account. Once you have an account, navigate to the Maps homepage to:
- Launch Maps
- Read the Maps FAQ
- View our roadmap
- Access the user feedback survey
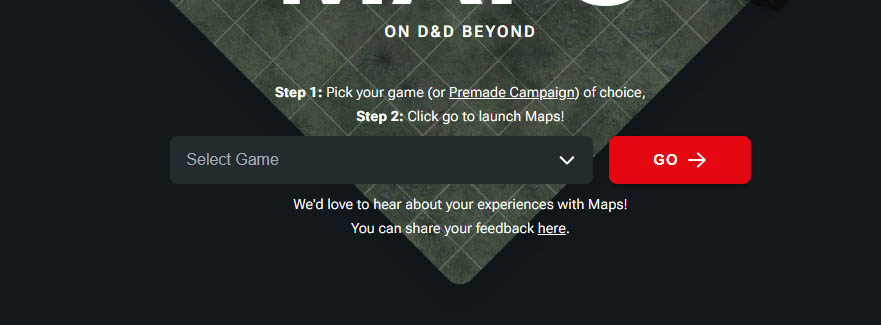
To get this tutorial started, let’s choose one of your existing campaigns. From the top of the Maps homepage, you’ll see a dropdown with a red “Go” button next to it.
From the dropdown, select the campaign you want to set up maps for, and then click “Go.”
Using Maps on Mobile
While Maps isn’t going to be initially optimized for phone and tablet, you can still use your mobile device to access and use the VTT for your D&D games on the go. You may encounter some areas where the menus or interface don’t quite properly display. Over time, we will work out these kinks and ask for your feedback as we develop this tool.
Adding a Map
You’ll now be loaded into your campaign with a view of the Map Browser and a message saying, "Add a map from a Source to get started."
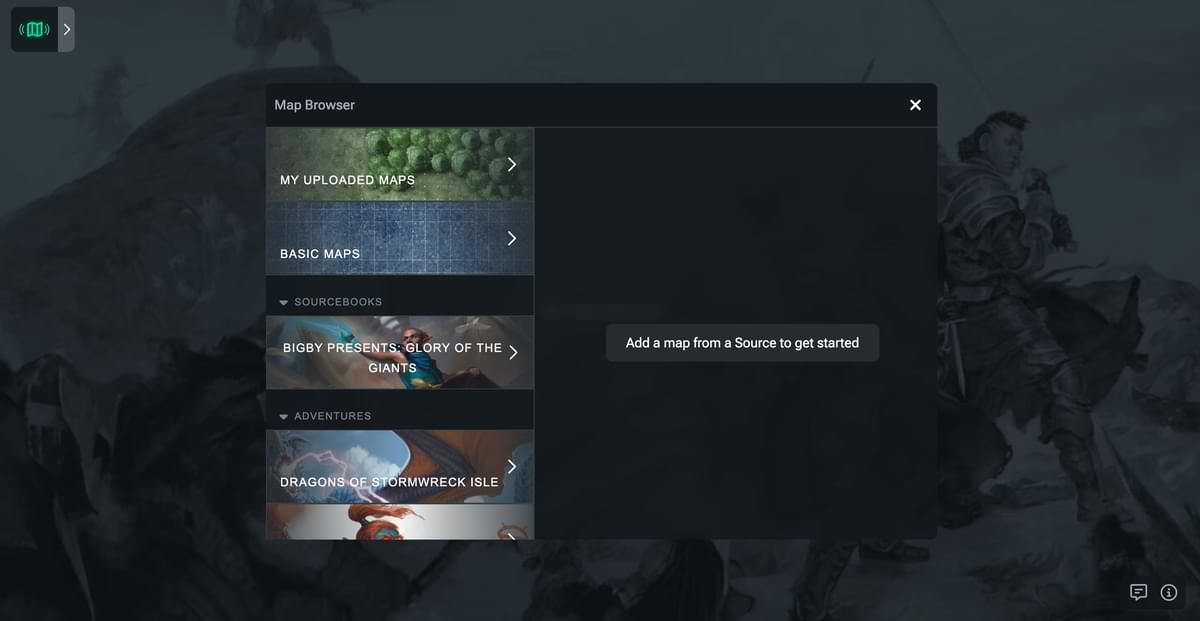
The first two options on the left are “My Uploaded Maps” (we’ll get to that later, don’t worry) and “Basic Maps.” Basic maps are generic maps that can be used for a variety of scenarios, so we’ll be using these further on in this tutorial.
You’ll also see “Sourcebooks,” and, after that, “Adventures.” These two categories are where all the premade maps from the books you own on D&D Beyond will live. Future digital and physical products will launch with their maps already configured for use here, and books released previously will be added over time, so expect to see this list grow.
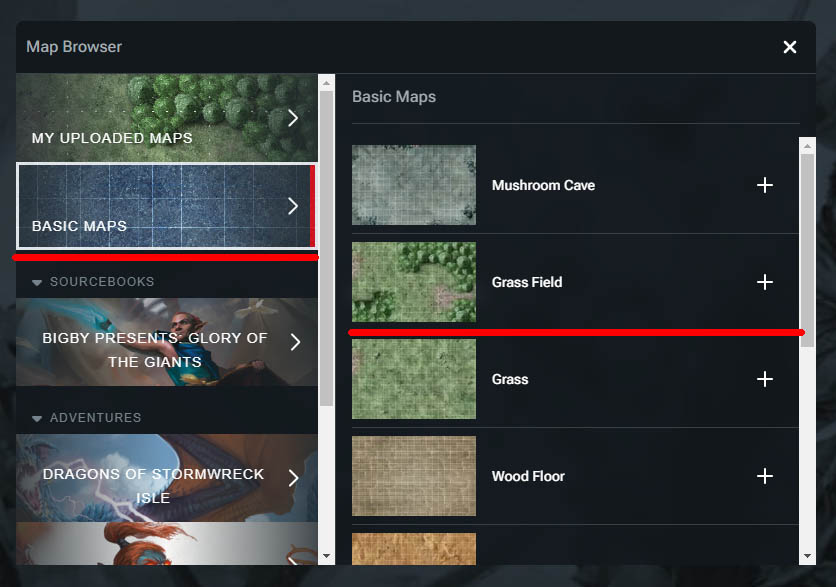
To start, let’s add a basic map, so click that category. You’ll see the right-hand panel populated with a list of maps. Add the “Grass Field” map by clicking the “+” sign to the right.
In the bottom left of the screen, you’ll see the message, “Added ‘Grass Fields’ to the map list,” but not much else. This is because while the map has been added to the list, we still need to select that map to view it. Click the “X” in the top right corner to close the Map Browser, then click the down arrow next to “Select Map” to open the dropdown.
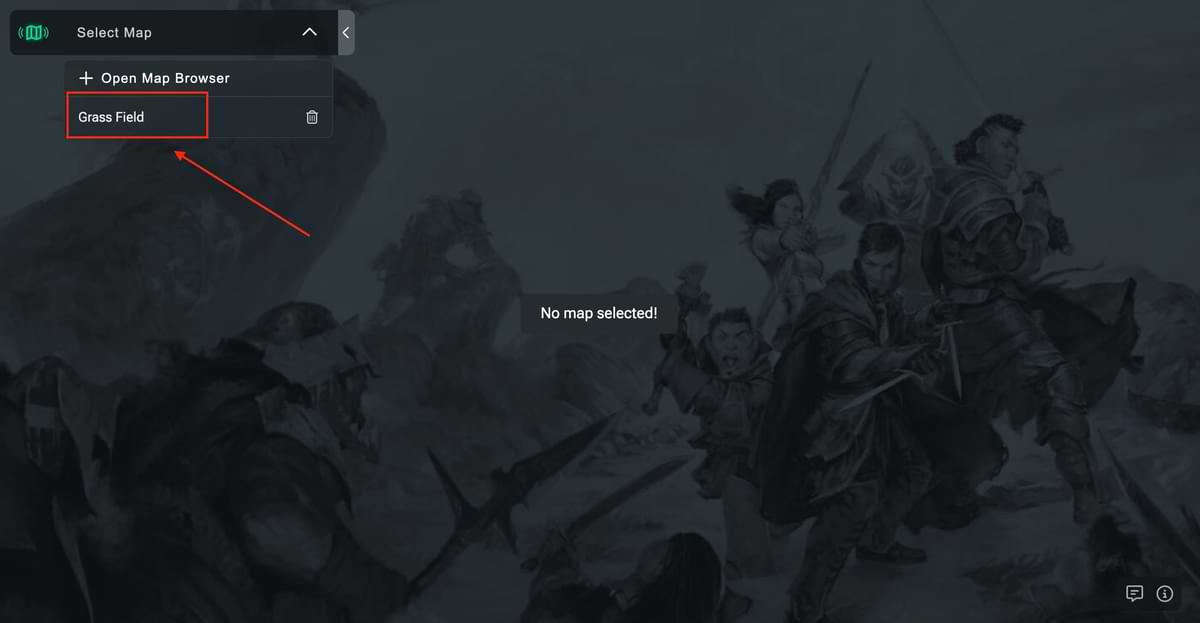
Now you’ll see the “Grass Field” map listed, with a trash can icon to the right. You can click this icon to remove a map from your list, but for now, let’s select the map by clicking its name. You will now be looking at your first map!

If you want to add more maps, you can repeat the above steps, and they’ll be added to your map list. You can switch between maps at any time by expanding the map list and clicking the map's name.
Animated Maps

You can now upload your own animated maps—or use one of the new animated Basic Maps—to bring your encounters to life with the magic of motion:
-
Upload Your File. Open the map dropdown and select Open Map Browser. From there, choose My Uploaded Maps > Upload Map. You can upload an .mp4 or .webm file up to 100 MB.
-
Title and Scale. Give your map a title, then click Next to scale your tokens to the map.
-
Controlling the Animation. The map loops automatically, but each player can play or pause the animation using controls in the bottom right, next to Fullscreen and Spectator View.
Uploading and Scaling a Map
Even with the massive selection of maps available across the library of official D&D books, you may still want to upload your own. With Maps, this is a simple endeavor!
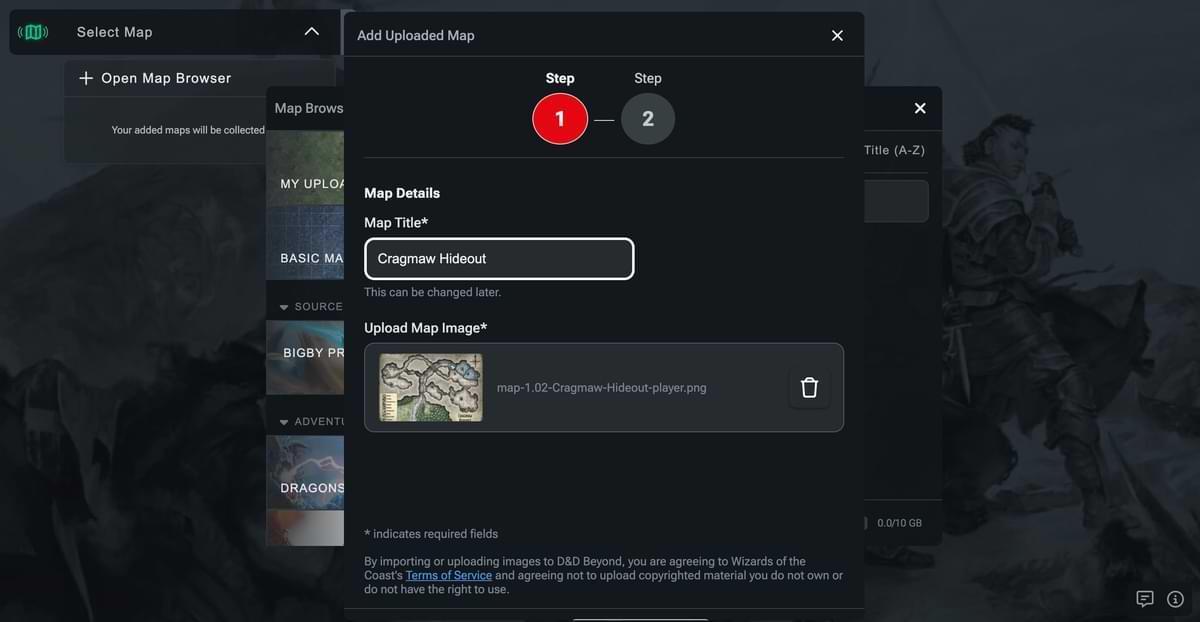
To do this, select “+ Open Map Browser” to open the Map Browser again. Now, instead of selecting a ready-made map, we’re going to select “My Uploaded Maps.” Because we haven’t uploaded anything yet, click “Upload Map,” which will open the “Add Uploaded Map” dialogue.
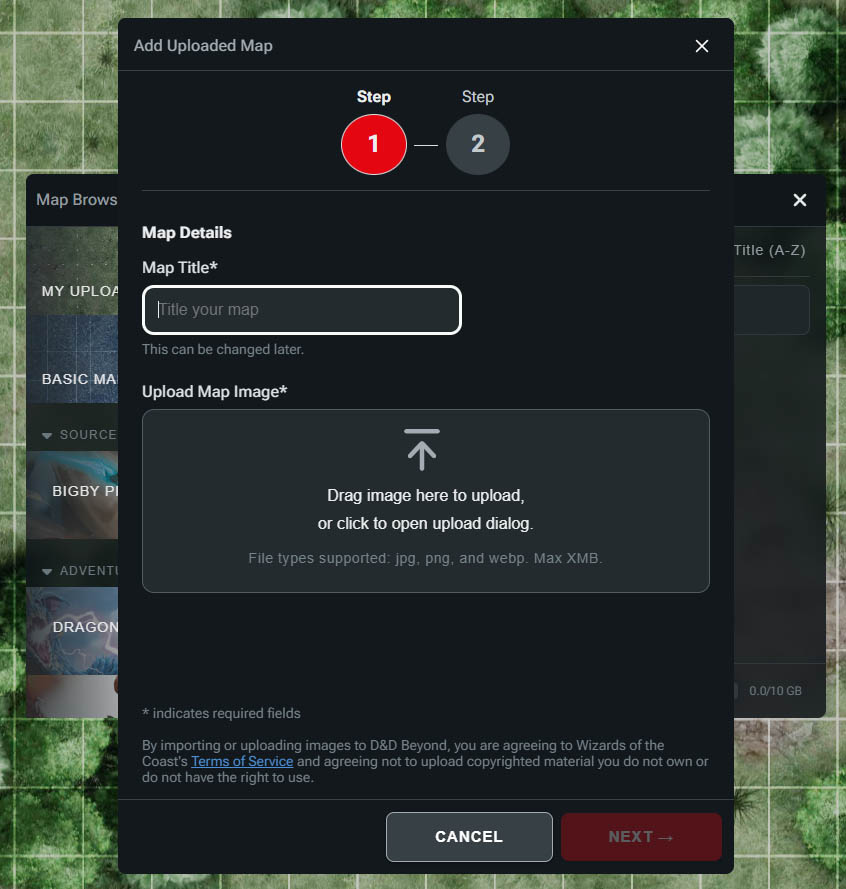
First, give your map a title, and then you can either drag your map into the upload area or click the area to open your computer's file browser. Make sure that the map is the right file type, and keep in mind that Maps comes with a 10 GB total storage limit per user. It’s also important to pay attention to the terms of use at the bottom of the dialogue regarding what images you upload.
Once you’ve uploaded your map, click “Next,” and you’ll be taken to the scaling dialogue. Here you set the scale of your map.
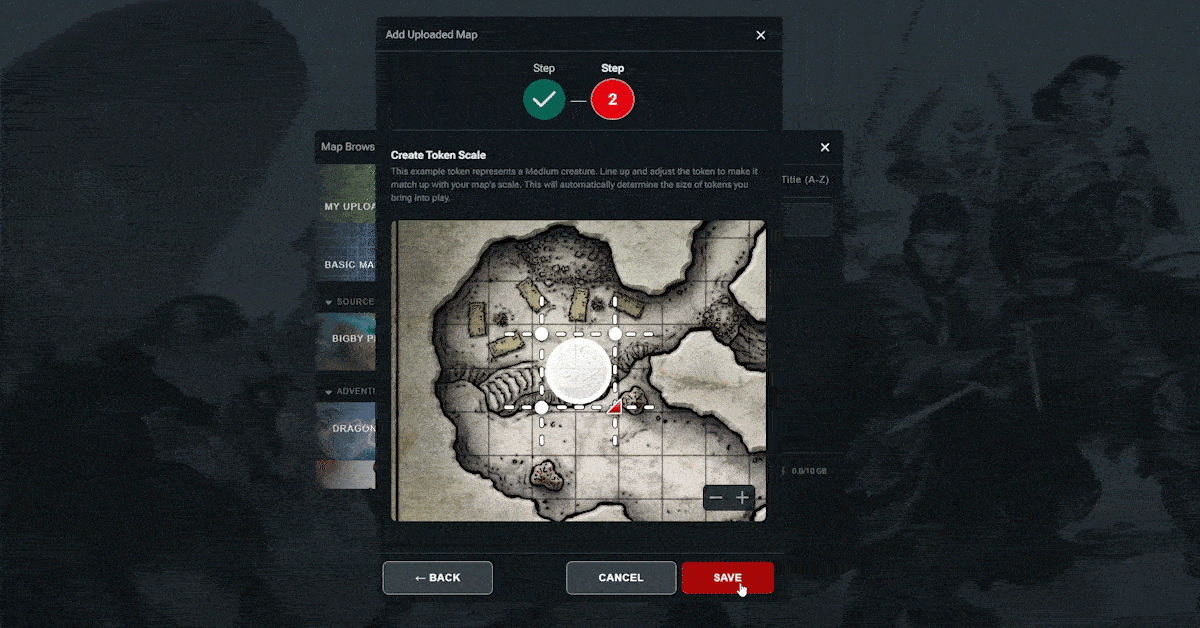
In the middle of the map preview, you’ll see a white circle surrounded by dotted lines, three smaller circles, and a red arrow. The larger circle represents a Medium-sized token, the lines represent grid lines, and the smaller circles represent the corners of a grid square. You want to align these dotted lines and corner markers with the grid of your map if it has one or adjust the scale of your token to suit the map if it doesn’t have a grid.
First, click and drag the large white circle so the top left corner marker is aligned with the corner of a square on your grid.
Then, click and drag the red arrow in the bottom right to rescale the token and the markers. You want to scale it so all the corner and grid line markers line up with the grid on your map.
If you can’t see enough of your map to align things properly, you can click the "-" and "+" icons in the bottom right to zoom in and out.
Once you have everything aligned to your liking, click the “Save” button. You can also click the “Cancel” or “X” button to exit the process, or the “Back” button to change the map you’re setting up.
Now we have a map uploaded and scaled correctly, we can click the “+” icon to add it to our map list, from which we can select it for play.
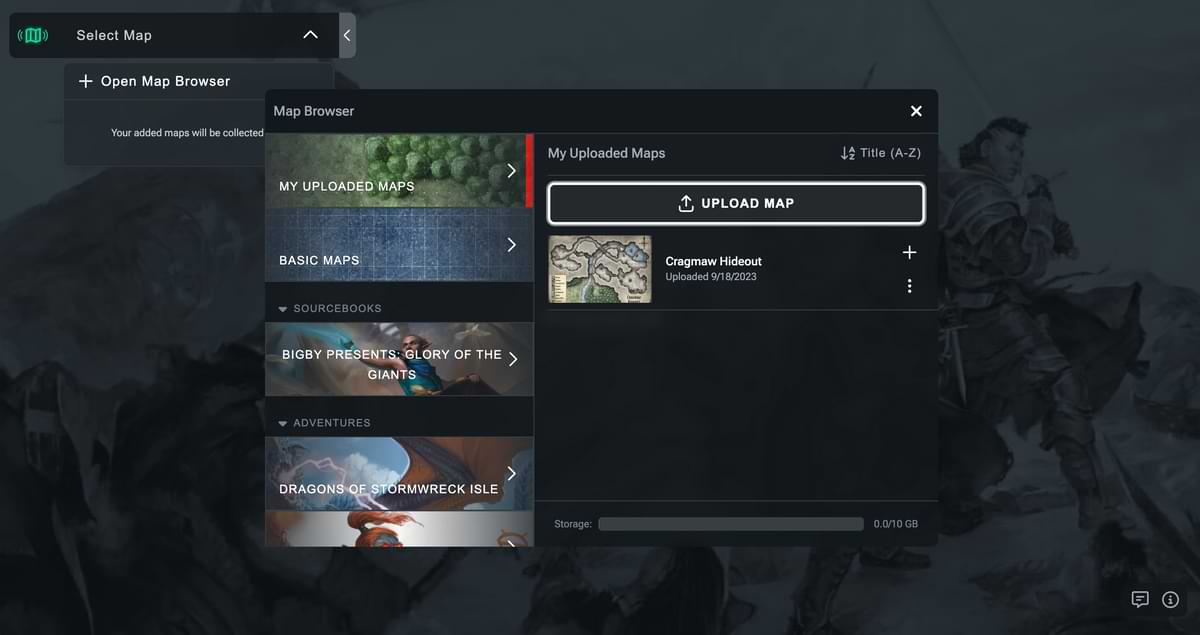
If at any time you want to remove or edit the map, you can do so from the “My Uploaded Maps” section of the Map Browser. Just click the three vertical dots next to any map to access the “Edit” and “Delete” options. "Delete" will remove it from your library of maps, while "Edit" will allow you to rename the map and adjust any scaling.
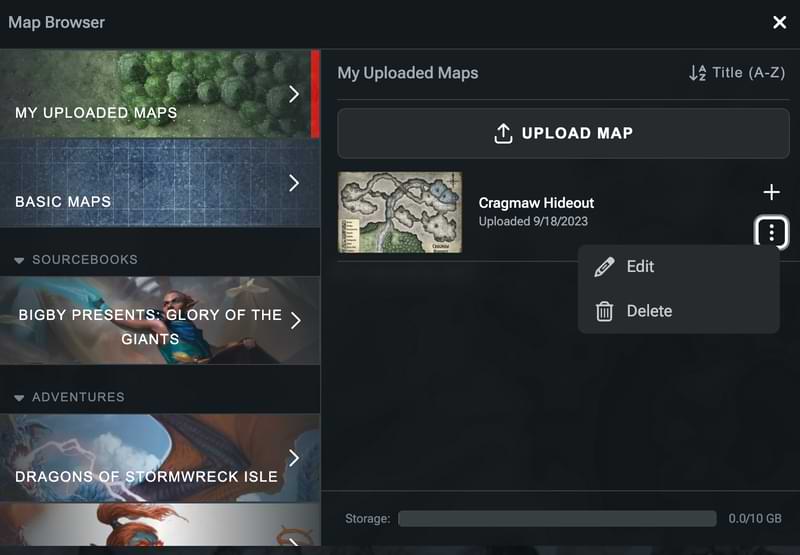
Once you’ve uploaded a few maps, you may want help finding and managing them. In the top right, you can change the sorting order of the maps, while at the bottom of the menu, you can see how much of your storage you’ve used.
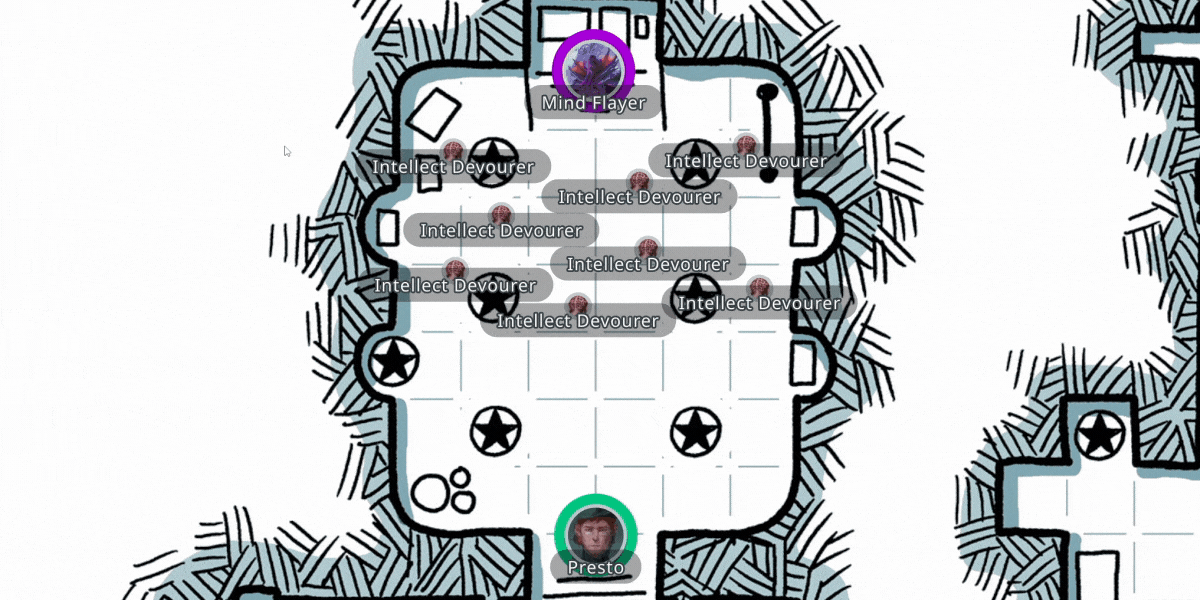
Adding Tokens
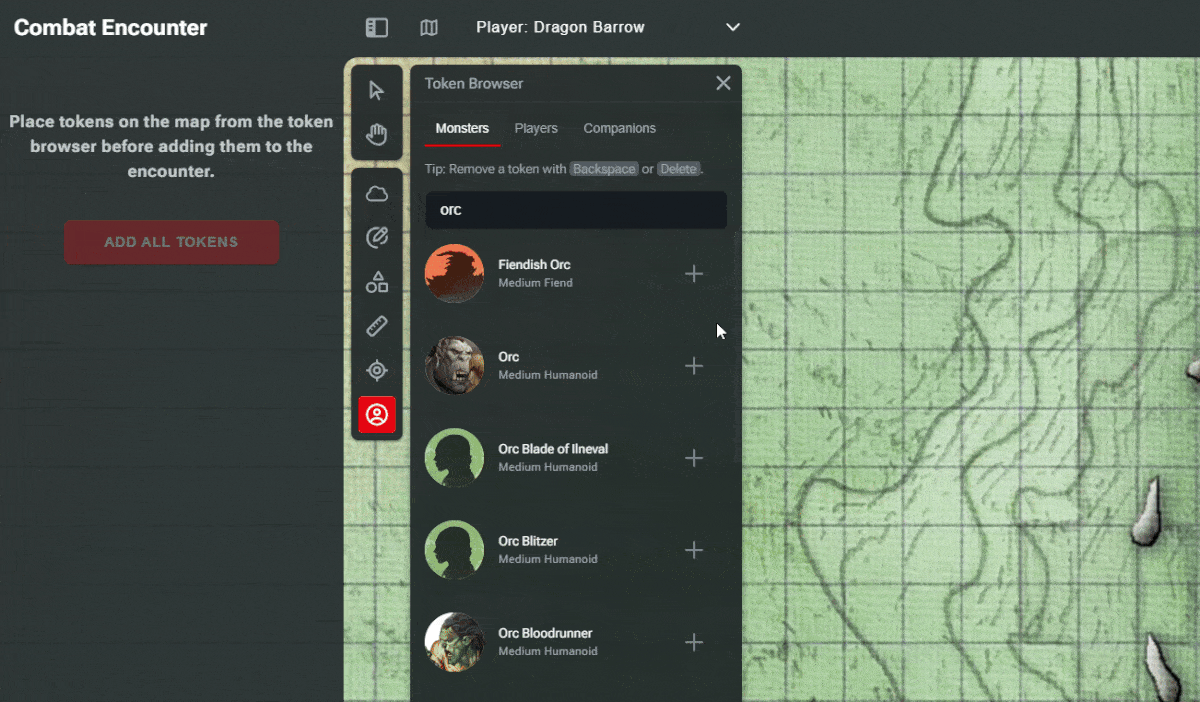
So we’ve got a map, but it’s not much use without some tokens, is it? You may notice that once you’re viewing a map in the VTT, three new buttons appear on the left side, below the map dropdown. We want the third button on that list, which is shaped like a figure with a circle around it—the Token Browser. You can access it by clicking it or pressing "V" on your keyboard.
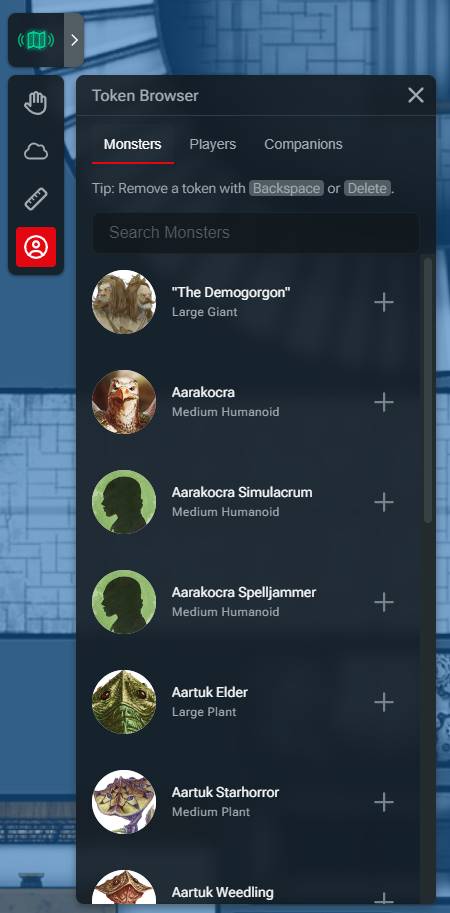
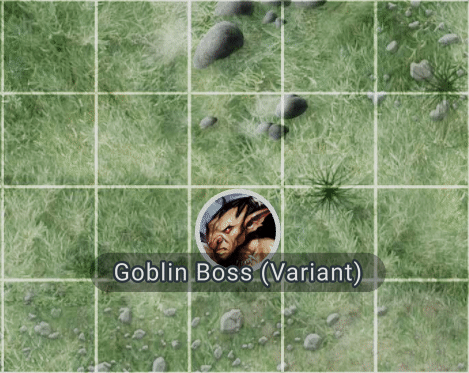
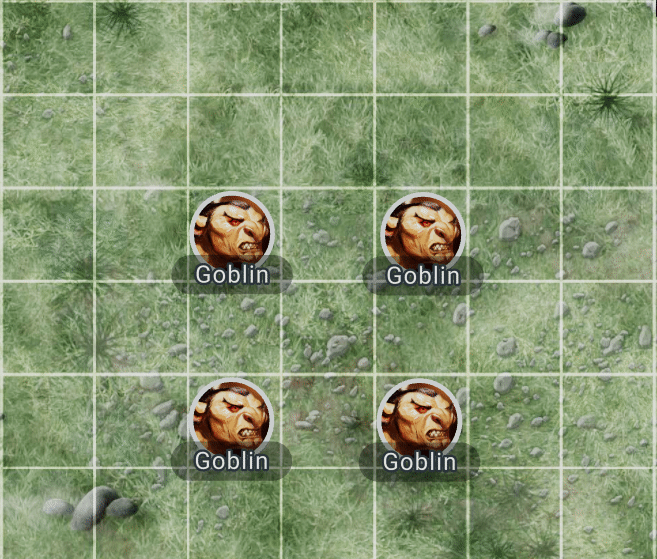
With the Token Browser open, you’ll see three tab options: “Monsters,” “Players,” and “Companions.” First, let’s add a monster. You’ll see a list of monsters with their official art along with their name, size, and creature type. You can even search monsters using the “Search” field. Let’s add some goblins.
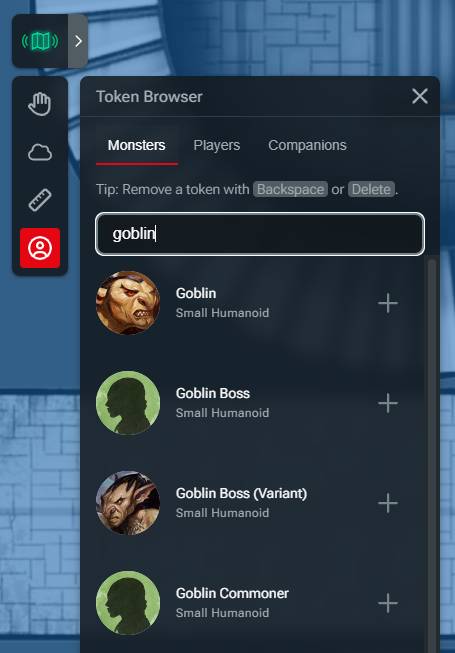
To the right of each monster, you’ll see a “+” icon, which you can click to add the token to the map. Let’s add three goblins and a goblin boss (variant). You’ll notice that each time you click the “+” button, a token will appear in an empty space, so you don’t have to worry about them stacking up on each other messily.
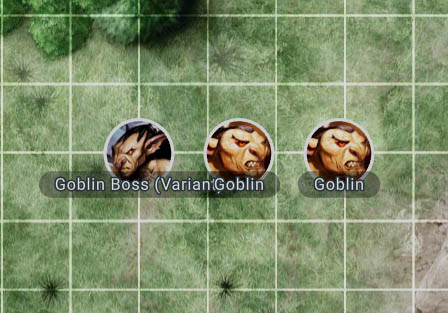
You’ll notice that the monsters display their names and are automatically set to the right size based on the scale of your map. If you add a large creature, say an ogre, it’ll be scaled to 2x2 squares automagically!

Now that you’ve added some enemies, it’s time to add the player characters. Navigate to the “Players” tab, where you’ll see all the characters currently in the campaign you selected. You’ll see the name of each character as well as the art they have selected on their character sheet.
Clicking the “+” button will add that player's token to the map. Once you’ve invited each player to the map, they’ll be able to control their own tokens and move them around within the VTT.
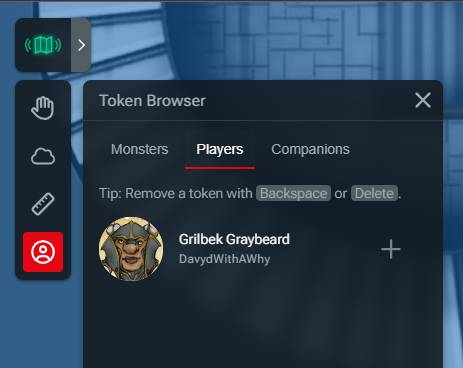
The “Companions” tab is the final option in the Token Browser and is where you’ll see any creatures that your players have added to the Extras section of their character sheet. Grilbek has a draft horse mount called Gallahop, so we’ll add them to the map as well by clicking the “+” icon.

You can close the Token Browser at any time using the “X” button in the top right.
Adding Stickers
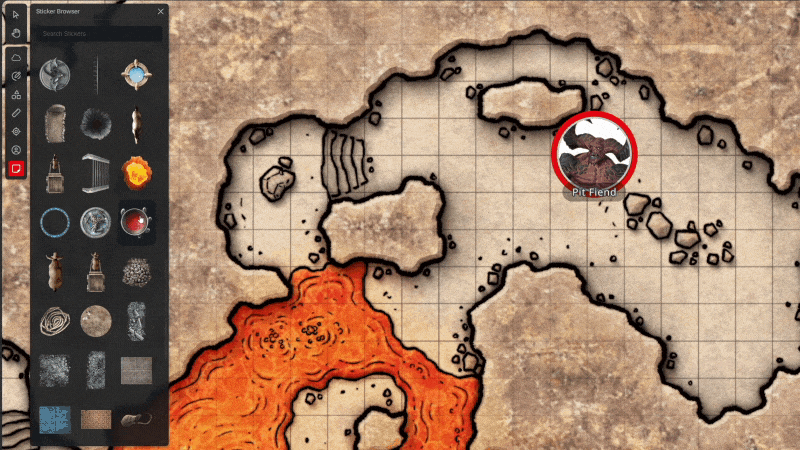
Stickers allow you to add various props and effects to your maps such as treasure chests, traps, or molten lava. Stickers are accessed by selecting the Sticker Browser button from the menu, or by pressing the "S" key.
Clicking on a sticker will display its name, what searchable tags it has, and the + button to add it to your map. Alternatively, you can drag a sticker directly onto the map in the same way as tokens.
Once you’ve placed a sticker on the map, you have a variety of options. Clicking the sticker will select it and clicking and dragging will allow you to move it around the map. Stickers have their own menu, from which you can toggle its visibility, lock it in place, and delete it in the same way as tokens.
You can also rotate and resize stickers using the four corner handles and the rotate handle.
When scaling a sticker, its width in feet based on its default rotation will be displayed, allowing you to easily gauge how big you’re making it.
Navigating the Map
So you’ve got a map with some tokens, the next step is navigating the map. From the list of three buttons, select the Pan feature, the first button with the hand icon. Alternatively, you can press the “H” key on your keyboard. With this feature selected, you can do two things:
- Click and drag to move around the map
- Click and drag to move tokens around the map
You can also use the mouse wheel to zoom in and out, but this function is accessible regardless of what feature you have selected. Additionally, you’ll find a zoom control in the bottom right that displays a "+" and "-" icon to zoom in and out, respectively, as well as your current zoom level.
Navigating Maps and Moving Tokens on Mobile
Navigating maps on mobile devices works pretty much as you would expect. Press and hold on an area of the map, then move your finger to drag the map around and pinch to zoom in and out. Tokens can be tapped to select them, and then dragged in the same way you can drag the map.
As a reminder, Maps functionality on mobile is still in development, so your experience may not be ideal!
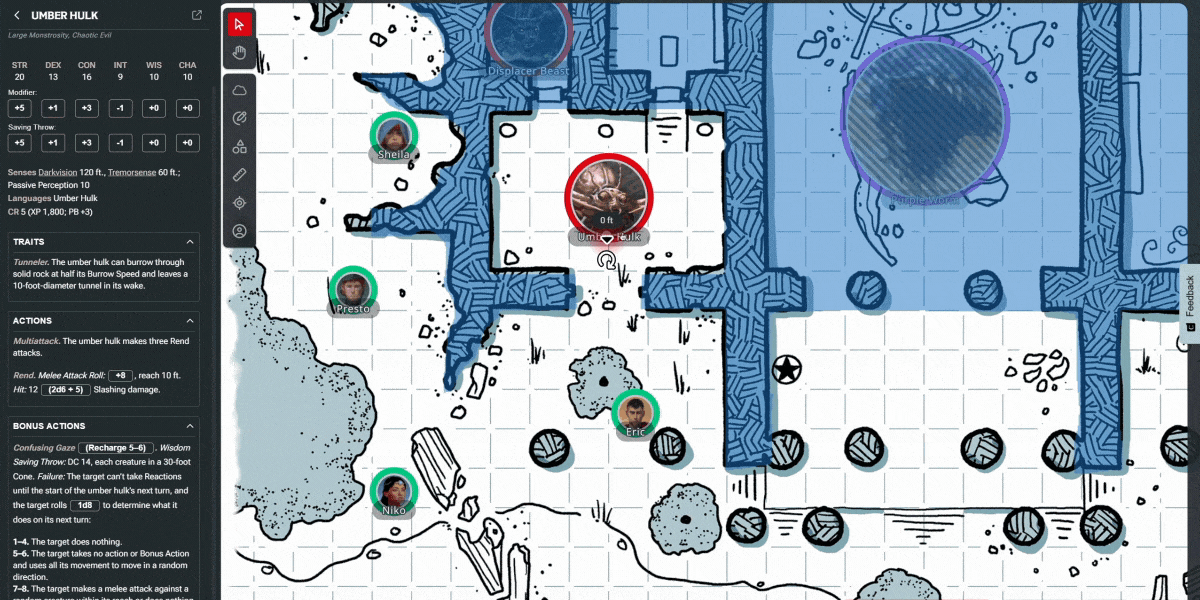
Controlling Tokens
Once you’ve placed tokens on the map, you and your players can begin controlling them. It’s important to note that, currently, anyone viewing a map can move any token on that map, so it is possible for players to move monsters and each other's tokens.
To move a token, make sure you don't have a feature selected, then click on a token so that its border turns red. The token will appear to lift up from the map. You’ll then be able to drag the token around, and the token toolbar will display above that token. Clicking anywhere else on the map will cause the red highlight ring and toolbar to disappear.
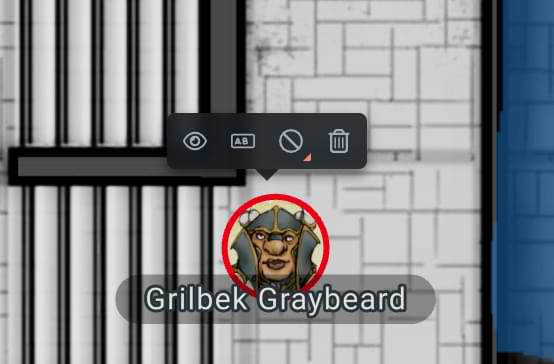
The Token Toolbar has four useful features:
- Hide/Reveal options
- Rename
- Border Color options
- Delete button
Hide/Reveal Options
The Hide/Reveal feature is accessible only by the Dungeon Master. It allows the DM to render a token hidden from the players or reveal that token. Clicking it causes the token to desaturate, and the eye icon displays with a line through it, indicating that the token is hidden. Clicking it again reveals the token.
You can also toggle a token’s hidden/revealed state with the keyboard shortcut “Shift + H.”
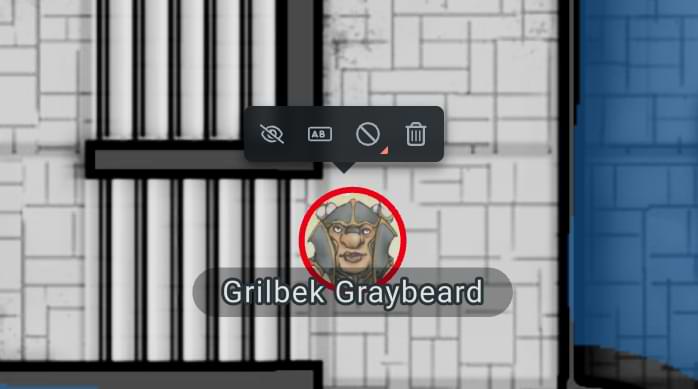
You can rename tokens by selecting the rename icon from the token toolbar. This will bring up a text input field.

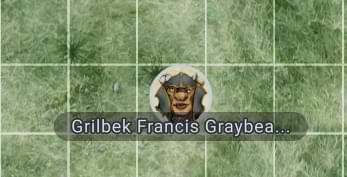
You can enter names up to 128 character long, but any name longer than 24 characters will be shortened on the map.
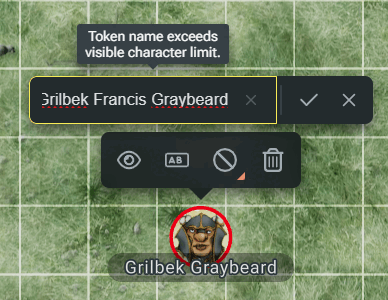
You can remove a custom name from a token by clicking the revert icon.

Renaming tokens can be great for giving your boss a custom name.
Or making those minions easier to tell apart.
Border Color Options
The Border Color feature allows a DM or player to place a colored ring around a token, enabling easier identification of that token. You can use this border color to differentiate between different tokens of the same monster type, conditions, or who controls a given token. To access the color picker for the Border Color feature, click the icon of a circle with a line through it, which indicates that no color has been applied.
This will bring up the color palette of border colors. Selecting any one of them will apply that color to the token.

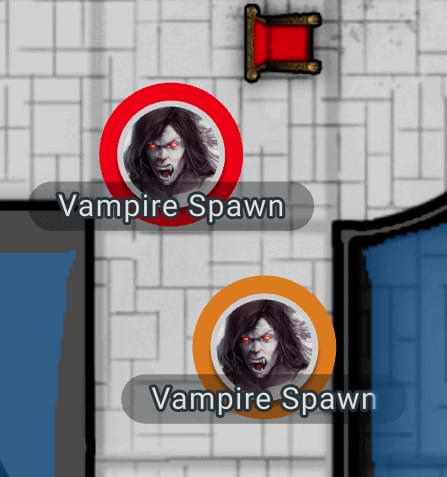
To remove a border color, open the picker again and click the circle with a line icon from the top left.
Delete Button
The Delete button adds a new way to remove tokens in addition to the “Delete” and “Backspace” keyboard shortcuts.
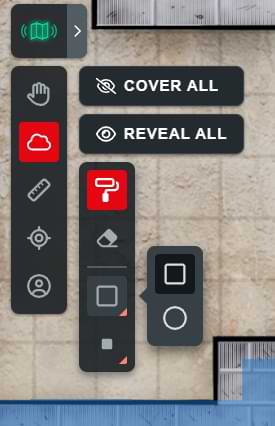
Fog of War
As a DM, you may want to limit how much of the map the players can see at any given time. This is where the Fog of War feature comes in. To open the menu for Fog of War, click the cloud icon, or press "F" on your keyboard. As long as this feature is selected, you’ll see six options: "Cover All," "Reveal All," a paint roller icon, an erase icon, your current brush shape, and current brush size.
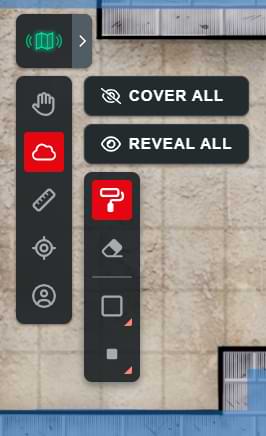
The first two options will cover the entire map in fog of war and clear the entire map, respectively. As long as an area is covered by fog of war, your players won’t be able to see that part of the map, but you will. The third icon lets you selectively paint fog of war on an area of the map, and the fourth icon lets you remove it.
Let’s apply some fog of war to the Cragmaw Hideout map we uploaded previously. As the players enter, they can only see the tunnel straight ahead of them. First, I use the “Cover All” button to fill in the whole map and save me some time. Then, I select the erase icon and reveal what I think the character should be able to initially see.
When the players move so they can see another room, I can use the eraser to reveal more areas of the map for my players to see, or the paint roller to obscure more areas should they lose line of sight.
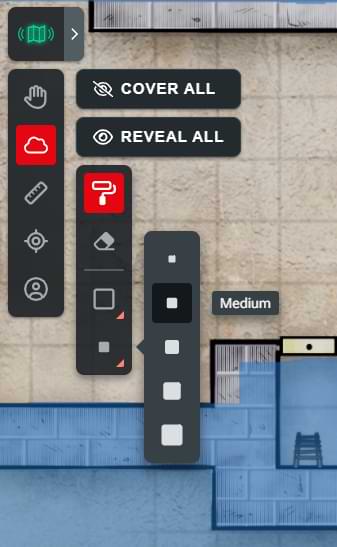
The last two options allow you to adjust the shape and size of the Fog of War brush to suit the area you want to conceal or reveal.
The shape feature allows you to select between a circular and square brush; the circular brush is great for fine detail while the square brush is perfect for grid-based maps.
The final option controls the size from tiny to gargantuan. These sizes conveniently correspond to size categories as described in the rules. So for example, if you want to reveal the length of a 5-foot corridor, the medium size option will be perfect.
Using Fog of War on Mobile
When using the Fog of War feature on mobile, you can’t move the map around while you have the paint or erase features selected, so you’ll need to switch back to the Pan feature in order to zoom or pan the map. However, with the paint or erase feature active, you can simply draw with your finger where you want to add or remove fog of war.
Ruler, Point, and Ping
Ruler Feature
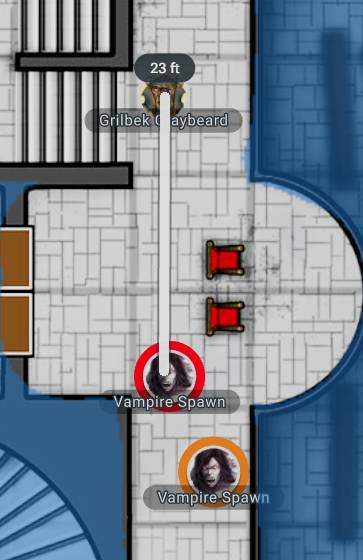
If you or your players want to measure the distance between two spaces on the map, you can do so with the Ruler. Either click the ruler icon in the toolbar or press “R” on your keyboard, and you’ll be able to measure distances on the map.
To measure, click and drag from your starting point to the point you’d like to measure to, and the straight line length will be displayed in feet. This distance is automatically scaled based on the map. The ruler is only visible to the person using it, so don’t worry, it won’t give things away when you’re measuring to see if that red dragon's Breath Weapon will reach your paladin!
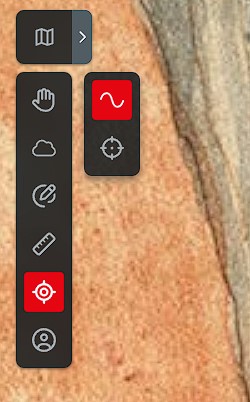
In addition to being able to measure distances in the VTT, players and DMs can also draw attention to things using the Point and Ping features. When you select the "Point & Ping" icon from the menu or click "X," you will be able to select between the Point feature and the Ping feature.
Point Feature
When selected, your cursor will change to a white dot with a red outline.
 With this selected, the DM or any player can draw on the map to create a trailing highlight visible to everyone else. This highlight is also visible over areas hidden by fog of war, which is useful if a DM wants to draw the player's eye to something mysterious happening beyond their view.

Need to warn your party where you're about to drop a Fireball or point out a trap? The Ping feature drops a highly visible ping on the map for other players to see:

Draw
The draw feature allows Dungeon Masters to mark the map using a variety of colors and brush sizes, as well as erase some or all of those same marks. This is a very useful feature for marking points of interest, special details, or game effects.
You can find the draw feature in the toolbar, the third icon down of a pen with a circular line around it.
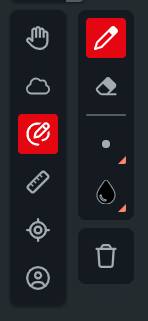
The draw feature has five options from top to bottom:
- Draw: This sets your brush to draw in the selected color and brush size.
- Erase: With this mode selected, the feature will erase any markings at the selected brush size.
- Size: You can select from five different brush sizes ranging from tiny to gargantuan.
- Color: From this menu, you can select from twelve different line colors.
- Clear All: This removes all marks from your current map.
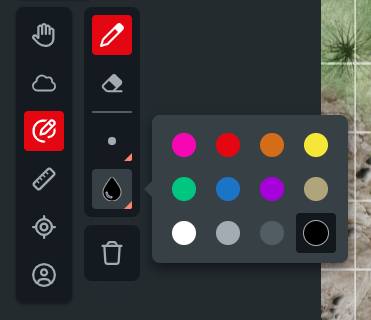
Only Dungeon Masters can use the draw feature, but all players can see marks made using it. Drawings made will persist on a map even after you switch away from the map or they are hidden by fog of war.
Overlays
On the main toolbar, you’ll see an icon with three shapes. This is the overlay tool. By either selecting the icon or pressing "O" on your keyboard, you can open the Overlay menu.
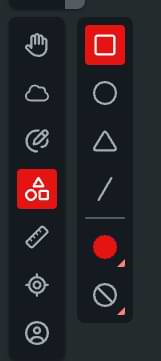
From top to bottom the options are:
- Square/Cube
- Circle/Sphere/Cylinder
- Cone
- Line
- Color
- Pattern
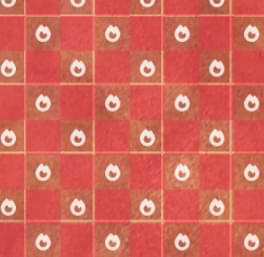
The first four options let you select what shape you’ll be placing and the fifth lets you select what color it’ll be drawn as. The sixth option allows you to apply a pattern so you can tell your Darkness from your Fireball. There are fifteen patterns in total.

Overlay Patterns (Alphabetical Order)
| Bludgeoning | Healing | Poison/Acid |
| Cold | Lightning/Thunder | Psychic |
| Darkness | Nature | Radiant |
| Fire | Necrotic | Slashing |
| Force | Piercing | Water |
Selecting any pattern will apply it in a checkerboard effect across the overlay.
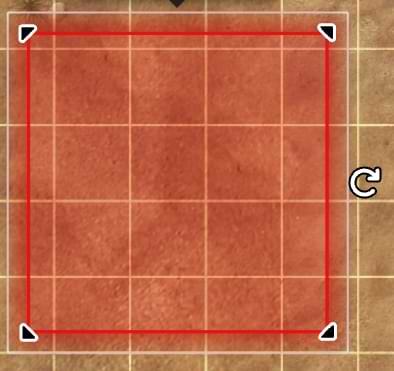
Drawing an Overlay
To draw an overlay, select a shape, click/tap and hold on the map, and then drag. How the shape is drawn will depend on the shape. As you draw your shape, you’ll see a ruler displayed informing you of the size of your overlay in feet:
- Squares and circles are drawn diagonally from top left to bottom right. Squares are measured from side to side and circles from center to edge.
- Cones are drawn from the origin at the point to the base. Cones are measured from origin to base.
- Lines are drawn from one end to the other and measured the same way. Lines are always drawn 5 feet wide.
Once you’ve drawn your shape, you can adjust it in several ways. Selecting it and dragging allows you to move it around the map, while dragging the rotate icon will allow you to change its orientation. Dragging any of the triangle handles allows you to adjust its shape, bringing up the ruler and displaying the overlay's origin point as you do so. Squares and circles are resized from their center, while lines and cones are resized from their origins.
When you select an overlay, you’ll also get a menu that gives you further options.
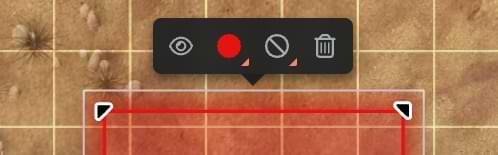
The first option allows you to toggle the visibility of an overlay, which is useful if you have a trap or other hazard that you don’t want to reveal to your players until they trigger it. The second and third options allow you to change the color and pattern of the overlay in the same way you can from the menu bar. The final option allows you to delete an overlay from the map.
Select and Group
Map elements like tokens and overlays can now be locked or grouped together. You can access these features by selecting a map element or group of map elements and choosing from the following via the icons on the element’s toolbar or hotkeys:
- Lock map elements (Shift + L): Want to keep a Beholder's Antimagic Cone on the map for your players to reference? You can lock the map element with this shortcut. DMs can toggle whether players can lock map elements in the Settings menu.
- Group map elements (Shift + G): You can group monsters together to move and interact with them as a unit, for example. To add additional elements to the group, select both the group and the new element and hit Shift + G or select Add to Group. DMs can toggle whether players can group map elements in the Settings menu.
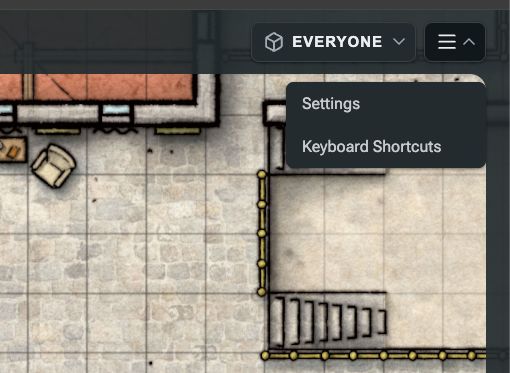
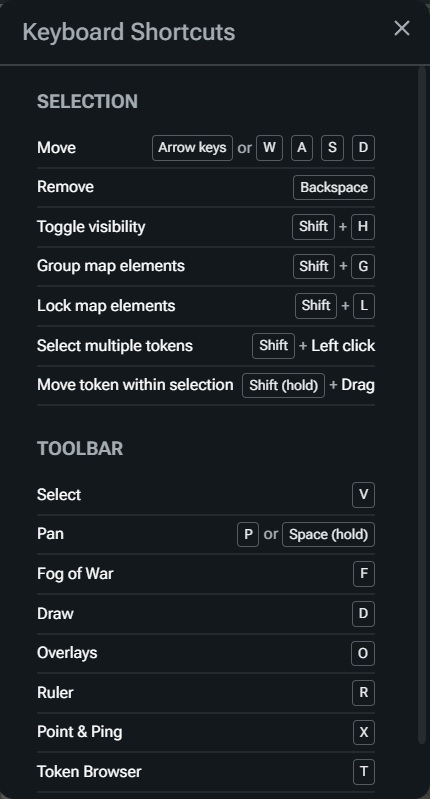
View Keyboard Shortcuts
From either the hamburger menu in the top right or the game information menu in the bottom right, selecting Keyboard Shortcuts will open a menu displaying all the available keyboard shortcuts in Maps.
Session Controls
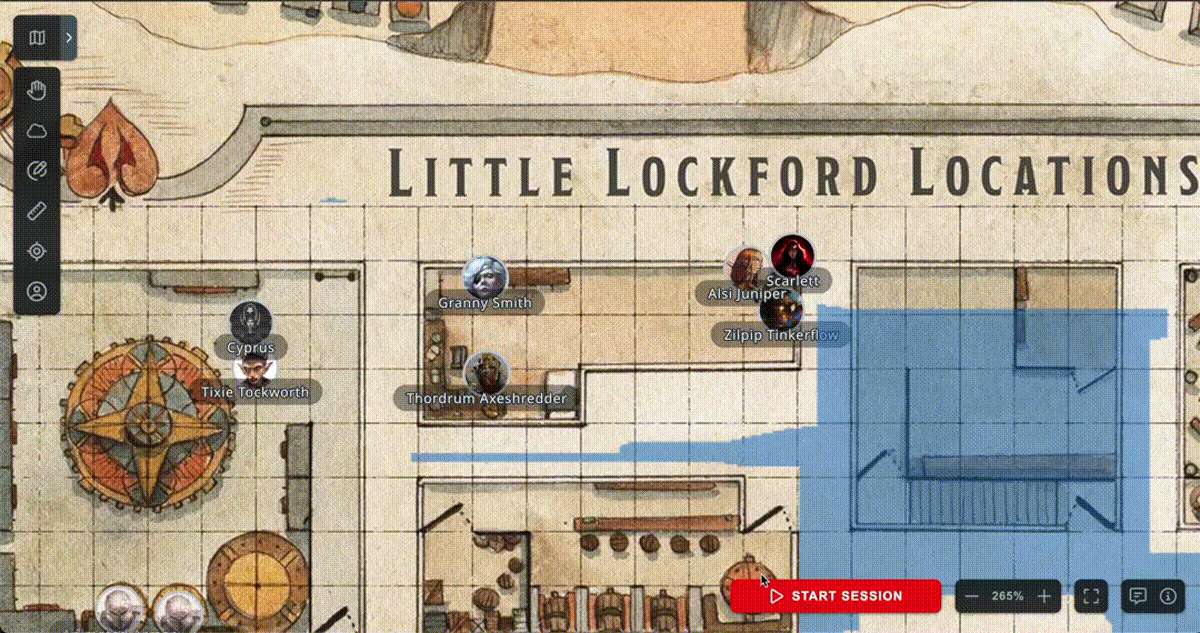
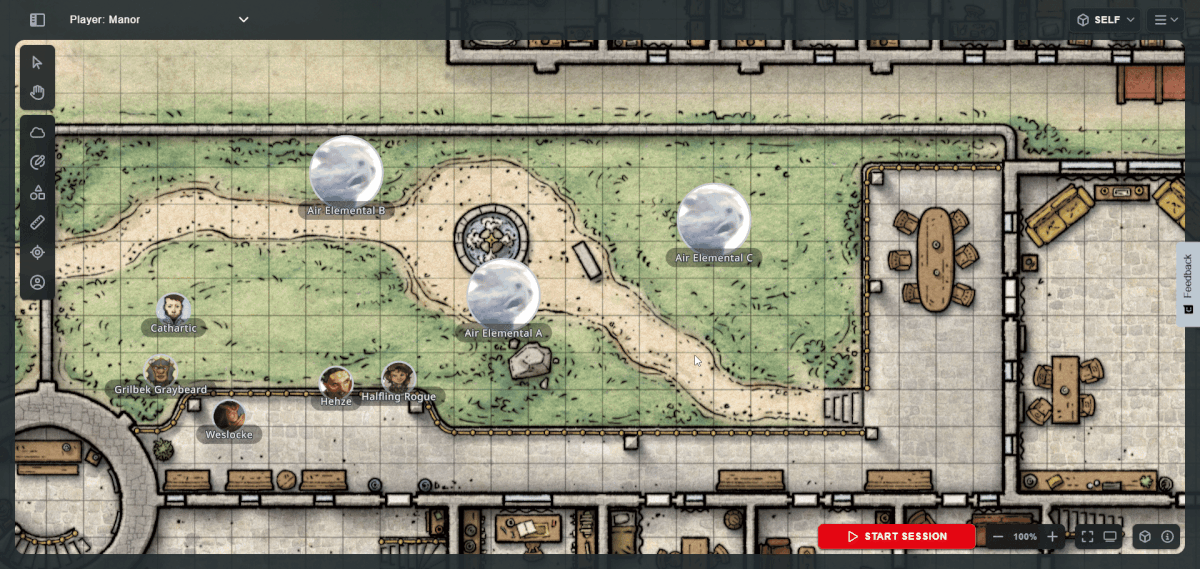
In the bottom right of the screen, you’ll see a large red "Start Session" button.
 Until you click this button, your players won’t see any maps and instead will be shown the message, "Please wait for your DM to start the game session."
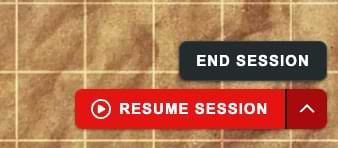
Once you click that button, your players will be able to see the currently active map, and the button will change to a pause icon along with a submenu.

From here you can either Pause the session, or end it. Both options will hide the currently active map but will display a different message to your players:
- Pause. "Your DM has paused the game session."
- End Session. "Your DM has ended the game session."
You can resume a paused session using the resume session button, or end the game whilst paused by using the sub-menu.
 Using these options, you can prevent your players from seeing maps until you’re ready, which is especially useful when switching between maps.
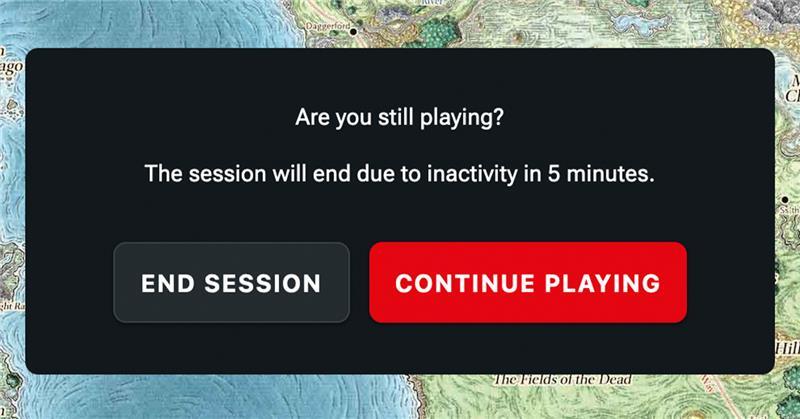
If you're inactive on your map for a while but want to keep your session running, Maps now features an inactivity popup. This lets you stop Maps from automatically ending your session, which is especially useful if you have the map open on another screen but aren't actively using it.
Inviting Players to View the Map
You’ve got a map, you’ve got tokens, and maybe you’ve even got some fog of war. But you haven’t got the most important part of any D&D game yet, your players! In the bottom right of the map screen, you’ll see two icons, a speech bubble and an “i” in a circle.
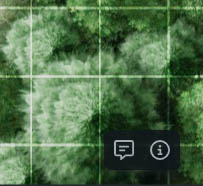
Click the “i” icon, and you’ll see the “Invite Link” and “Map Link” options. Invite Link copies the campaign invite URL if you want to quickly add new players to your campaign. However, the player we’re adding to the map is already in the campaign, so we’ll click the Map Link button. This will copy the URL for this map to your clipboard so you can share it with your players.
If a player follows this URL, they’ll be brought to this campaign's map within the VTT, where they’ll see the selected map and any tokens, and will also be able to control any tokens associated with their character sheet, including companions.
Connected Players Menu
If you select the “i” in the bottom right, you’ll be shown the Connected Players menu. This lists each player that currently has Maps launched from your campaign and what character they’ve connected with.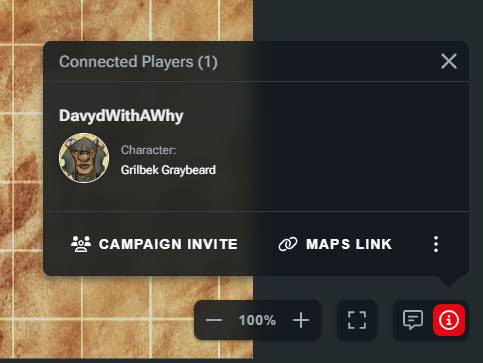
Additionally, if you click a character’s name, you’ll be taken to their character sheet.
This view is accessible by DMs and players, allowing everyone to quickly see who’s connected to the Maps session.
Game Settings
Selecting the Game Info option in the bottom right will open the game information menu, where you’ll find the Settings option.
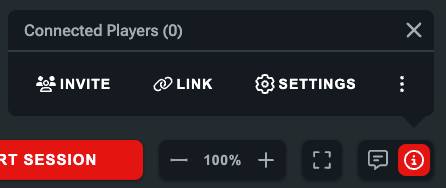
Clicking this will open the Settings menu which allows the Dungeon Master to toggle the following features on or off for players.
- Access and interact with monster tokens
- Draw on the map
- Use the pointer
- Ping the map
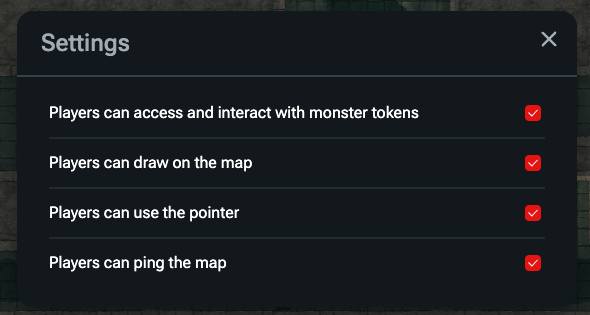
These options grant DMs a little more control over how players use the map, which can be useful when you have slightly more rambunctious or mischievous players.
Spectator View
Spectator view allows the Dungeon Master to open a new window that displays the map as the players will see it, including fog of war, pings, and drawings. This is very useful if you use maps on a projector or digital tabletop setup.
To access the spectator view, click the “i” in the bottom right, then select the three vertical dots in the bottom right. From this submenu, you’ll see a "Spectator View” option.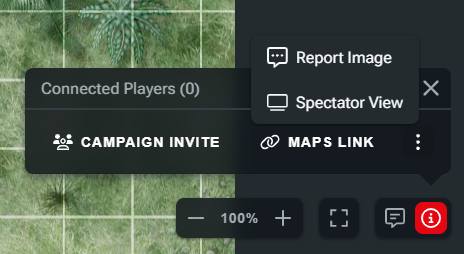
Selecting this option will open a new browser tab on the same map page. In spectator view, your view will be slightly different as there'll be no map browser or fog of war tool. However, you can still access the token and draw tools. 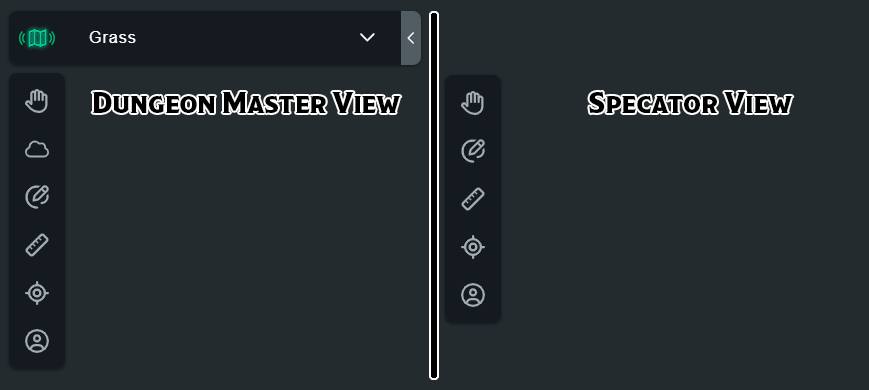
Spectator view behaves a lot like the player view. When you change maps, the spectator view will be moved to that map, and any hidden tokens or terrain behind the fog of war will be hidden in spectator view.
You can drag the spectator view to another screen and use it to display your maps in person without giving away details you don't want your players to see.
Game Log
By selecting the speech bubble icon in the bottom right, you can open the Game Log for your currently selected campaign. Here, rolls made from the following locations can be seen all in one place:
- Character sheets via browser
- Character sheets via the D&D Beyond app
- Discord via Avrae
- Encounter builder
- Combat tracker
If you select a roll, it’ll expand, giving you more information about the roll.
You can close the Game Log at any time by clicking the "X" in the top right corner or the speech bubble in the bottom right corner of the screen.

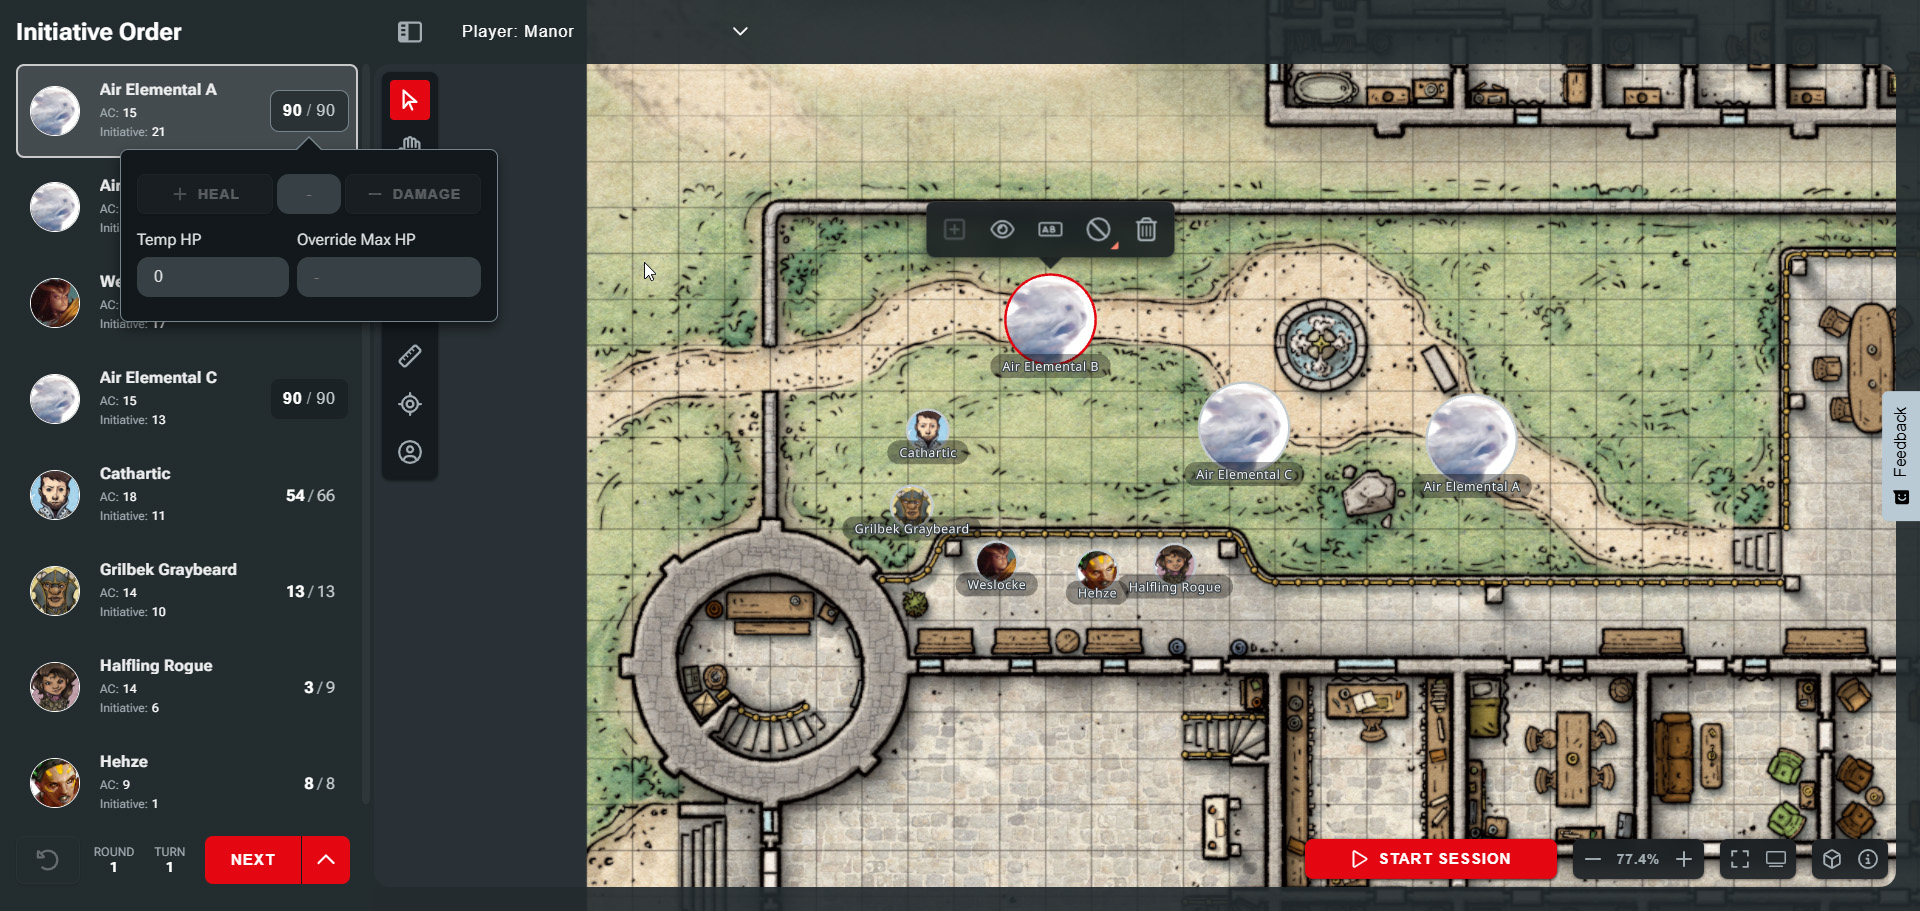
Combat Encounters on Maps
You can build and run combat encounters within Maps. Combat encounters can be populated automatically based on the tokens present on the map, and once populated, it can be used to track Initiative.
To access the Combat Encounters menu, select the icon to the left of the Map Browser dropdown. This will open the Combat Encounter menu as a sidebar on the left side of your screen.
![]()
This menu will initially be empty, and the “Add All Tokens” button will be grayed out if there are no tokens on the map. To enable the button, place some tokens on your map.
Once you have placed your tokens, you can select “Add All Tokens,” and the encounter will be populated.
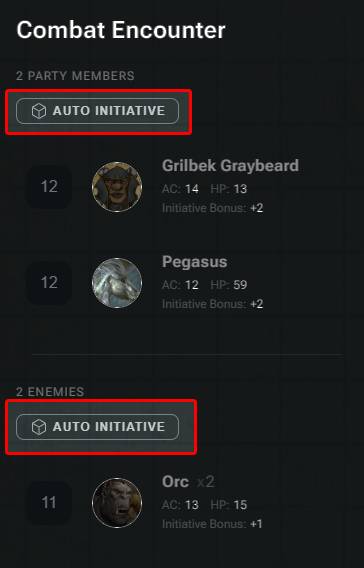
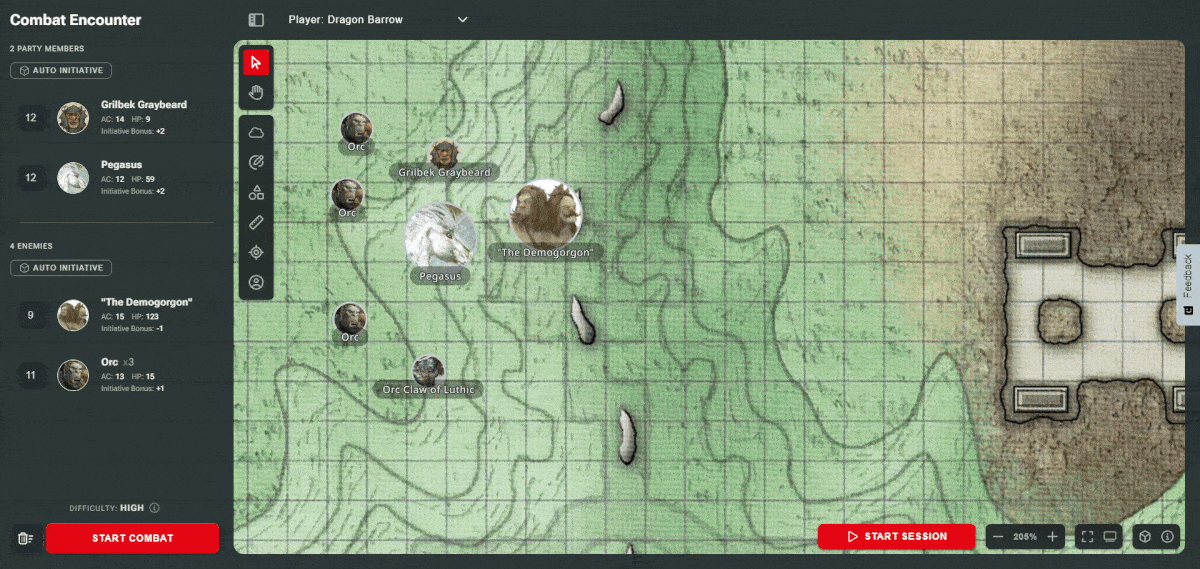
You’ll see a list of all creature tokens on the map split into two groups by default: party members–including companions–at the top and enemies at the bottom. A third group for nonplayer characters will be displayed when a creature is allocated to that role.
When a token is added to the encounter, its Initiative will automatically use the creature's Initiative score (10 + their Dexterity score.) However, you can click “Auto Initiative” for either party members or enemies to roll for Initiative. Alternatively, you can type in Initiative values manually.
Players Rolling for Initiative
Players can roll Initiative from their character sheets before combat begins. Results will appear both in the Combat Encounter sidebar and Game Log.
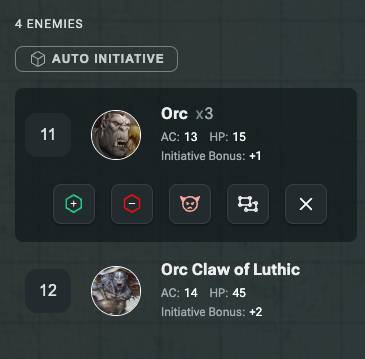
Selecting a creature in the Combat Encounter menu will give you a menu of options:
- Advantage. Applies a +5 to the Initiative score or Advantage on Initiative rolls.
- Disadvantage. Applies a -5 to the Initiative score or Disadvantage on Initiative rolls.
- Change Side. Gives three options to set the creature's role in the encounter: Make Party Member, Make Nonplayer Character, and Make Enemy.
- Ungroup. This option is only available for creatures with multiple tokens. It splits them out on the Combat Encounter menu so they can be managed individually.
- Remove from Encounter. Removes the creature from the Combat Encounter menu but doesn’t remove their token from the map.
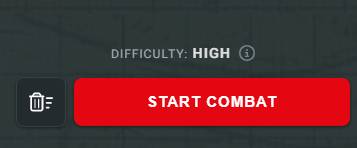
At the bottom of the Combat Encounter menu, you’ll see a difficulty rating from Low to High. This is based on the encounter difficulty rating rules in the 2024 Dungeon Master's Guide and will adjust as you add and remove tokens from the encounter.

If you want to add more tokens to the map after you’ve clicked “Add All Tokens” and have them appear in the encounter, click on a token and click the [+] icon in the context menu. This will add the monster to the encounter.
This option can be used with the Select feature to allow you to add multiple tokens at once.
Once you’re happy with your encounter, you can click “Start Combat” to begin tracking Initiative. Alternatively, if you wish to start over, you can click the trashcan icon to delete the encounter.
This will only clear the encounter and won’t remove tokens from the map.
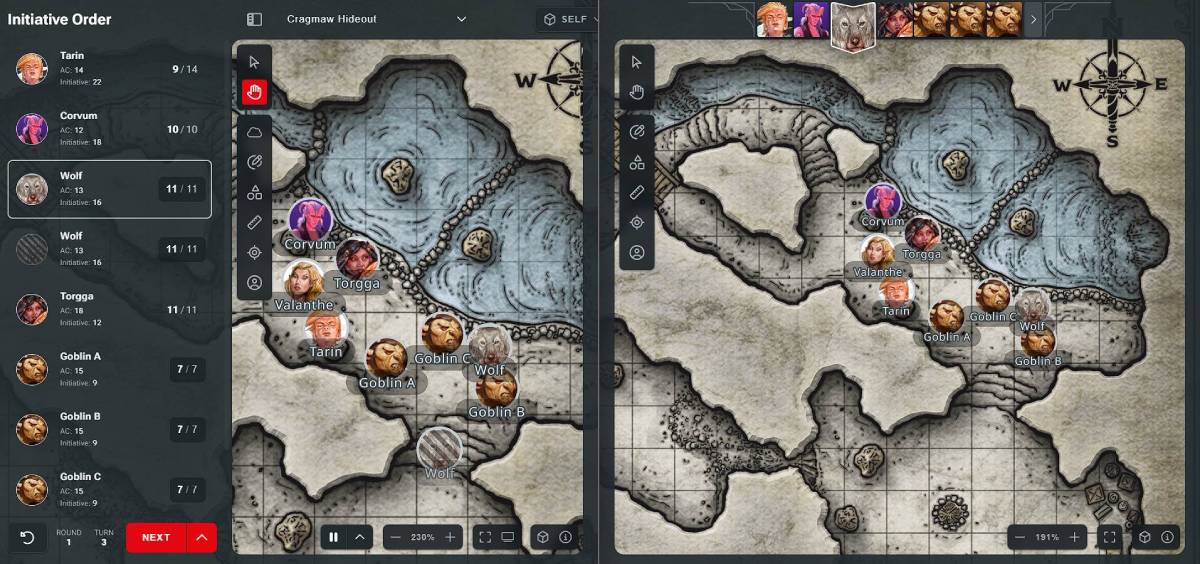
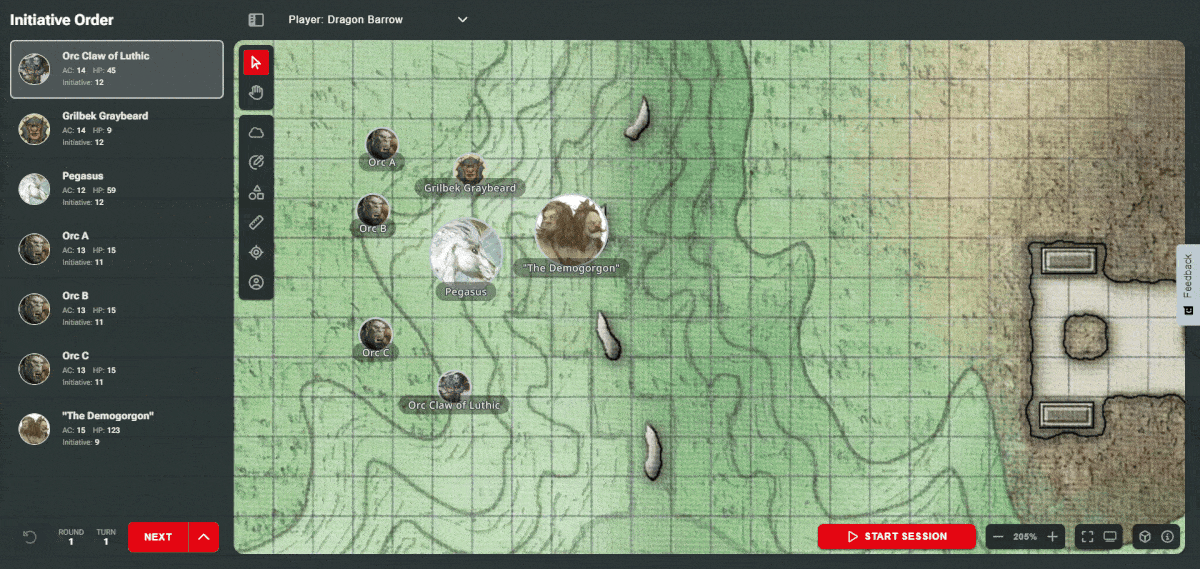
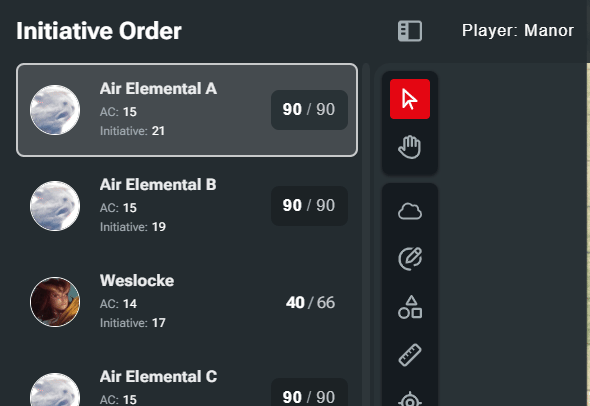
Clicking “Start Combat” will take you to the Initiative Order menu. All tokens will be sorted by Initiative Order, and any duplicate monsters will be given a suffix to their name from A to Z, both in the Initiative Order and on the map.

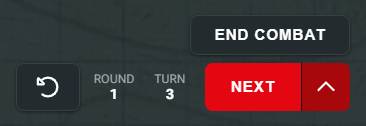
You can advance through the turn order with the “Next” button, next to which you’ll see the current round and turn counts. If you wish to backtrack the turns, there is also an "undo" button to the left.
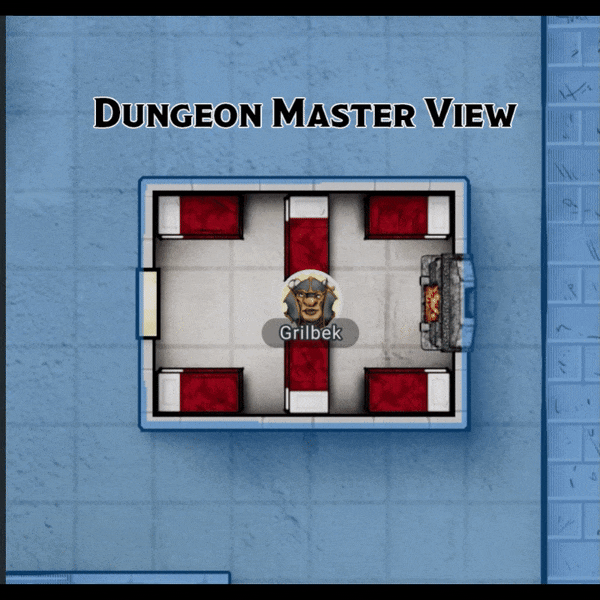
The Initiative Order will be displayed to your players as image flags along the top of the screen. Players can hover their cursor over monsters in the Initiative Order to see its name. If a token is currently hidden, it won't be visible from the player-facing Initiative order, and its hidden status will be indicated on the Dungeon Master view.
Advancing the Initiative to a hidden creature will leave the player-facing Initiative Order on the monster immediately prior, to not reveal the hidden creature. Additionally, hidden monsters will not be considered for renaming multiples of the same monster. This means if you have two of the same creature, but one of them is hidden, the other will not be renamed “monster B” until the second is revealed.

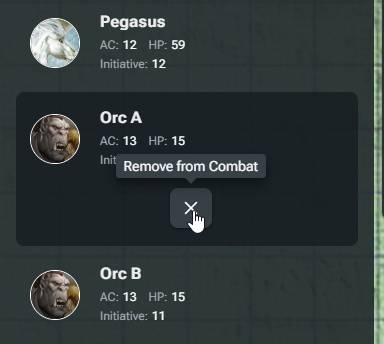
When a creature is defeated in combat, and you wish to remove it from the encounter, there are two ways you can do this. Clicking on the creature in the Initiative Order will give you a “Remove From Combat” button. This will not remove the token from the map, so it is useful if you want to mark where a downed enemy is, for example.
Alternatively, you can delete the token from the map. This will remove the token from both the map and the Initiative Order.
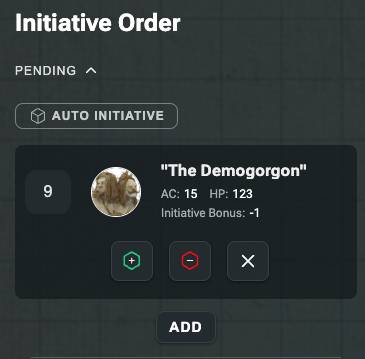
If you want to add a creature mid-combat, you can do so by adding an appropriate token to the map, selecting that token, and then selecting the [+] button to add it to the Initiative. You can also use the Select feature to add multiple tokens this way. This will place the creature or creatures in a Pending section of the Initiative Order, where you can roll for its Initiative. Then, once you’re happy, click “Add.”
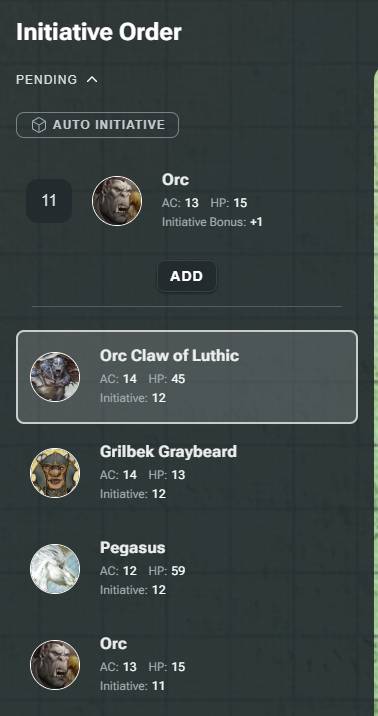
Selecting a pending creature will give you the option to toggle Advantage or Disadvantage on their Initiative or remove the creature.
If there is already a token of this creature on the map, the existing creature will have “A” appended to its name in the Initiative Order, and on its token. The new Creature will have “B” appended to its name to help you differentiate. If there are already multiple tokens of the same sort on the map, the next appropriate letter will be added.
Once combat is over, you can click the up chevron next to the Next button to access the "End Combat" button.

Clicking this will clear the Initiative Order and remove any letter suffixes added to duplicate monsters.

If a player changes their character's Hit Points from their character sheet, their Hit Points in the Combat Encounter menu will automatically update.
Tracking Monster Hit Points
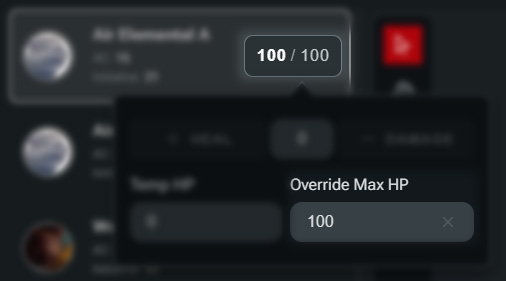
To modify a monster's Hit Points, click the button that displays their current Hit Points.
If you want to use a Hit Point maximum other than the creature's average, the Override Max HP option allows you to apply a custom Max HP amount. Enter the amount you wish to use in the text input box.
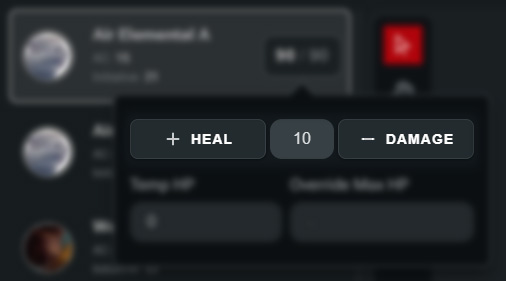
To adjust a monster’s Hit Points, from the Hit Point context menu, enter the amount you want to adjust their Hit Points by and click either "+ Heal" or "- Damage."
Temporary Hit Points can be added using the Temp HP input option.
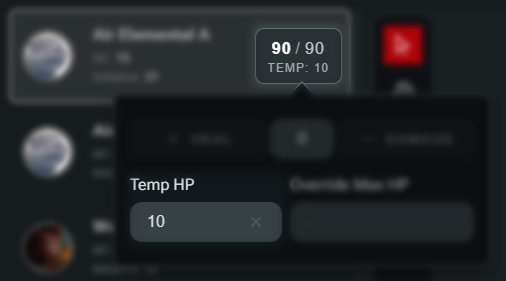
If damage is applied to a creature with Temporary Hit Points, that damage will be deducted from the Temporary Hit Points first. However, healing will only be applied to Hit Points. Entering a new value for Temp HP will replace any previous values.
Additionally you can access monster Hit Points and Temporary Hit Points directly from a monster's token. Selecting a token will display the context menu where its current HP will be displayed.
Clicking their HP will open a flyout menu where you can apply healing and damage, as well as apply Temporary HP and override their maximum HP.

Viewing Monster Stat Blocks
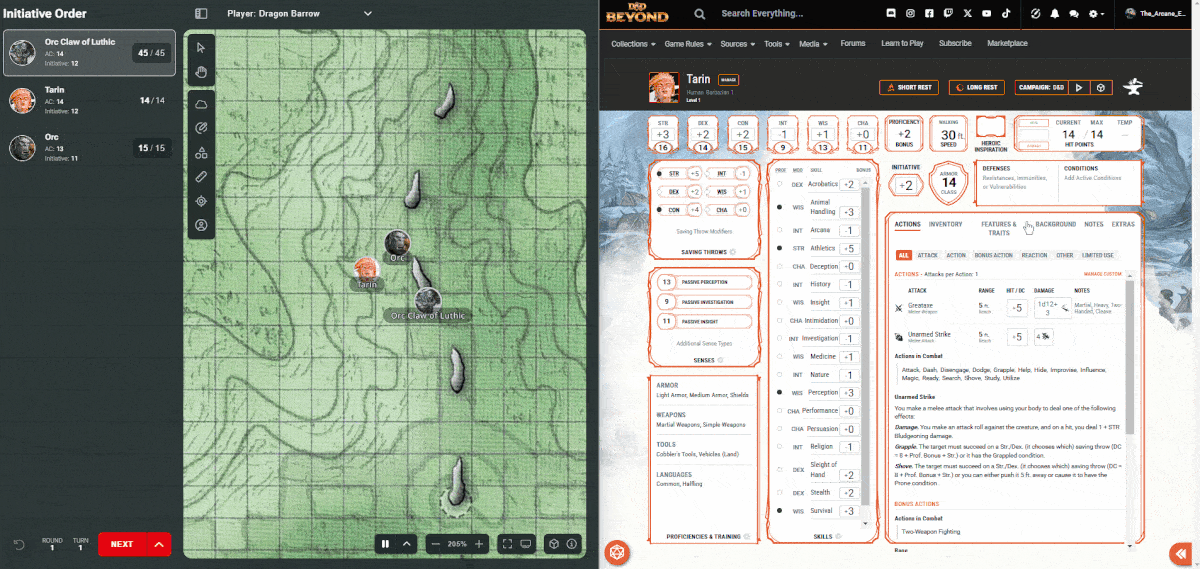
If you click a monster in the Initiative Order, next to the remove button, you’ll see an option to view the stat block within Maps. Additionally, there is an option to view the stat block in a new tab.
Rolling for Monsters
When you initially select a monster in the Initiative Order, you can roll any ability checks or saving throws, which is useful for making quick rolls. Clicking through to the full stat block, you can roll any of their attacks, damage, recharge rolls, or any other dice expressions they may have in their stat block.

A monster's stat block can also be accessed directly from its token context menu. Click any monster token and then click the scroll button. This will open the monster's stat block in the sidebar.
Safety and Feedback Features
The last feature is by no means the least important, and that’s the reporting and feedback features. These can be accessed by clicking the “i” icon, and then selecting the three vertical dots. From there, you’ll see two options; “Report Image” and “User Feedback”.
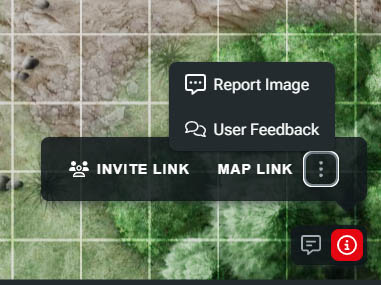
User Feedback takes you to the feedback portal for Maps Beta, but Report Image is an important tool for ensuring your safety. If at any point you encounter inappropriate images in the VTT, either as a map itself or a token, you can use this option to access our support portal. From here, you can report the issue and help make sure that D&D is a safe and welcoming space for everyone.
Drop in a Map and Start Playing!
So there you have it, the Beta version of D&D Beyond Maps! While these are all the key elements you need to get started running combat using battle maps, there’s still more to come for this new D&D VTT. Some exciting features you can look forward to in the future can be found in the “Our Roadmap” section of the Maps homepage! As a reminder, you can also see major updates to Maps in the D&D Beyond Changelog.
This article was updated September 2025.
Davyd is a moderator for D&D Beyond. A Dungeon Master of over fifteen years, he enjoys Marvel movies, writing, and of course running D&D for his friends and family, including his daughter Willow (well, one day). The three of them live with their two cats Asker and Khatleesi in south of England.