


This installment of New Player’s Guide is a little bit more casual than usual. That’s because I’m talking about a specific element of my home D&D campaign that I think will improve yours, rather than sharing broad wisdom that I’ve learned over the years. Let’s talk about handouts!
First, Some Backstory
 A few weeks ago, some of my players delved into the Underdark-like caverns beneath the Isle of the Dawn, the island fortress-city that my current campaign is based out of. This campaign draws heavily from the lessons on running urban adventures I learned writing and playing Waterdeep: Dragon Heist, but there’s one lesson that I’ve learned more recently. It seems self-evident, but I missed it completely while running Waterdeep: give the characters ample opportunity to leave the city on short excursions. This adventure could take them into the dangerous caverns below the paved streets, or it could involve them getting on a boat and sailing to the mainland for some more typical fantasy adventures before returning to their home base.
(What about handouts? We’re getting to it—this set-up is important.)
One challenging aspect of running an urban adventure is handling information. It’s easy enough for folklore and oral legend to be the only information available to adventurers while they’re investigating ancient tombs out in the wilderness. But when your adventure hooks tend to start in the big city—especially in a city like mine, where the characters have easy access to a well-maintained monastic library—the DM has to be ready to prepare information ahead of time.
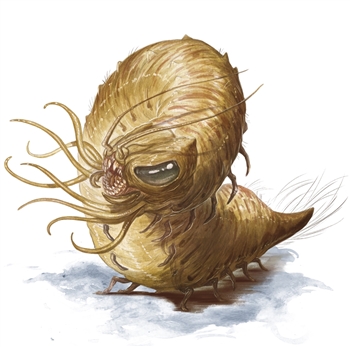
Obviously, you can always do what DMs do best: improvise lore as necessary and fly by the seat of your pants. But if you want to wow your players with your masterful presentation and attention to detail, one easy way to do so is to create handouts. These handouts are invaluable tools for the DM who has planned out an adventure for the players and really wants them to commit to that adventure. For example, in my campaign, the heroes delved into the caverns beneath the isle because they needed silk produced by carrion crawlers in order to craft a garment of the finest pride silk—a material stolen and adapted from Explorer’s Guide to Wildemount.
Once they learned about the silk, they decided that they didn’t want to go into this situation without doing proper recon. (If your players aren’t interested in doing recon, there’s not much you can do about it. However, if they don’t know that researching dungeons and caverns and creatures is an option, suggest it to them! You could be subtle and have a friendly NPC tell them in-character, but you don’t have to be. Just telling your friends “hey don’t forget you can do research” is a perfectly valid approach.)
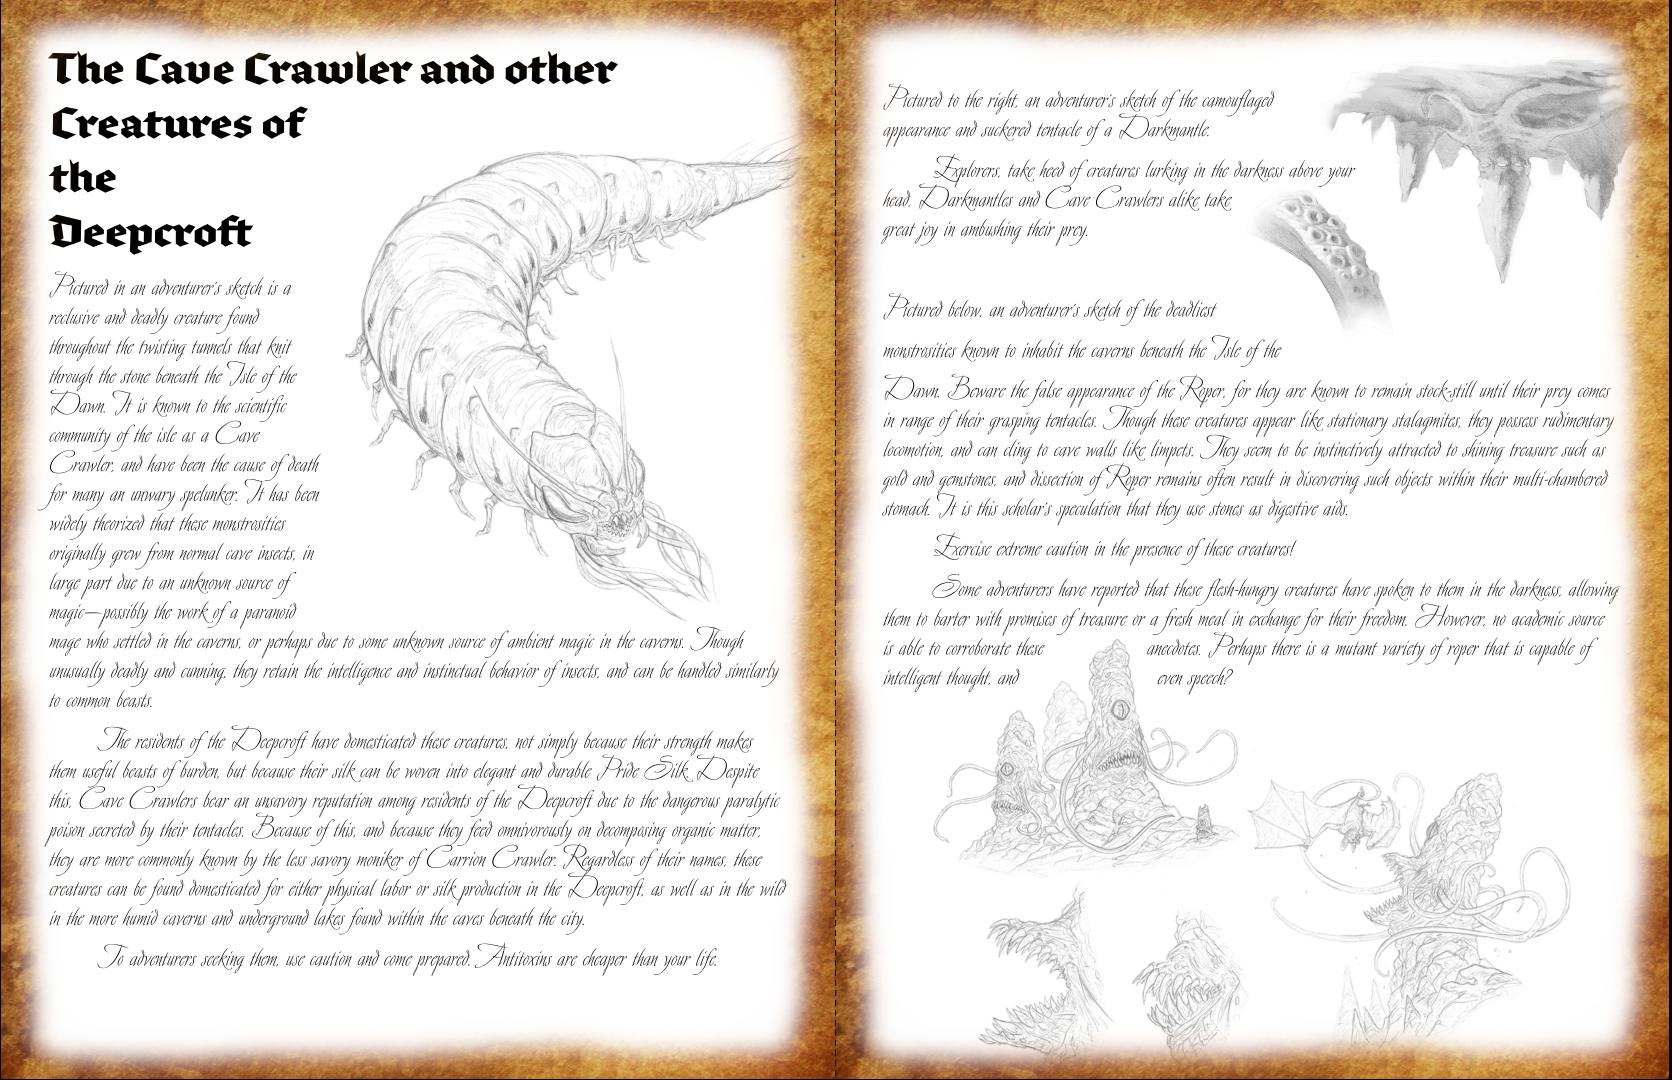
They didn’t know jack about carrion crawlers or their habitat, so they went to the monastery’s library and did some research. That’s when I unveiled the handout: a two-page document I’d written in the voice of a scholar of the isle, detailing not just the whys and wherefores of carrion crawlers, but also other creatures that are known to share their habitat. Here’s that handout (if blurry, click to zoom in):
What I Like About this Handout
This handout was effective for me and my group. I won’t call it universally applicable, but there are things about it that served me well, and that I think will serve you well, too.
In-World Knowledge. Lore dumps aren’t usually very fun. The DM monologuing to the players tends to bore them. But turning that monologue into fallible, opinionated, in-world information gives that lore character. Even if, like on this handout, no character is named, it’s clearly written in the voice of a scholar writing an essay on natural philosophy.
The use of line-art sketches on this document (created by the masterful Brynn Metheney for the Monster Manual) also add to this in-world atmosphere. Full-color art from D&D books are gorgeous, but they have a polished tone that doesn’t quite fit an in-universe document. Use of fonts that mimic handwritten cursive or calligraphy enhances this tone.
Mechanical Knowledge. This handout rewards players that read it carefully. It talks about more than just lore: it gives tips that will help them survive combat encounters. It notes that carrion crawlers like to lair on cavern ceilings and drop upon their prey. It recommends stocking up on antitoxins to avoid their paralytic poison. Some lore can even be used as tactical knowledge; if I describe a room as “smelling of rot and decay,” they might wisely deduce to look up at the ceiling, suspecting that a carrion crawler is nearby.
Roleplaying Information. Even though the ropers mentioned in this document didn’t show up in the adventure they went on, their inclusion provided a sense of suspense and tension. Had a roper appeared, this information would have given them a nonviolent solution to a deadly problem: a roper attack against 3rd-level characters: a rumor that some flesh-hungry ropers are capable of sapient thought and might be swayed to release adventurers if they promise to pay them tribute in the form of treasure or a replacement meal.
How to Make a Great Handout
Your ideal handout is probably rather different from mine. You’ll include different varieties of information, and your handout will serve different purposes. Your handout might depict a tile mural rather than sketches and handwriting on parchment. Nevertheless, these simple graphic design tips will help you create handouts that will help you take your DMing skills to the next level.
Find Good Fonts. This whole handout business is an exercise in aesthetics, so you might as well go hard on the aesthetics of your font. Fonts are expensive as hell, but there are a number of fonts available for free as long as you don’t use them in a commercial project. Google Fonts is a good place to start looking for fonts, but there are dozens of websites out there. Since I subscribe to the Adobe Creative Cloud for work, I make heavy use of Adobe Fonts—but that is decidedly not a cheap resource, unless you’re already a CC user for programs like Photoshop or InDesign.
- BrokenscriptOT Bold is the name of the font I used for the header in my handout
- Avalon Regular is the name of the font I used in the body of my handout
Start with Word. If your handout will include text, like mine did, then there’s no better starting point than Microsoft Word—or an equally powerful word processor. Google Docs is okay, but you can’t use custom fonts like you can on app-based word processors. It also easily allows you to wrap text around images. To do this:
- Select the image
- Go to “Picture Tools: Format” on the top ribbon
- Click “Position” and choose any alignment. Now you can move the picture wherever you want to move it!
- Click “Text Wrap.” I like the Tight positioning, but play around with things until you find a setting you like
Use the Art on D&D Beyond. If your handout calls for it, like mine did, there’s so much monster art available on D&D Beyond that you’ll never be able to use it all. The Monster Manual has a number of bits of sketchy concept art in it, like I used in this handout. They’re only for a select few monsters, though, so choose your monsters carefully. For instance, I chose carrion crawlers as the main monster of this quest specifically because D&D Beyond had sketchy art of one available.
Export as PDF. If you’re playing digitally, it’s vital that you save your document as a PDF and not a DOCX (or whatever your word processor’s file type is) because you’re probably using fancy, non-standard fonts that will break on your friends’ computers. If you’re playing in person and printing your handout, there’s no need to worry about that—but the final step will require you to save it as a PDF anyway!
Get a Textured Background. If you’re creating a handout that features words written on paper (or carved into stone, wood, etc.), then your handout will look much better if you apply a textured background! Usually, lighter backgrounds are better because standard black text appears more legibly on them, as you can see in the written handouts in Curse of Strahd. For paper handouts, let me recommend assets by Critical Role and Explorer’s Guide to Wildemount cartographer Deven Rue! Her “Digital Paper” assets are high-quality scans of real paper that she’s made herself. They’re available to her Patreon patrons.
Deven’s fantasy paper assets come highly recommended because of their impressive resolution. There’s no guarantee that assets you find on the internet will be the size you need, and stretching too-small assets will often make them look blurry or otherwise unpleasant. Other textures (like cloth, stone, wood, etc.) are harder to find, but I have faith that you can find them on the internet!
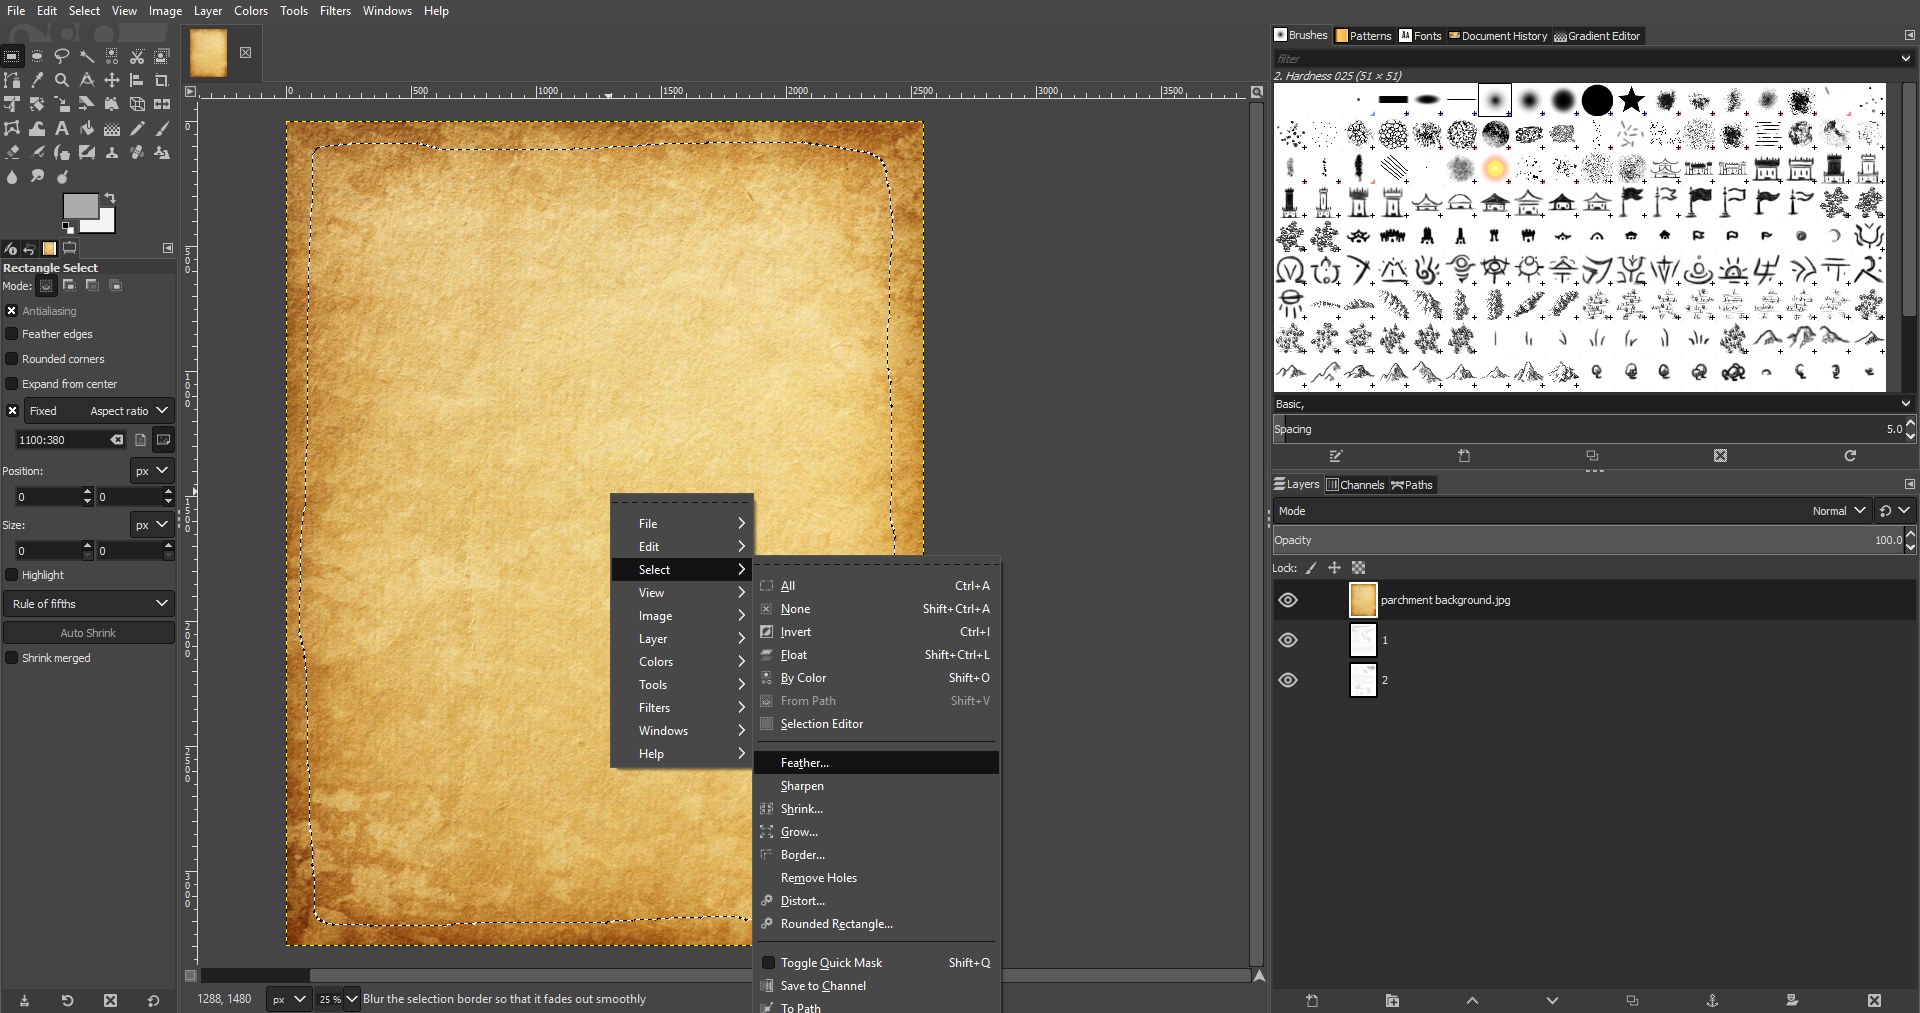
Assemble it in GIMP. This step may require you to download a program you’ve never used before, but it’s highly worth it. GIMP is a free image-manipulation software available for Windows, Mac OS X, and Linux. It’s not quite as powerful as Photoshop, but it will work fantastically for our purposes.
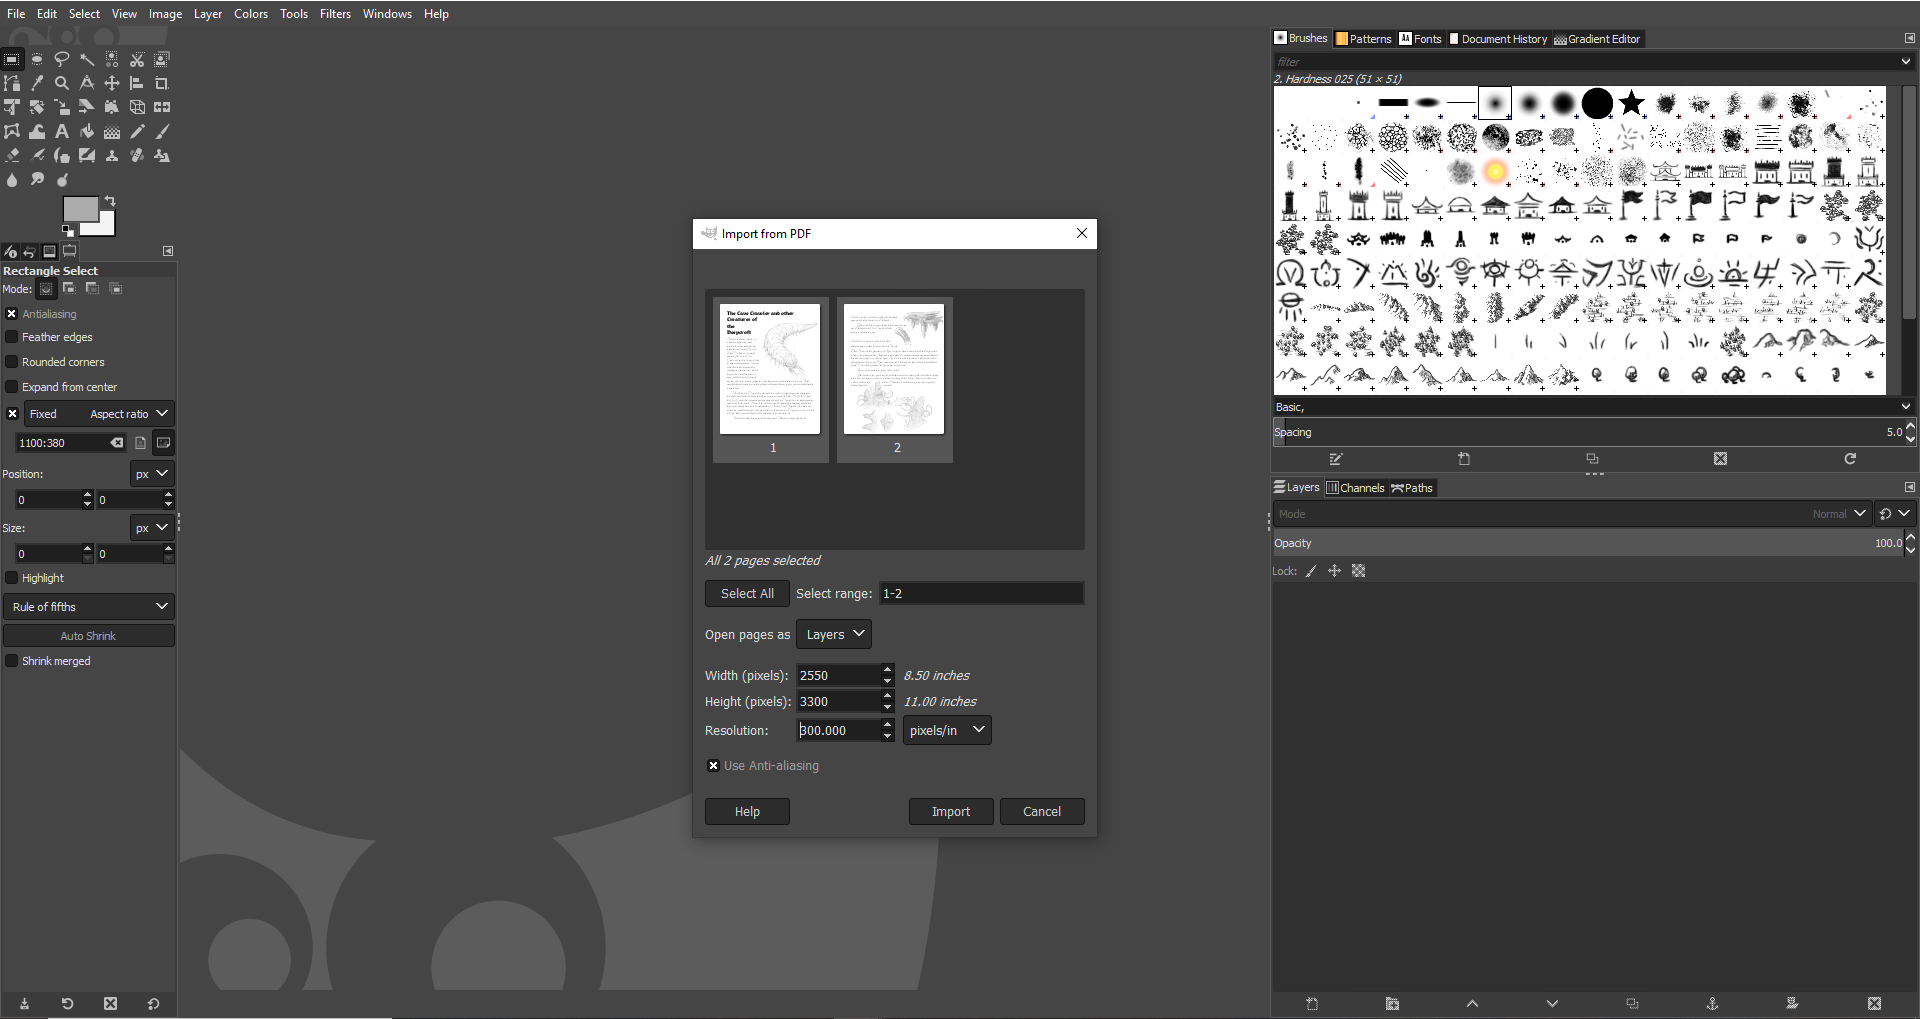
Once you’ve downloaded and installed GIMP, run the program without opening a new document. Now, drag the PDF you created earlier into the window. This will open up a window asking you how you'd like to import your PDF; all you need to do is make sure your page resolution is set to 300 pixels per inch and select Import. If you select a lower resolution, your original document will get blurry. This will turn your PDF into an image file that you can manipulate in GIMP. If your PDF has more than one page (mine has two, for instance), it will open each page as a separate layer. You can click the “eye” icon in the Layers pane to hide or show layers.
Now, drag whatever paper texture you found into the document. If it’s a horizontal image, you may want to rotate it one-quarter turn by right-clicking on the image, going to Layer, going to Transform, and going to Rotate 90 degrees Clockwise.
Now that you have a vertical page texture, right click on the image again. Then go to Layer and click on Scale Layer. Click on the “chain link” icon so that it looks like a broken chain link. This stops the picture from scaling proportionally. Now change the units to Inches and enter 8.5 in the width box and 11 in the height box. Click Scale and your paper texture will now be the exact size of your PDF pages.
Go to your paper texture in the Layers pane and right click on its layer. Select “Add Alpha Channel”. This will give that layer a transparent background. Now, click the “eye” button on that layer to turn it invisible so that you can see the text and images on your original document. Go to the toolbox on the left side of your screen and click on the Free Select Tool. Click on the image and draw a rough rectangle around your text and images, like you’re creating a border around your text. It doesn’t have to be perfect; in fact, a few imperfections will make it look more natural.
Once you’ve connected the beginning of your free-select line and the end of the line, click the Rectangle Select tool in the toolbox. This will select the region you’ve outlined. Now that you have an area selected, right click on the image, go to Select, and click Feather. Set your feathering to 100 (this is a value you can play around with to your personal taste). Now, click the “eye” button on your paper texture layer. Then right click on the image, go to Edit, and click on Clear (or hit the Delete key on your keyboard). This will erase the feathered selection, creating a parchment textured border that gently fades to white.
Now, right click on your freshly edited page texture in the Layers pane and select Duplicate. Arrange your layers so that one page texture is above page 1 of your document, another is above page 2, and so on for all the pages in your handout. Now right click on your topmost page texture and click Merge Down. This will combine your outline and your page. Do this for all of your textures. Now you’re ready to export your PDF.
Go to File and click on Export As. Make sure that your filename has “.PDF” at the end. When you click export, make sure the “Layers as Pages” and “Reverse Page Order” boxes are checked. Voila! Now you have a beautiful handout with the aesthetic illusion of being written on fantastical, aged paper while still having all the clarity of being printed in black and white. Even better, this method saves a TON of ink if you’re printing it out, compared to printing a fully textured page.
Have you ever created handouts for your players before? Share some of your creations in the comments!
Create A Brand-New Adventurer Acquire New Powers and Adventures Browse All Your D&D Content
 James Haeck is the lead writer for D&D Beyond, the co-author of Waterdeep: Dragon Heist, Baldur's Gate: Descent into Avernus, and the Critical Role Explorer's Guide to Wildemount, a member of the Guild Adepts, and a freelance writer for Wizards of the Coast, the D&D Adventurers League, and other RPG companies. He lives in Seattle, Washington with his fiancée Hannah and their animal companions Mei and Marzipan. You can find him wasting time on Twitter at @jamesjhaeck.
-
View User Profile
-
Send Message
Posted May 31, 2020Another great article! But just remember when using Microsoft Word to set the alignment properly, otherwise it defaults to Chaos Evil ;-)
-
View User Profile
-
Send Message
Posted May 31, 2020You can also create good handouts on Roll20 by uploading a generic parchment texture and then some transparent document elements like wax seals, watermarks as png or gif format as supports transparency... Although the fonts are a bit basic in the Roll20 text tool I’ve also found it useful when I realised I’ve messed up and need to re-do text or re-layout the document ;-)
-
View User Profile
-
Send Message
Posted May 31, 2020This brought back memories of the old Ultima instruction books with a bestiary guide. Ah. The good old days. 💚
-
View User Profile
-
Send Message
Posted May 31, 2020Pls tell me more. I love guides with beasts and things. And learning about old DnD.
-
View User Profile
-
Send Message
Posted May 31, 2020THANK YOU!!!!!!!!!!!!!!!
-
View User Profile
-
Send Message
Posted Jun 1, 2020in photoshop there is a filter that turns your full blown colored pictures into sketches !
I use it it often to create some wanted posters. taking a picture i like on the net and then turning it into a wanted poster and it works great.
you can even choose the level of detail in the picture.
I usually use "Filter > Sketch > Photocopy" filters, it removes the background colors and only leaves the lines in. makes a great sketch like image.
another way to do it, is to actually use the sketching by finding lines. but that leaves colors in, thus you still need to remove those first by setting it in black and white and then using levels to remove the colors. but heres what you can use as well...
"Filter > Artistic > Poster Edges"
any of those two in photoshop works great for sketching of images.
-
View User Profile
-
Send Message
Posted Jun 1, 2020Not totally true, they have integrations built-in that lets you use fonts from the very source you mentioned earlier in the article! It's a little bit hidden, but dig through the menus and you can find it quite quickly (I can't remember the route off the top of my head right now).
True, it's not 100% flexible, you can't upload your own bought/custom-made/proprietary font to use from your local machine, so you're limited to what's available in their huge list of Open web fonts, but it's better than nothing!
-
View User Profile
-
Send Message
Posted Jun 1, 2020I used this background: https://www.flickr.com/photos/digibard/4866086423
-
View User Profile
-
Send Message
Posted Jun 2, 2020I don't know what they pay you James, but you deserve a raise anyway.
-
View User Profile
-
Send Message
Posted Jun 2, 2020Under the Fonts dropdown is More Fonts which lets you pull from their online font repository. There are almost 1K font families in fonts.google.com and are all available in google docs (at least I've not found one that isn't available). You should be able to find something useful if you want to use google tools.
You can give the doc a custom background color, but not a texture. You would need to use Google slides or Google Drawing with a custom size (File > Page Setup) and you can then work in layers. Save it as a pdf or share it out directly. I do 99% of my stuff in google tools for my online games.
-
View User Profile
-
Send Message
Posted Jun 2, 2020I love me some handouts...great tips, and well timed for one of the adventures I am running too. My DoIP group has left the Phandalin region for Triboar on a little research excursion that will help develop the story further for them. Maybe presenting the info they seek via a cool handout would be a nice way to reward their efforts of going out of the way to find it.
-
View User Profile
-
Send Message
Posted Jun 3, 2020same!
-
View User Profile
-
Send Message
Posted Jun 3, 2020Is it possible to create an "art search" option, to allow searching of all the books images by tags? This would provide significant benefit to owning a book on here rather than (or as well as) owning a hard copy.
I'm sure if you had an "Upload your (free to use) fan art" section on DnDBeyond as well, many of the talented artists on here would also upload great images that people could use in their games.
-
View User Profile
-
Send Message
Posted Jun 3, 2020There is. It's called the Art and Crafts Forum. Go onto forums. Then onto art and crafts. And loads of people do upload their brilliant art.
-
View User Profile
-
Send Message
Posted Jun 3, 2020I appreciate your reply (and will ignore the curt tone), though the Art and Crafts Forum isn't:
a) an "art search" option, to allow searching of all the books images by tags or,
b) full of "free to use" fan art, let alone in an easily searchable way.
Those were my suggestions. Most people I play DnD with face to face do not see the value in DnDBeyond vs using free apps and books (including my DM), so suggesting these sorts of features could increase the value equation with minimal additional cost to DnDBeyond.
In regards to the Art and Crafts Forum, there is one thread on the front page called '[OPEN] DND Art Tavern (Art Freebies!)' started 6 days ago, though the creator hasn't uploaded art yet and going back a few pages, I also found 'ARTIST - Open for commissons FOR FREE'. Neither has free to use fan art for the moment, though if there was a central place where people could post free art, then it would make DMing on the forum PbP much easier. There may be other "Freebie Art" threads as well, and if there are, please let me know as I'd be very interested in them.
Most other threads I've seen where there are illustrations are "share your character art" type threads and I'm not sure how happy people would be if they saw their art being used on the forums in other people's PbP games. If I were a decent artist I'd start a thread myself with all the tokens I use, though I'm not and have had to hack together tokens for many NPCs in the game I'm DMing instead.
-
View User Profile
-
Send Message
Posted Jun 3, 2020I'd add, it can be worth getting some nice paper for special occasions. Mostly people use standard, white printer paper with price often being the deciding factor.
Back in the heady pre-family days we ran weekend sessions at holiday cottages and I was doing that cowboy horrror game.
I found a lovely pack of yellowed looking paper that was a pretty good match for the Wanted posters in the movies, a bit of fiddling with font colours got that nice umber look and Wild West fonts are easy.
A quick look on that online seller using the search "Linen printer paper" gets everything from proper, textured paper in a variety of patterns & colours to pre-made vintage look at a variety of prices from £4 for 25 sheets
-
View User Profile
-
Send Message
Posted Jun 3, 2020Art of the crimson coven art is the thread I go on. The artist (HardHenessy) will do your art, is nice and posts his own art as well as your suggestions often. Check it out.
-
View User Profile
-
Send Message
Posted Jun 4, 2020Oh dude this just really went hand in hand with a situation I realized I put my players in, lol.
The players were investigating this kidnapped librarian and found a book of theirs that details all these different ruins and ancient cultures within the land they're in. I just gave them a map of several locations that the kidnapping faction have shown interest in.
I just read this article and realized I can let them know they can cross reference the map with the book to try to figure out more information about the area they've chosen to investigate first! Sweet!
-
View User Profile
-
Send Message
Posted Jun 4, 2020Hey, that artist’s work is really cool, thanks for the link.
-
View User Profile
-
Send Message
Posted Jun 4, 2020Google Docs can use custom fonts. You just have to add them and it isn't too tough. And it is totally worth it if you want any kind of document to stand out from the crowd.
Second, an easier way to assemble a cool looking handout than moving between Word and GIMP/Photoshop is to use a program like Adobe InDesign or if you are poor like me Lucidpress. Lucidpress is free and is like a web-based InDesign. You can use custom fonts, add images, and arrange them using layers and so much more. The free version does have some limits, but college students can use the paid version for free if they register with Lucid using a .edu email address.