


This scenario is based on the D&D adventure Curse of Strahd, and Strahd Must Die Tonight!, a distillation of that adventure designed to be run in a single night as a Halloween event. Strahd Must Die… IN SPACE is a sequel to Strahd Must Die Tonight! and its sequel, Strahd Must Die Again, but it’s perfectly usable as a standalone experience. This scenario is a wacky, over-the-top, and mercifully non-canonical adaptation of the source material, making it ideal for people who’ve already played through the original adventure in some way, or who want to have a fun and flippant Halloween party with their friends.
The goal of this adventure is simple: kill Strahd in a single four-hour session of D&D. This scenario begins just as the party crosses the threshold of Castle Ravenloft, but they quickly learn that not all is as it seems. A wizard named Mordenkainen, recently cured of a madness that afflicted him while he was trapped within Strahd’s domain, has chosen to protect the balance of power in Barovia by hiding Ireena Kolyana—at her request—on his home world of Oerth. Mordenkainen was reluctant to interfere, but Ireena’s steely determination persuaded him.
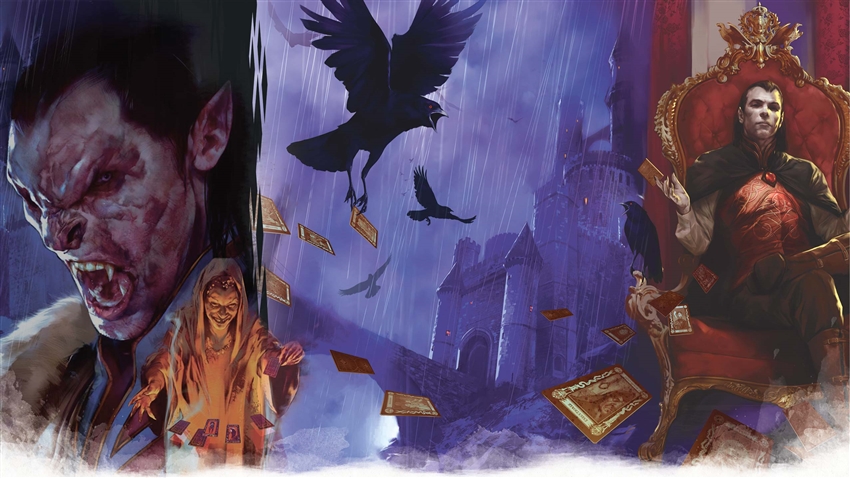
Infuriated by his “beloved” being stolen from him, the cruel and possessive vampire lord Strahd von Zarovich has spent years searching for a way to claim her again. Suddenly, it seemed as though fate delivered him a boon. Strahd’s minions salvaged a spelljamming helm from a crashed spelljammer at the edges of Barovia, and after much experimentation, Strahd managed to integrate it with his castle. He has discovered Ireena’s locations through divinations, and he is now prepared to go on his greatest quest yet—cross the darkness between the stars and steal Ireena once and for all.
Need Curse of Strahd? Use the code STRAHD15 in the D&D Beyond Marketplace to get 15% off your purchase of Curse of Strahd through November 1st, 2020!
Some Assembly Required
 To battle Strahd in a single night, all you need is a copy of Curse of Strahd and 3 to 6 friends to play with. Some things that will make your play session easier and more exciting include:
- A tarokka deck, like the deluxe deck found in the Curse of Strahd Revamped boxed set, or the standalone deck produced by GaleForceNine.
- A top-down map of Castle Ravenloft, like this map pack found on the Dungeon Masters Guild. The isometric poster map of the castle that comes with Curse of Strahdis gorgeous, but it can be hard to read on the fly. You can take these maps to a print shop and get a gorgeous set of battle maps, or use it as a reference to hand-draw the maps on a vinyl wet-erase mat.
- Pre-generated characters. If you want your game to be easy to pick up and play, you may want to create enough pre-generated characters for your whole group, since time is of the essence for this dungeon delve. (See “Character Creation” for information on how to create characters for this scenario.)
- A digital timer—like the one on your cell phone.
Single-Night Ravenloft “Event” Rules
This is not a normal session of D&D. Ravenloft isn’t a small dungeon, and a party could explore it for a dozen hours or more without defeating Strahd. Unless you have friends who could play D&D from dawn to dusk, you will most likely need to impose a concrete time limit upon the adventure. For most groups, the maximum amount of time they can commit to playing D&D is about 4 hours. This scenario transforms a routine exploration of Castle Ravenloft into a deadly race against the clock to find and defeat Strahd in his lair at the top of his spacefaring castle.
Countdown to the Count
Castle Ravenloft is too big to explore fully in a one-shot game, especially if your players are roleplaying and soaking in all the gothic details. Just as in Strahd Must Die Tonight! and Strahd Must Die Again, this scenario has a four-hour time limit that lets your players explore as much of the castle as they are able before time runs out and the final confrontation begins.
In this scenario, Strahd is traveling through the space between worlds on the Material Plane to find the object of his dark desire, Ireena Kolyana. His spacefaring castle takes four real-world hours to travel from the mists of Ravenloft to Ireena’s secret hiding place on a world called Oerth. If the characters confront Strahd before their four hours are up, they have the opportunity to defeat him then and there—if they’ve gained enough of the powerful artifacts hidden within Castle Ravenloft, of course. Once four hours are up, Strahd materializes in the courtyard of his castle, where the characters have one last chance to defeat him. Come life or come death, the hunt ends here.
At the end of every real-life hour, Strahd appears before the party and mocks the party, pitying their inevitable defeat. He offers to bestow a random gift upon one of the characters, determined from the table below—if that character allows Strahd to bite them and drink their blood first (Strahd makes a single Bite attack against the volunteer that always hits). These gifts are designed to speed up play by goading the players into rash action. If you feel an event would drag the game down, you can replace it.
Why does Strahd give these gifts? The same reason he’s set a time limit at all: he’s toying with the characters like a cat toys with a mouse. He believes himself invincible… until any character finds the Sunsword. Once he knows this item has been found, his hourly taunting visits are replaced with hourly surprise attacks against the character wielding the blade. He materializes from thin air, strikes, then flees using his Shapechanger trait as quickly as possible.
Using an oversized digital timer allows the characters to watch the time in between visits from Strahd tick down before their very eyes. The more vintage your digital timer looks the better, to give this game a campy, retro sci-fi feeling.
Gifts of Strahd Event Table
|
1d8 |
Event |
|
1 |
The character’s weapon attacks deal an extra 2d6 radiant damage against all undead except Strahd. Or, the character’s damage-dealing cantrips deal an extra 2d6 radiant damage against all undead except Strahd. |
|
2 |
The character is immune to being charmed or stunned by all creatures except Strahd. |
|
3 |
The character is immune to being restrained and paralyzed except by Strahd. |
|
4 |
The character and up to six other creatures that they are touching can teleport to the castle’s Chapel (area K15) by spending 10 minutes in meditation. |
|
5–8 |
Strahd is interrupted by an object bursting through the Astral Mists and striking the castle. He instantly leaves to return to his lair and order his minions to investigate. Determine what emerged from the mist by rolling on the Astral Mists Disruption table (see “Astral Mists,” below). |
No Wandering Monsters
There’s already no way the characters will get through all of Castle Ravenloft in one night, there’s no need to bog play down with random encounters. If the characters decide to set up camp in a room and wait for Strahd rather than searching for him—and this tactic makes the game less fun for you or the players—roll on the Random Encounters in Castle Ravenloft table once every ten minutes of real time until they leave the area they’re camping in as Strahd tries to “smoke them out.” If you have to roll again during an encounter in progress, the new creatures join the encounter and roll initiative if necessary.
Ireena’s Projection
 Ireena Kolyana may be hunted by Count Strahd, but she is far from helpless. Using a magical artifact in Mordenkainen’s abode, she is able to cast astral projection to enter the castle and hunt down Strahd. She is always Strahd’s Enemy, as described in “Fortunes of Ravenloft,” below, and uses veteran statistics. If her projection is reduced to 0 hit points, her consciousness is instantly returned to her hideaway on Oerth, and she can no longer help the characters until the final confrontation. Her consciousness is likewise snapped back to her physical body once Castle Ravenloft arrives on Oerth.
The Dark Between the Stars
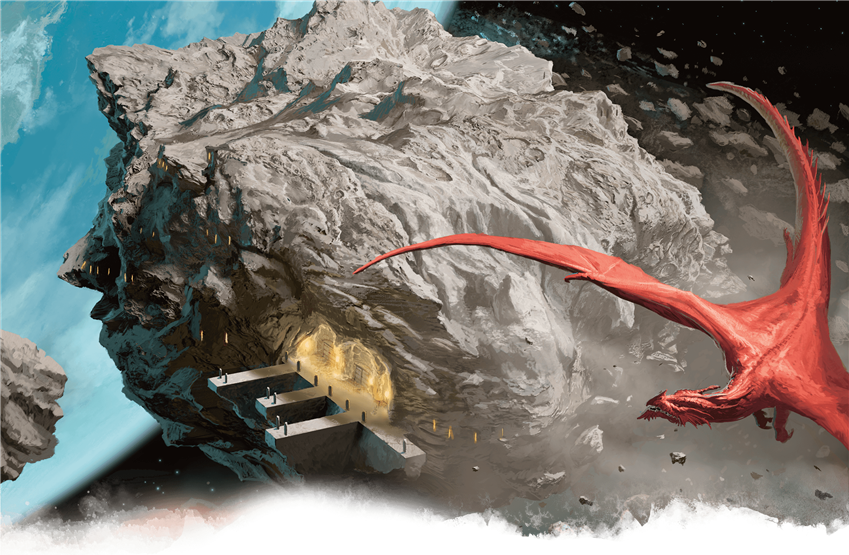
Castle Ravenloft has lifted from its ancient roots and is rocketing through the Realmspace, the dark void that surrounds the worlds of the Material Plane. The power of Strahd’s salvaged spelljamming helm transformed the castle into a massive vessel capable of travel between these worlds.
Blasting out of the interplanar prison that is Ravenloft, however, allowed some of the dreaded Mists of Ravenloft to travel along with the castle, as if allowing Strahd to evilly pursue Ireena, but restricting him from escaping his domain permanently. The corridor of astral mist that surrounds the castle prevent all living creatures from exiting the castle grounds, even using magical means. Spells and effects that teleport creatures out of the castle (such as some effects of the brazier in area K78), instantly fail.
The astral mists are a tunnel of silvery fog. Occasionally—either at your discretion if the session is growing boring, or whenever you roll a 5–8 on the Gifts of Strahd event table—an object hurtling through space crashes through the tunnel of mist and impacts against the castle. Roll on the table below to determine what crashed into the castle, and how it might affect the adventure. Additionally, comet-like streaks of silvery mist constantly tear across the castle’s exterior. Any creature in an outdoor area must make a DC 13 Dexterity saving throw at the start of each of their turns or take 22 (4d10) force damage and fall prone. If the creature is flying, the DC is increased to 18.
Astral Mists Disruption Table
|
1d8 |
What Appears through the Mists? |
|
1–4 |
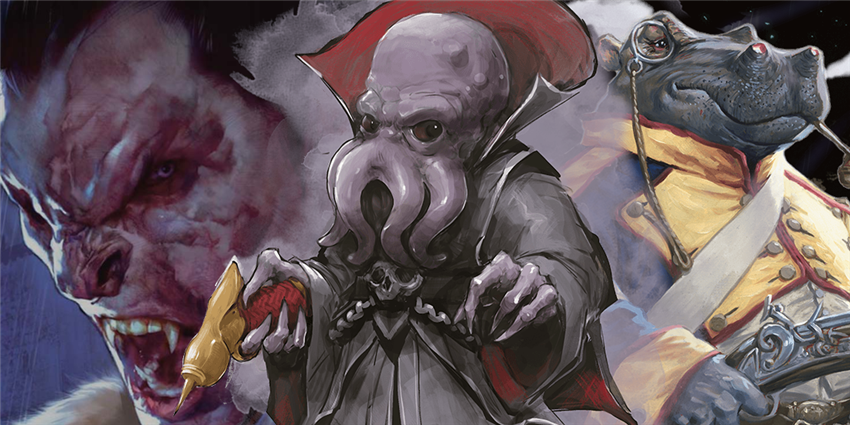
Giff Platoon. A stylish, wood-hulled galleon bristling with cannons crashes into the castle courtyard (area K1). Emerging from the scarred and smoking craft are a group of five giffs. They enter the castle and start destroying evildoers wherever they see them. If the characters meet the zealous giffs, their commander, Captain Adelaide Cholmondeley, joins the characters as an ally and commands her other giffs to scout for Count Strahd’s location. She informs them that he likely has a spelljamming helm that is allowing his castle to function like a gigantic spacecraft. |
|
5–6 |
Ultroloth’s Flying Object. A disc-shaped spacecraft smashes into the chapel garden (area K5). From it emerges a single ultroloth. Infuriated, this fiend swears to become master of this strange, stone vessel, and goes on a rampage through the castle. Roll a d12 every time the characters enter a new room from here on out. On a roll of 10 or 11, the ultroloth has annihilated its inhabitants. On a roll of 12, the ultroloth is in the room, battling its inhabitants. When the characters encounter the ultroloth, it has half its maximum hit points remaining and both of its “1/day each” spells have been used. |
|
7–8 |
Gnome Ceremorph Nautilus. A shell-shaped mind flayer nautilus plows into the castle’s catacombs (area K84). A group of four gnome ceremorphs emerge and begin curiously exploring the castle, hoping to find some mortals to capture and devour |
Confronting Strahd Early
Strahd von Zarovich has transformed the peak of his castle’s North Tower (area K60) into the control room for his flying castle. He has accomplished this feat by outfitting the tower with a salvaged spelljamming helm. This helm is a high-backed, 200-pound throne which uses the statistics of the helm of the Scavenger from Waterdeep: Dungeon of the Mad Mage. It has one alteration of Strahd’s devising: this helm can pilot any vessel, regardless of its weight—including Castle Ravenloft itself.
When the characters reach area K60, read or paraphrase the following boxed text instead of what’s written in Curse of Strahd:
The stairs leading up the tower end in a room eerily lit by dozens of colorful, pulsing lights. In the middle of the room is a high-backed throne of black onyx, upon which sits Strahd von Zarovich himself. His eyes are closed in concentration, but they snap open as soon as he senses your appearance.
“Your disturbance is unfathomably crass,” Strahd says in a lilting growl. “I trust I can make no appeal to your sense of honor, for what would honorless wretches know of true, immortal love?”
Strahd expects the characters to attack, and stands from the helm, causing the flying castle to slide on its momentum through space and slowly grind to a halt over the next 15 real-world minutes. He doesn’t want to fight in such close quarters, and uses his Shapechanger trait to transform into a cloud of mist on his first turn in combat. He attempts to escape out the tower’s trapdoor and into the air beyond. The mist then flees into the High Tower peak (area K59), and then down the High Tower shaft (area K18a) to the castle catacombs (area K84). He lurks there for 10 minutes, and then returns to area K60 see if his helm has been abandoned. If the characters are still there, he retreats again.
If the helm has been abandoned, he uses his Children of the Night action to summon 2d4 swarms of bats to guard the North Tower. He then assumes control of the spelljamming helm again and continues flying through space towards his destination. If he is disturbed again, he flees again. The only way for the characters to confront Strahd here is to find a way to block his escape. Otherwise, they must battle him when he reaches his destination after four real-world hours have elapsed. If escape is impossible, Strahd intentionally ends his attunement to his spelljamming helm and furiously attacks.
Character Creation
Characters for this scenario should be created in the following manner:
- Determine their ability scores using the array or point buy, then choose their race, class, and background as normal.
- Each character can choose one piece of nonmagical armor of their choice (plus a shield, if desired), two nonmagical weapons of their choice (or three weapons, if they are dual-wielding), plus 100 gp to purchase other adventuring gear.
- Each character can also choose a single rare magic item of their choice. The DM should screen which magic items they take. Items that are particularly powerful against vampires (such as a sun blade can make this scenario excessively easy.
Once characters have been created, use the guidelines in “Choose your Difficulty” to determine what level the characters should be. Also, once the characters levels have been finalized, the DM should take note of each characters’ Wisdom (Perception) score. Knowing these scores will help if the characters are ambushed by Strahd, if the vampire lord decides to stop toying with them and attack them instead.
Choose Your Difficulty
You can make this adventure easier or harder by changing the level of your characters. Strahd von Zarovich may be a CR 15 vampire, but the legendary artifacts of Ravenloft possess incredible power. If your party is skilled (or lucky) enough to find all three artifacts, it’s possible that with good strategy, even a party of 5th-level characters can defeat Strahd.
A party seeking a hard adventure should play 7th-level characters, a medium adventure caters to 9th-level characters, and an easy attack on the castle can be accomplished by 10th-level characters. Start from this baseline, and adjust according to party size and time limit.
Party Size. This adventure is balanced around a party of 4–5 characters. For every character you add to the party above 5, each character starts 1 level lower. For example, a party of 6 characters on a medium-difficulty adventure should each be 8th level. Likewise, every character you remove from the party below 4, each character gains 1 level.
Time Limit. This adventure is balanced around a 4-hour time limit (plus the time it takes to fight Strahd). For every 2 hours you add to this time, each character starts 1 level lower—since every hour they spend within the castle increases their chances of finding the incredibly powerful Artifacts of Ravenloft. For example, a party of 5 characters on a medium-difficulty adventure with a 6-hour timer should each be 6th level. For every 1 hour you detract from this time, each character starts 1 level higher.
Character Death and “Losing” the Adventure
What happens if a character dies? That’s entirely up to you. Odds are, your players don’t want to sit idly at the table with a torn-up character sheet while the rest of their friends struggle through the adventure, minus one player. This is a party event, not a hardcore dungeon crawl. Here are some options:
- Casual Revival. When a character would die, they instead fall unconscious and gain 1 level of exhaustion.
- Gothic Revival. When a character would die, they instead fall unconscious and gain a permanent Lingering Injury.
- Casual Permadeath. When a character dies, their player must make a new character, who is introduced at any time before the next encounter.
- Gothic Permadeath. When a character dies, their player must make a new character of one level lower than their last character, who is introduced at any time before the next encounter.
The only situation in which the characters lose the adventure is if the entire party is killed at once. There’s no coming back from a total party kill.
Fortunes of Ravenloft
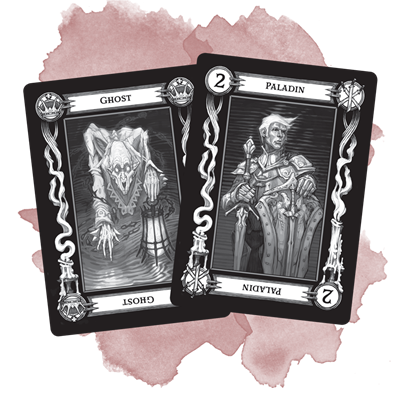
There are three powerful artifacts which can defeat Strahd scattered throughout the realm of Barovia. Unfortunately, your players do not have the luxury of wandering all over Barovia, they can only explore Castle Ravenloft itself. The location of these items are determined by a random tarokka reading, which prevents players from memorizing the exact location of the artifacts. It’s an excellent way to make this adventure replayable in future years!
If you want, you can simply do a tarokka reading as prescribed in Curse of Strahd and consider any artifacts drawn outside of the castle “unobtainable,” adding a level of randomized difficulty to the adventure. This scenario uses a modified version of the tarokka drawing in Curse of Strahd that removes locations outside of the castle. You’ll need either an actual tarokka deck or a modified deck of standard playing cards.
Before the game begins, you’ll want to separate your tarokka deck into the High Deck and the Low Deck. The first three cards are drawn from the low deck, and determine the location of the three artifacts capable of defeating Strahd. The final card determines the location of Ireena Kolyana, Strahd’s enemy, and is drawn from the high deck. The first card determines the location of the Tome of Strahd. The second card determines the location of the Holy Symbol of Ravenkind. The third card determines the location of the Sunsword, and the fourth card determines the location of Strahd’s enemy.
Variant: Empowered Tome of Strahd
In Curse of Strahd, the Tome of Strahd possesses no magical powers. If you wish to make finding the tome more exciting, you can have the tome grant the following trait to anyone who attunes to it.
Bearer of Strahd’s Truth. While attuned to the Tome of Strahd, you have advantage on saving throws made to resist Strahd’s spells and effects. If you succeed on a saving throw against Strahd’s Charm feature, Strahd takes 22 (4d10) psychic damage.
The Low Deck
First, separate your tarokka deck into the High Deck and the Low Deck. The Low Deck is usually larger, but it’s been modified for this adventure to remove results outside of the castle. This modified Low Deck consists of the following cards:
- The Paladin (2 of Spades)
- The Mercenary (4 of Spades)
- The Dictator (8 of Spades)
- The Warrior (10 of Spades)
- The Transmuter (1 of Clubs)
- The Necromancer (8 of Clubs)
- The Merchant (4 of Diamonds)
- The Miser (9 of Diamonds)
- The Shepherd (4 of Hearts)
- The Anarchist (6 of Hearts)
- The Priest (10 of Hearts)
The High Deck
The High Deck consists of the following cards; if you’re using a standard deck of playing cards, the High deck is comprised of both Jokers, and the Jack, Queen, and King of each suit:

- The Artifact (Joker 1)
- The Beast (Jack of Diamonds)
- The Broken One (King of Diamonds)
- The Darklord (King of Spades)
- The Donjon (King of Clubs)
- The Seer (Jack of Clubs)
- The Ghost (King of Hearts)
- The Executioner (Jack of Spades)
- The Horseman (Joker 2)
- The Innocent (Queen of Hearts)
- The Marionette (Jack of Hearts)
- The Mists (Queen of Spades)
- The Raven (Queen of Clubs)
- The Tempter (Queen of Diamonds)
The Card Reading
With the decks thus separated, you are prepared to do a tarokka reading and randomize the assorted treasures of Ravenloft, as well as the location of Strahd’s enemy. If this is your first time running an expedition into Castle Ravenloft, you may wish to perform the card reading in private ahead of time so that you can prepare for these locations instead of taking notes on the fly.
Read the “Fortunes of Ravenloft” section of Curse of Strahd at least once in full if you intend to perform the card reading for your players as a prologue to the adventure. This card reading could take many forms; see “Starting the Adventure,” below.
The Artifacts. The first step of the reading is fairly simple. Draw three cards from the Low Deck, and compare them in order to the Treasure Locations table in Curse of Strahd. Set these cards aside.
Strahd’s Enemy. Next, draw one more card from the Low Deck and compare it to the Treasure Locations table in Curse of Strahd, just as before. Ireena Kolyana, using astral projection to appear phantasmally within the walls of the castle, is always Strahd’s enemy in this scenario. She uses veteran statistics, and the card you draw from the Low Deck determines where Ireena is within Castle Ravenloft. She is found battling against Strahd’s minions there—and you can even alter the description of nearby rooms to show the remains of her previous battles as she fights through the castle.
Starting the Adventure
If you’ve read everything that comes before this point, you’re ready to start the adventure! The characters start their exploration of Castle Ravenloft in the castle’s courtyard (area K1). Read or paraphrase the following. Each paragraph break marks a place where you can easily pause for characters to react, comment, or investigate the scene before moving on.
You step into the withered courtyard of Castle Ravenloft as rain pounds upon your heads and lightning flares across the Barovian sky. Before you stand two massive wolves and a trio of gaunt, pale humanoids—nightmarish imitations of life you’ve seen time and time again in Barovia: vampire spawn. They hiss and spit as you approach, but one seems to have the wherewithal to speak. She says:
“My master bids you good evening, yet he regrets to tell you that he must turn you away. He will brook no intrusions tonight, for he has grand plans. And they do not involve you. It will be our honor to bar you entrance.”
These three vampire spawn and two dire wolves fight to the death. Once two of the three spawn are dead, read or paraphrase the following:
A bone-rattling hum pierces the courtyard, and the ground beneath your feet shakes until stones topple from the battlements of Castle Ravenloft. A look behind you reveals that the castle itself is rising from its foundations! It soars into the air, hangs for a moment, and then is surrounded by a swirling, silvery vortex as it rockets at impossible speed through the sky. A mere moment later, you burst through what can only be the veil of the planes as you begin tearing through a silver sea of stars.
A character that makes a successful DC 15 Intelligence (Arcana) check recognizes their surroundings as Realmspace, the darkness between stars and worlds. How Strahd could have propelled his castle into this realm is beyond even the most esoteric arcane knowledge. Only a character that succeeds on a DC 28 Intelligence (Arcana or History) check recalls legends of craft called spelljammers that can travel through the cold void between worlds.
Confrontation on Solid Oerth
If the adventurers fail to defeat Strahd before time is up, Castle Ravenloft appears in a flash before a humble cottage on the rolling fields north of the vast lake Nyr Dyv. This land is the realm of Flanaess on the world of Oerth, and this cottage is a tiny retreat of the great mage Mordenkainen. Ireena steps from the door, a silvered longsword in hand, and stands determined—terrified, yet determined—as Strahd von Zarovich floats in misty form down to the ground, then manifests before her.
The characters have one last chance to stop him. Strahd uses his Charm action to sway Ireena to his side, turning her into an enemy that must be subdued (but not necessarily killed) or avoided during the battle. If the characters fall, then there is nothing more to be said. If they defeat Strahd, consider ignoring his Misty Escape feature, so that his body falls to the ground, giving the characters the opportunity to drive a stake through his heart to kill him. Or, if they failed to plan ahead, they could grab Ireena, run back to the castle, and flee back to Barovia, making the slowly recovering Count Strahd another world’s problem…
Ending the Adventure
Strahd’s death marks the end of this adventure. This adventure eschews most of the Gothic melodrama that characterizes the story of Strahd, Tatyana, Sergei, and Ireena, in favor of weirder and more immediate action. Because of that, there isn’t much character drama to resolve in the wake of Strahd’s death. The best way to end this adventure is to describe Strahd’s death in extravagant detail, then stand and declare “congratulations!” and then pull over the candy bowl and cool down with your friends for a bit.
That draws this year’s horrific Ravenloft redux to a close. Happy Halloween!
Have you read the original One-Night Ravenloft redux, Strahd Must Die Tonight!, or its sequel, Strahd Must Die Again? Do you prefer the tried-and-true Gothic horror of that adventure, or the over-the-top twist presented in this year’s scenario? Let us know in the comments!
Want to play this adventure with maps and minis?


Create A Brand-New Adventurer Acquire New Powers and Adventures Browse All Your D&D Content
Did you like this encounter? Check out the encounters in the Encounter of the Week series. You can also pick up the adventures I've written on the DMs Guild, such as The Temple of Shattered Minds, a suspenseful eldritch mystery with a mind flayer villain. My most recent adventures are included in the bestselling Encounters in Theros, a collection of over 70 unique encounters created by the Guild Adepts, which can be used to enhance your campaign in Theros or in your Greek mythology-inspired campaign setting. Also check out the Platinum Bestseller Tactical Maps: Adventure Atlas, a collection of 88 unique encounters created by the Guild Adepts, which can be paired with the beautiful poster battlemaps in Tactical Maps Reincarnated.
 James Haeck is the lead writer for D&D Beyond, the co-author of Waterdeep: Dragon Heist, Baldur's Gate: Descent into Avernus, and the Critical Role Explorer's Guide to Wildemount, a member of the Guild Adepts, and a freelance writer for Wizards of the Coast, the D&D Adventurers League, and other RPG companies. He lives in Seattle, Washington with his fiancée Hannah and their animal companions Mei and Marzipan. You can find him wasting time on Twitter at @jamesjhaeck.
-
View User Profile
-
Send Message
Posted Oct 23, 2020First. Seems pretty cool.
-
View User Profile
-
Send Message
Posted Oct 23, 2020I am a huge fan of space travel now being canon to some extent, and the whole ultroloth-classic-alien-ufo-thing.
See, by this existing, it implies that the dev team has at least thought about spelljamming being a thing in 5e.
now I kinda want to buy curse of Strahd and run Strahd must die tonight, Strahd must die again...and again, and this consecutively.
-
View User Profile
-
Send Message
Posted Oct 23, 2020This is crazy, but fun.
-
View User Profile
-
Send Message
Posted Oct 23, 2020Considering that every slasher horror franchise with too many installments and too few ideas seems to end up in space, this is...strangely fitting. Not that I'd run it, but it's pretty darn funny.
-
View User Profile
-
Send Message
Posted Oct 23, 2020All done on purpose! Please enjoy the cheese. =)
-
View User Profile
-
Send Message
Posted Oct 23, 2020Please, please, PLEASE let this mean we might be getting a spelljammer book in 5e
-
View User Profile
-
Send Message
Posted Oct 23, 2020Since this is non-canon, unofficial content published by D&D Beyond and not Wizards of the Coast, this article release has no bearing on Wizards' future official releases.
-
View User Profile
-
Send Message
Posted Oct 23, 2020So you’re saying there is a chance???
-
View User Profile
-
Send Message
Posted Oct 23, 2020I'm currently running my players through the Spelljamming 2E Adventure, Crystal Spheres, adapted to 5E. I might follow up with this afterwards, since there is a Strahd hook already built in. Thank you!
-
View User Profile
-
Send Message
Posted Oct 23, 2020Why does it imply that?
-
View User Profile
-
Send Message
Posted Oct 23, 2020You really think WotC would let this out in the wild if it weren't? DDB is a 3rd party-licensed site. Anything that's published here likely needs to be OK'd with WotC (homebrew items notwithstanding) prior to publishing.
That said, I'm really excited for 5e Spelljammer content.
-
View User Profile
-
Send Message
Posted Oct 23, 2020I wonder what could be done to add a zero gravity "environmental hazard" to the encounter? Like, just at random, short intervals throughout the night the castle loses its magical grip on gravity and the players are again reminded that they are, in fact, in space as items begin to float in the room and they find difficulty moving freely.
Obviously this wouldn't last for too long, but could spice up one or two combat encounters, as the enemies and players both suddenly find they need to use their surroundings and each other to try and maneuver in this fight.
On that note, using the gravity magic from Explorer's Guide to Wildemount could add some fun flavor to this one-shot as well
-
View User Profile
-
Send Message
Posted Oct 23, 2020!!!!!!!!!!!!!!!!!!!!!!!!!!!!!!!!!!!!!!!! this. is. AMAZING!!!!!!!!!!!!!!!!!!!!!!!
-
View User Profile
-
Send Message
Posted Oct 23, 2020You literally just proved the fallacy of your own argument. Homebrew, which is what this is even if it's fun and light hearted, doesn't need WOTC approval even if it uses their works. Critical Role content isn't WOTC approved, and is really distinct because D&D Beyond is partnered with Critical Role so it likely has Matt Mercer's content as separate from standard Homebrew, but it's still as far as any technicality goes, Homebrew.
Given that WOTC just entered a legal battle over rights to Dragonlance and Krynn, Spelljammer is likely never going to happen. It's fine to hope, but realistic. WOTC is more about making D&D *theirs* through the Magic the Gathering content, rather than having to figure out things like DarkSun, Spelljammer, or Dragonlance where the rights are split between three or four groups.
-
View User Profile
-
Send Message
Posted Oct 23, 2020this is great and I cannot wait to run it
-
View User Profile
-
Send Message
Posted Oct 23, 2020Awesome job!
-
View User Profile
-
Send Message
Posted Oct 23, 2020He's saying that this post has no bearing on the possibility of a Spelljammer.
-
View User Profile
-
Send Message
Posted Oct 23, 2020That would be a game that lasts at least 12 hours. It'd be insane, but awesome. I might try it some day
-
View User Profile
-
Send Message
Posted Oct 24, 2020You mention Realmspace a few times here, but that's specifically Toril's crystal sphere, Oerth's crystal sphere is called Greyspace.
-
View User Profile
-
Send Message
Posted Oct 24, 2020this has very little to do with space hah