


For in-depth looks on how to use the D&D Beyond homebrew system, check out the Design Workshop series by master designer James Introcaso. There are six parts in this series, with each part explaining a different type of homebrew creation in detail.
In addition to the topics covered by Design Workshop, D&D Beyond has also added the ability for you to create your own homebrew subclasses. If that’s what you’re here for, keep reading! Here’s how to make your own brand-new subclass on D&D Beyond, or modify an existing one for your own use.
The Important Questions
When setting out to design any new feature for your D&D game, stop and ask yourself the three questions that James Introcaso laid out at the beginning of his Design Workshop series:
- What do I want to make?
- Does my creation already exist as official D&D content?
- Can I reskin or tweak another creation to suit my needs?
Designing a Subclass
If you’re completely new to designing subclasses for fifth edition D&D, don’t fret. The Dungeon Master’s Guide already has some guidance on how to create subclasses in chapter 9: Dungeon Master’s Workshop—and you’re going to get even more advice throughout this article. The first and most important design decision is: what’s this subclass’s theme?
The best subclasses in D&D can be summed up in a single sentence. The Battle Master is “a fighter who uses maneuvers to gain a tactical advantage.” The Swashbuckler is “a stylish rogue that fights with theatrical, acrobatic grace.” Start by creating a sentence that encapsulates the story of the subclass you want to design, and look back to it whenever you create a new subclass feature.
In this article, I’m going to be creating a fighter called the Juggernaut. My one-sentence theme is, “a fighter who uses two spiked shields to crush enemies and defend allies.” This is a wild and silly concept, and I wouldn’t publish it in an official context unless I had a very good reason—but this is for my campaign, and it just so happens wild and silly is totally okay in that context! Let’s roll with it!
Step 1. Choose a Class
Every class’s subclass options are different, so the class you choose to design for is the most important step to start with. For example, a fighter’s Martial Archetypes give a total of five features, at 3rd, 7th, 10th, 15th, and 18th level. However, a rogue’s Roguish Archetypes give a total of four features at 3rd, 9th, 13th, and 17th level.
At this point, it’s a good idea to look at some of the other subclasses available to the class you’re creating a new subclass for. If you want to build a rogue subclass, you should know that most rogue subclasses have a powerful feature at 3rd level, and then a much less powerful feature at 9th level. These aren’t strict rules, but rather guidelines that you can use to create subclasses that feel balanced with the rest of the characters in your party. As usual, the most important thing about designing homebrew character options is that they work well for the game you’re playing right now—not that they’re objectively balanced.
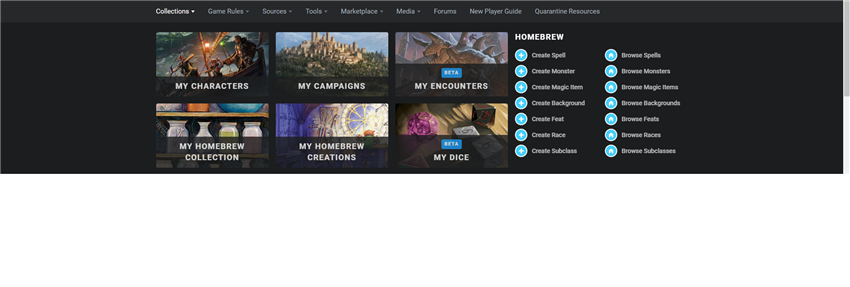
My Juggernaut fighter is going to be a wholly unique subclass, so I’m going to choose from the first menu. However, if you just want to modify an existing subclass—because you think it’s underpowered, or you just want to swap out one feature—then it makes more sense to use the second menu.

This first page is your starting point. Put down your subclass’s name (or a placeholder name, if you aren’t sure yet), and put your one-sentence theme in the “short description” box. It’s totally okay to leave the “description” box blank for now. We’re focused on getting ideas on paper, not making them look pretty.
If your subclass grants a class that normally can’t cast spells the ability to cast spells (e.g., the Eldritch Knight subclass gives the usually non-spellcasting fighter class the ability to cast spells), then select Yes the “Can Cast Spells” box, and choose their spellcasting ability. Usually, this spellcasting ability is the same as the class’s core ability (e.g., Wisdom for monks), but you can choose any ability that you think makes the most sense for your subclass’s flavor.
Then hit “Create Subclass” to lay the foundation. You can build more features on top of this base as you go!
Step 2. Creating Feature Concepts
Now you’re on the “landing page” for your subclass. If you ever need to edit the information you just entered, click the + icon on the Basic Information tab. Now, it’s time to add this subclass’s features. Click the Add a Class Feature button under the Class Features header.
Since fighter subclasses have five different features, we should give our subclass five different features too. Every single one of the subclass features you design should support the one-sentence theme you created earlier.
It’s easier for me to take down notes and then expand them into full ideas later, so I’m just going to jot down some ideas.
- 3rd level (CORE FEATURE) -> wield two shields for offense and defense; protect self, protect allies, use shield as weapon
- 7th level (IMPROVE CORE FEATURE A) -> choice between improving self-protection, or improving ally protection
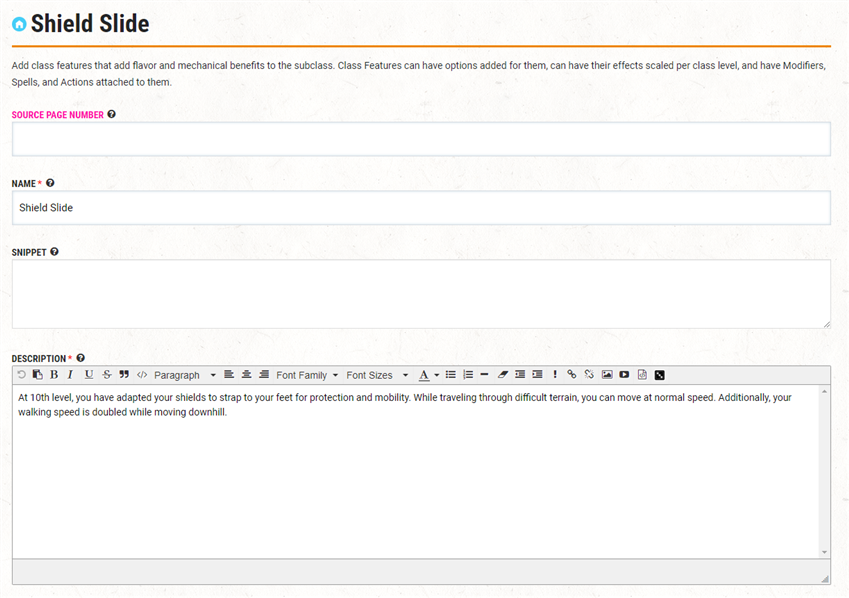
- 10th level (STANDALONE CONCEPT) -> mobility option
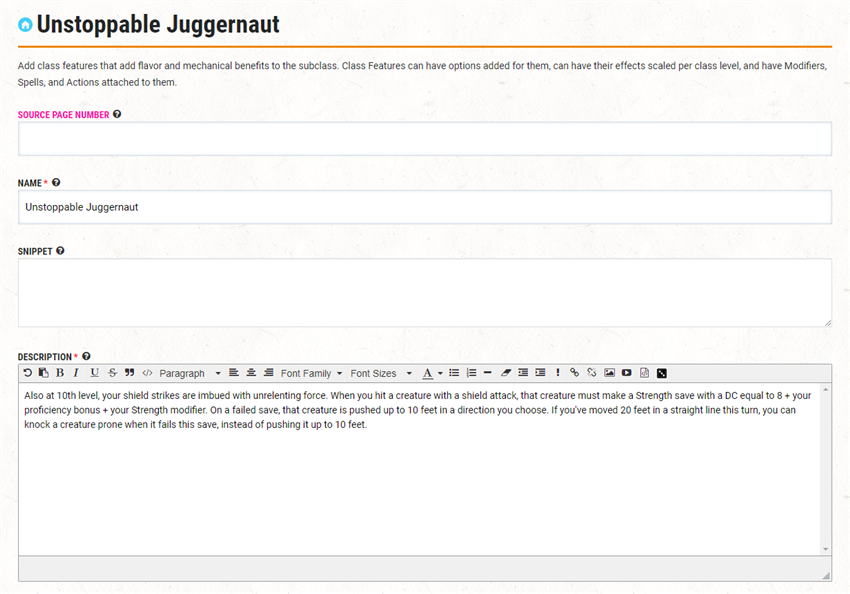
- 10th level (IMPROVED ATTACK) -> minor attack bonus [both 10th level options are minor improvements at best, so having two small options seems reasonable]
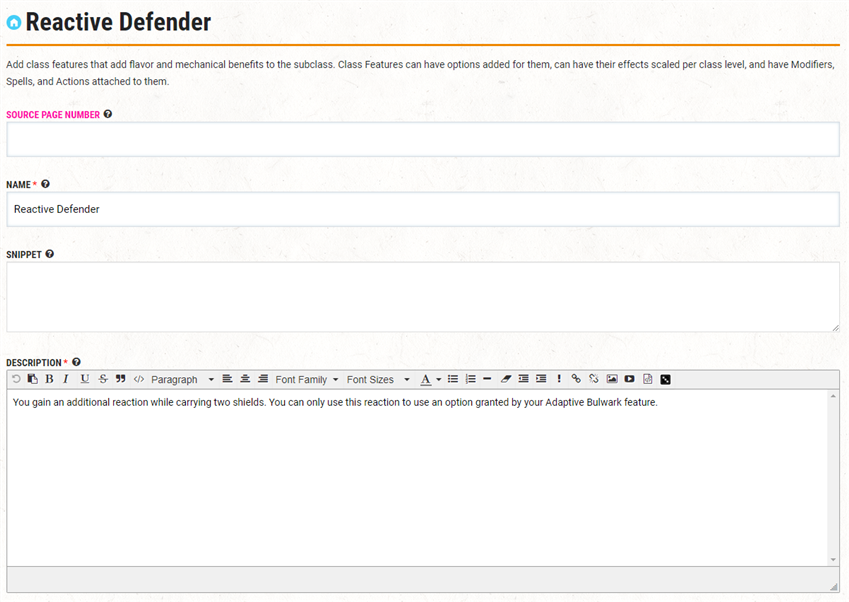
- 15th level (STANDALONE CONCEPT) -> gain more reactions
- 18th level (IMPROVE CORE FEATURE B) -> gain the other option you didn’t choose at 7th level
Great! These small concepts are enough of a seed for me to get started designing options. Now I can start writing things out in the Subclass Features menus. When creating these features, be sure to note the level this feature can be gained at. Mixing up your 3rd and 15th-level features would be a silly mistake to make, but it’s easy to overlook.
The Dungeon Master’s Guide suggests: As you design each class feature, ask the following questions:
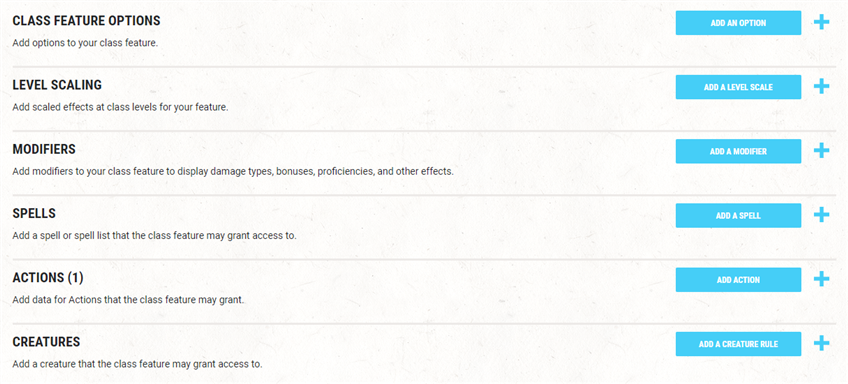
Step 3. Implementing Features
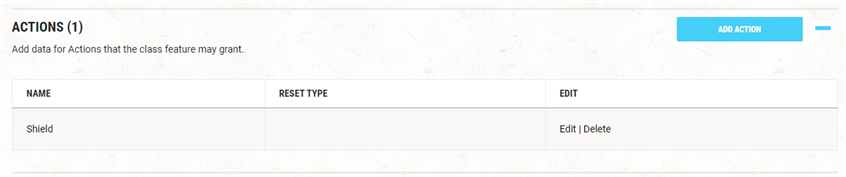
If your class feature grants new actions, like attacks, be sure to note those new actions in the “Actions” drop-down below, as well. This will allow the action to appear in the actions tab of your character sheet.
Here are the features I've chosen to create for this Juggernaut fighter subclass!
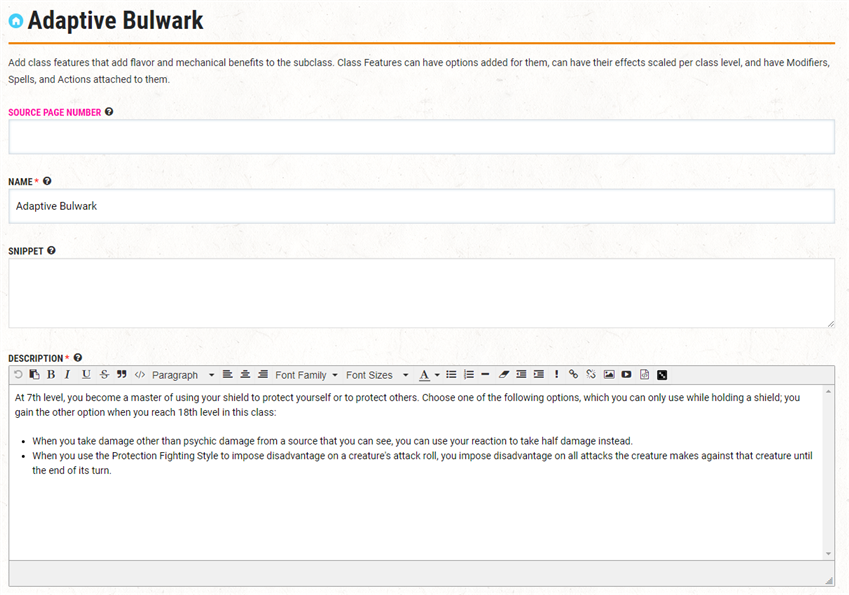
Also, do you see how my 7th-level and 18th-level features are really just one feature with two choices? They can be expressed easily as just a single feature by clicking the “Has Options” checkbox, and then writing “7,18” in the “Class Levels Where Options Known” form.

Step 4. Refining Features
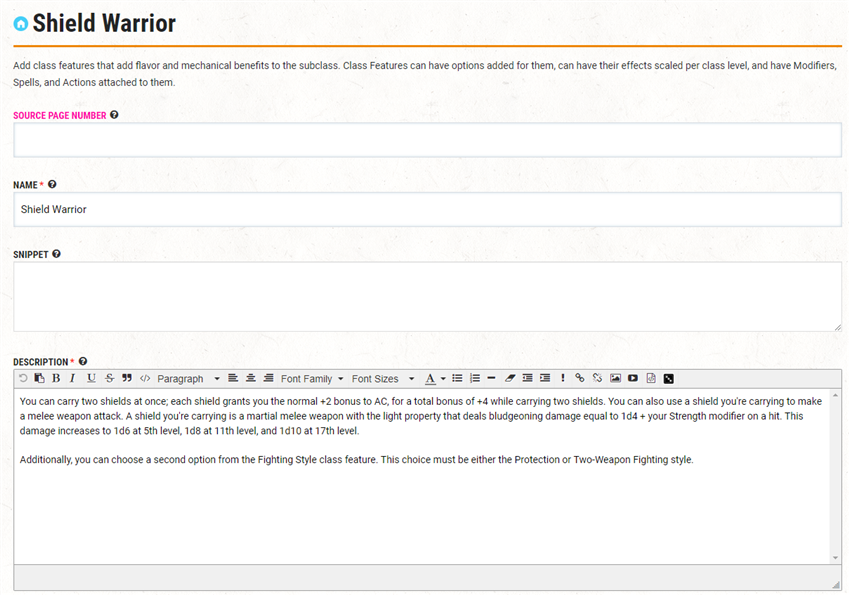
Many class features have bits of metadata that make them easier for the character sheet to use, like the “Actions” drop down mentioned in step 3. If one of your features improves at higher levels (like the damage to the attack granted by the Shield Warrior feature), grants access to spells, grants special modifiers like resistance or immunity, grants actions (like the shield attack from the Shield Warrior feature), or references a creature’s stat block, use these menus to make your life easier while using the D&D Beyond digital character sheet.
Step 5. Share your Homebrew!
Now that you’ve created your masterpiece subclass, it’s time to make it public. Go back to your Homebrew Creations page, click on your subclass, and click SHARE WITH COMMUNITY. A message will appears asking if you’ve read the Public Homebrew Content Rules & Guidelines and explaining the moderation process for public content. Be sure you understand all this information before you publish; it’s worth not running afoul of the moderators or having your submission rejected for a silly, easily preventable reason.
And don’t forget—publishing your homebrew publicly is only required if you want to share it the greater D&D Beyond community! If this subclass is just for your home game, all you need to do is create your homebrew; any player creating a character in a campaign of yours will be able to use your homebrew as long as content sharing is activated.
Have you ever created homebrew content on D&D Beyond? What’s your favorite homebrew that you’ve found on the site? Let us know in the comments below!
 James Haeck is the lead writer for D&D Beyond, the co-author of Waterdeep: Dragon Heist, Baldur's Gate: Descent into Avernus, and the Critical Role Explorer's Guide to Wildemount, a member of the Guild Adepts, and a freelance writer for Wizards of the Coast, the D&D Adventurers League, and other RPG companies. He lives in Seattle, Washington with his fiancée Hannah and their animal companions Mei and Marzipan. You can find him wasting time on Twitter at @jamesjhaeck.
-
View User Profile
-
Send Message
Posted Jul 11, 2020Thank you so much!!!
-
View User Profile
-
Send Message
Posted Jul 11, 2020I really think that the ability to create homebrew nonmagical equipment such as weapons and armor - potentially even introducing a way to apply an expanded system of weapon properties - would be great. I really like to experiment with making tweaks to the existing equipment system, and I'd love some way to apply it.
-
View User Profile
-
Send Message
Posted Jul 11, 2020That subclass looks like a lot of fun, but wouldn't the player lose the bonus to AC when their shields are strapped to their feet (unless the attack comes from below of course), or are they just going to do karate kicks to block attacks? Or do they get ANOTHER two shields?
-
View User Profile
-
Send Message
Posted Jul 11, 2020ALL THE SHIELDS. The armor is just a bunch of separate shields strapped together, too.
-
View User Profile
-
Send Message
Posted Jul 11, 2020When will we able to put an entire class in? I just want to use the Ranger revised here but your system dont even allow us to homebrew it in.
-
View User Profile
-
Send Message
Posted Jul 11, 2020This is great! I've had to go back and forth between a character sheet and the editing screens multiple times to figure out which "snippet" appears where and when and spent lots of trial and error trying to work in unusual traits such as negative modifiers.
This will be a huge help for anyone starting out. Very well done!
-
View User Profile
-
Send Message
Posted Jul 11, 2020Seconded! I'd really like to be able to make a dex based spear or something and have it work properly without having to make it magical.
-
View User Profile
-
Send Message
Posted Jul 11, 2020Put both feet on one to slide, and use the other to block!
-
View User Profile
-
Send Message
Posted Jul 11, 2020Angry shoes: You put the shoes on. You're now angry. You have to do three Chaotic Evil acts before you can take them off. 🐷
-
View User Profile
-
Send Message
Posted Jul 11, 2020I think that's a reasonable suggestion! An action requirement would be useful in communicating the "change in state" from walking to sliding. Maybe a bonus action to enter or exit the sliding state, during which time you lose your bonus to AC from the shields.
-
View User Profile
-
Send Message
Posted Jul 11, 2020Honestly, one of the best sub-classes I found on here, was a patron for warlock- it was none other than the DM themselves! I think it's brilliant!
-
View User Profile
-
Send Message
Posted Jul 11, 2020I might argue that the awesomeness of surfing through difficult terrain while swatting attacks aside with your other shield is so insanely badass that you can do both at the same time without penalty.
Just sayin'.
-
View User Profile
-
Send Message
Posted Jul 11, 2020Id like to echo some others on here wondering if there will be a way to Homebrew whole classes rather than just settling for a subclass
-
View User Profile
-
Send Message
Posted Jul 11, 2020I was thinking more of both creating historically accurate weapons and adding new weapon properties to existing ones. My intent is to make weapons a little more flexible and realistic, but not too complex.
-
View User Profile
-
Send Message
Posted Jul 11, 2020Thinking about it, new classes must be a lot more complex to map, considering magic items can be specific for classes. If the new class is a spellcaster they need to be added to the "spellcaster" list, etc. Basically, making a new class would involve adjusting many other aspects of the game to specifically work with that class.
-
View User Profile
-
Send Message
Posted Jul 11, 2020Technically a little off topic, but James, a little while back I saw that Lauren Oboe submitted her own homebrew Phoenix Domain cleric. Would it be possible to compile all the homebrew made by DDB staff and put them all on a single page for us to peruse?
-
View User Profile
-
Send Message
Posted Jul 12, 2020This is an awesome Post. Thank you. I've been trying to create my Tailorist/Weaver Wizard variant properly for ages and will use this.
-
View User Profile
-
Send Message
Posted Jul 12, 2020thanks for it
-
View User Profile
-
Send Message
Posted Jul 12, 2020The homebrew I'm most proud of came from wanting to play a Warlock of the Celestial with the Pact of the Chain. There are two fiendish options for "fancy" familiars, but no celestial ones. So since my Yuan-ti Pureblood character has a pact with an Elder Couatl, I created a "mini-couatl" familiar based on the flying snake with benefits nibbled off the Couatl and balanced against the other fancy familiars. It's called, inevitably, a Quetzal. (It's the CR 1, not any of the higher level monsters of the same name.)
-
View User Profile
-
Send Message
Posted Jul 12, 2020I mean, I'd probably rule it that you jury-rigged your 'main' shield (the one you had for longer) to make it bigger, so that you can surf comfortably, and that you toughen up the other shield so you retain your +4 to AC while getting the movement, although I do like the idea of just being able to do both to increase badass-ness.